This post presents a feature of the upcoming S-Filer/Portal™ v4.8.0 release: Delegated Authentication. It is the first step in the roadmap to supporting more advanced authentication use cases such as 2 factor authentication(2FA) and federation.
The goal of this feature is to allow S-Filer/Portal to better integrate with Web Access Management (WAM) solutions. These solutions are usually installed in large enterprises to manage the authentication workflow for the various web applications based on corporate policies. They usually support many advanced authentication scenarios (2 factor authentication, recognized mobile devices, OAuth, SAML, step-up authentication) and then pass the authenticated identity to the web application behind. Another important aspect of these kinds of solutions is that they allow enterprise-wide SSO for all web applications behind them, significantly enhancing the user experience. Clients with a WAM solution can now leverage it and enable all these advanced authentication use cases with S-Filer/Portal.
This feature is called delegated authentication because S-Filer/Portal delegates the task of authenticating the user to the WAM and then trusts the identity sent by the WAM. The feature is mainly about the mechanism by which the WAM can send the identity to S-Filer/Portal. Here is an explanation of how it works:
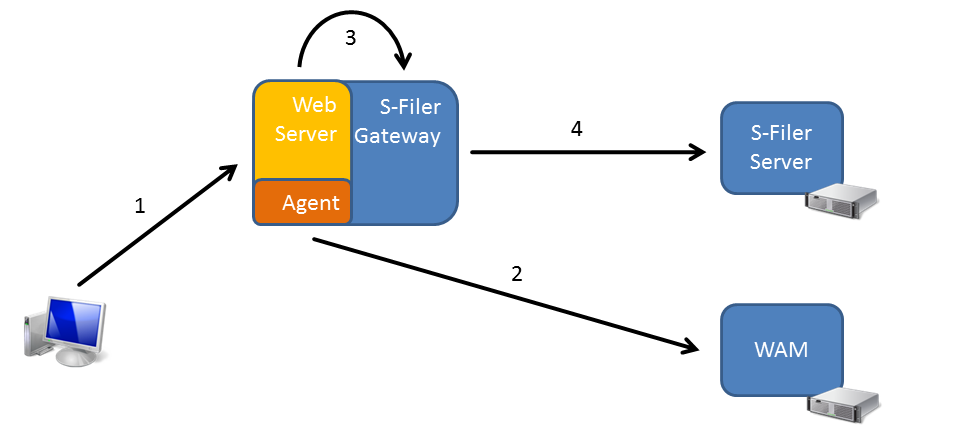
Step 1
The user performs a request to access S-Filer Portal. The request is received by a web Server, typically Microsoft IIS or Apache HTTPD server. On this weberver, a WAM Agent is installed which intercepts the request.
Step 2
The WAM agent sends the request to the WAM server for inspection. Typically, one of these scenarios happens:
- The user is already authenticated and the request carries a cookie recognized by the WAM
- The user is not authenticated, so the WAM tells the agent to ask the user to authenticate by presenting a login page. Once the user has authenticated, the WAM cookie is set for future requests
The WAM sends back to the agent the identity of the authenticated user along with some additional information.
Step 3
In the WAM configuration for the S-Filer/Portal application, the settings indicate to set two HTTP header variables. In the first (named SFILER_USER), it will write the account identifier of the authenticated user, typically for Active Directory accounts this is the samAccountName. In the second (named SFILER_DOMAIN), it will write a constant representing the identifier of the authentication domain matching the Active Directory. This is retrieved from the S-filer configuration.
When S-Filer is configured for delegated authentication, it will trust the values in those headers. Therefore it is critically important to make sure that the agent ALWAYS writes those values and prevents these headers from coming in the original request. Further, networking measures (such as firewalls) should be put in place such that only the web server with the WAM agent can communicate with the S-Filer Gateway web port. Otherwise, someone could connect to the S-Filer gateway web port directly, send a request with the right headers and be authenticated as anyone in the system simply by knowing his samAccountName.
Step 4
The gateway will issue a special authentication request to the S-Filer Server called a delegated authentication request. This request contains the username, the domain identifier and the IP address of the client as received in the headers. The request is also signed using the S-Filer Gateway’s private key. Upon receiving this request, the server checks the signature using the public key of the gateway (which it stores in its database) and also checks that delegated authentication is activated for this gateway. If everything is right, it will issue an authentication token and everything else is just as if the user had authenticated with a password.
Security Considerations
This feature brings more power and flexibility, however great care must be taken in configuring it as there are potential risks associated with it as well. This section will highlight mandatory measures which must be put in place in order to securely use this feature.
- The WAM solution or web server must be configured such that if the delegated authentication headers (SFILER_USER, SFILER_DOMAIN) are specified in the request coming from the client, these headers are discarded. It can then set those headers itself with the authenticated identity or let the request through without headers to let S-Filer authenticate the user using a password
- The S-Filer gateway web port must not accept connections except those coming from the web server on which the WAM agent is installed. Typically, this is done by having the web server with the WAM agent installed on the same server as the S-Filer Gateway and blocking, using a firewall, any requests to the S-Filer Gateway web port that do not originate from “localhost”
- As usual, all network communications should be over TLS to secure the data in transport
S-Filer configuration
The following shows how delegated authentication is configured in the S-Filer configuration interface.
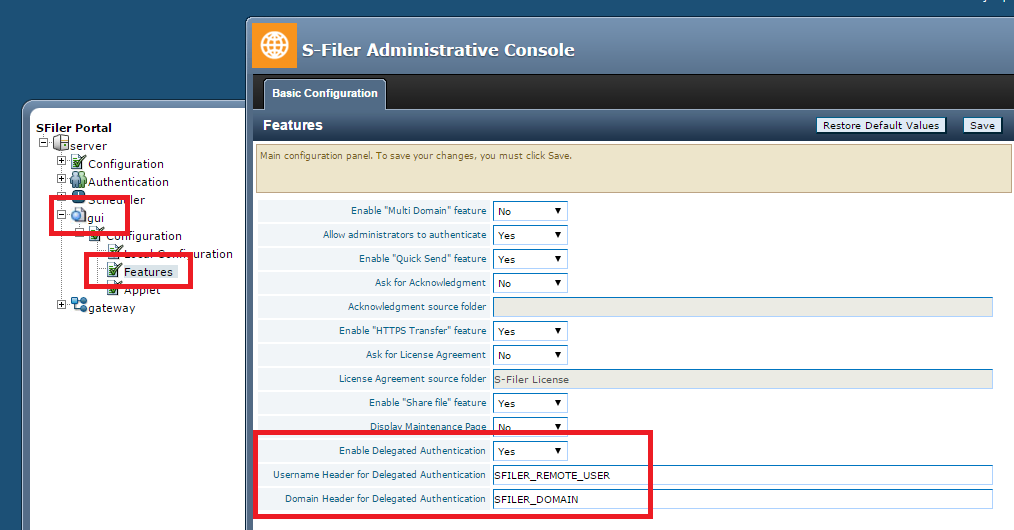
- In the configuration interface, select the web interface for which delegated authentication must be activated
- Then select “Features”
- Finally enable delegated authentication and choose the names of HTTP headers to use to pass the identity
Conclusion
This is all there is to this new feature. As mentioned before it offers great power and flexibility but it must be used carefully in order not to introduce vulnerabilities.