
How to create a shared file repository
This guide details the steps to create a sharing space that allows external users (guest users) to share files without being able to see what other external users deposit in the sharing space. This configuration is ideal for Template for Share File Repository scenarios where each external user can only see their own files.
Overview
The objective is to create a system where:
- External users can deposit files.
- Each external user only sees their own deposited files.
- Internal users can see all deposited files.
- Deposited files appear in audit reports.
- External users cannot delete their files once deposited.
Prerequisites
- System administrator access to S-Filer Portal.
- Understanding of templates, groups, communities, and sharing spaces concepts.
- Knowledge of permissions and transfer options.
Step 1: Creating a Template Community for "Template for Share File Repository"
The system administrator must create a specific template that will be used for all "Template for Share File Repository" type sharing spaces. You can consult the section on templates to understand how they work.
1.1 Community Template Configuration
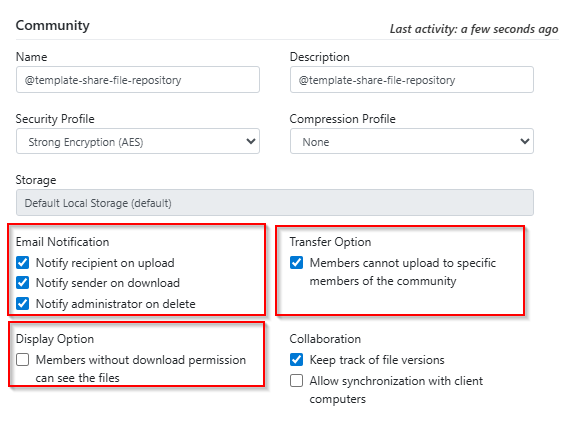
- Give a name to the community template:
@template-share-file-repository(the "@" is a visual indicator to distinguish this template community from the list of communities).
In the community template, configure the following settings:
Community members are not allowed to upload files to specific members of the community. : ✅ Enabled
- This option is critical for anonymous operation.
- It prevents community members from sending files to specific members.
- Files can only be sent to the entire community.
Unauthorized members can see the file list. : Disabled (to prevent users from seeing other users' files).
Other recommended settings :
- Email notification : Enabled (to inform internal users of a file deposit or external users of the retrieval of their file(s)).
1.2 Creating the Group Template
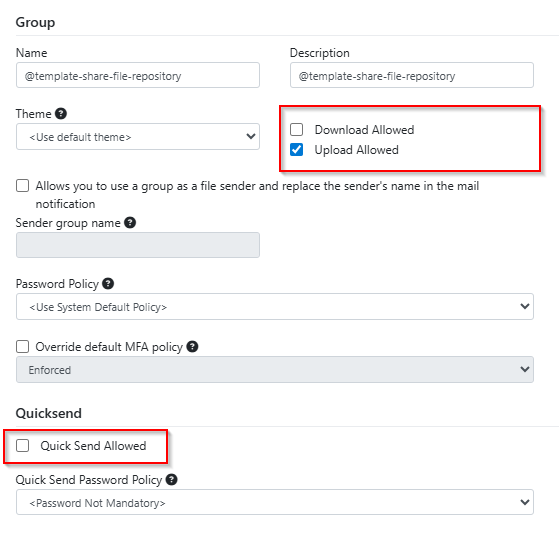
- Give a name to the group template:
@template-share-file-repository(the "@" is a visual indicator to distinguish this template group from the list of groups).
In the group template, configure the following settings:
Group Template Configuration
Essential permissions :
- ✅ Permission to send files : Enabled.
- ❌ Permission to receive files : Disabled.
- ❌ Quick send allowed : Disabled.
This configuration allows external users to deposit files but not download them, creating a one-way deposit system.
1.3 Creating the Sharing Template: "Template for Share File Repository"
- Log in as system administrator.
- Access the left menu and click on Create a template.
- Give a name to the template:
Template for Share File Repository. - Select
@template-share-file-repositoryas the community. - Select
@template-share-file-repositoryas the group. - Uncheck the option to apply this template as the default one.
- Click Save to finalize the template.

Step 2: Creating the Sharing Space
Regular users can now create a sharing space using the Template for Share File Repository template.
- Log in as a regular user.
- Click on Create a sharing space in the navigation tree.
- Fill in the fields:
- Name : Name of your sharing space.
- Expiration date : (optional) Expiration date of the share.
- Template : Select
Template for Share File Repository
- Click Save

Scenario A: Centralized Management of Internal Users in the Share
This scenario requires the intervention of a system administrator. They will create a specific user group that will be assigned to the Template for Share File Repositorys sharing space. All members of this group will be automatically assigned to the sharing space.
Step 3-A: Creating the Internal User Group (Auto-assignment)
The solution administrator must create a group containing all internal users who will have access to the sharing space.
- Log in as system administrator.
- Access User Groups in the administration menu.
- Click on + Create a user group.
- Configure the group:
- Name :
Specific-Internal-Users-Group. - Description : Group for internal users with access to the specific sharing space being created.
- Permission to send files : Disabled (considering that external users are the only ones uploading files).
- Permission to receive files : Enabled.
- Name :
- Add all necessary internal users to the group.
- Add the new group to the community linked to the sharing space.
In this mode, each user belonging to the Specific-Internal-Users-Group group will be notified when a new file is uploaded and can retrieve it if necessary. The sharing space owner does not need to invite internal users. However, this scenario requires the intervention of the system administrator to manage the Specific-Internal-Users-Group group. Nevertheless, one of the members of this group (probably the sharing space owner) can be designated as group administrator to avoid administrator intervention.
Scenario B: Delegated Management of Internal Users in the Share
In this scenario, all internal users of the organization are part of a group called Internal-Users-Group. This group must be added to the @template-share-file-repository template. This group must have the permission to receive files.
Step 3-B: Inviting Internal Users
The sharing space owner can then invite internal users. These will become participants in the sharing space while maintaining the settings of the Internal-Users-Group group. They will therefore not be limited to file upload only.
Step 4: External User (Guest) Experience
4.1 Receiving Invitations
The external user receives two emails :
Invitation to the S-Filer Portal platform :
- Contains login information.
- Link to the platform.
- First login instructions.
Invitation to the sharing space :
- Specific notification for the sharing space.
- Usage instructions.
4.2 File Deposit Process
- The external user logs into S-Filer Portal.
- Accesses the sharing space using the left menu.
- Uses the Upload option to deposit files or the drag-and-drop functionality.
- They will be notified when their file is retrieved.
4.3 Behavior After Deposit
File Visibility
- During transfer : The file is visible in the upload interface.
- After transfer : The file is no longer visible in the external user's interface.
- Sent files list : The transfer appears in the user's "Sent files" section.
Restrictions
- The external user cannot download the file after deposit.
- The external user cannot see files deposited by other external users.
4.4 Traceability and Audit
- Audit report : All transfers appear in audit reports.
- Notifications : Internal users receive email notifications.
- History : Complete history is maintained for compliance.
Advantages of This Configuration
Security and Privacy
- Isolation of deposits between external users.
- Complete traceability of transfers.
- Granular access control.
Ease of Use
- Simplified interface for external users.
- Intuitive deposit process.
- Automatic permission management.
Compliance
- Complete audit reports.
- Transfer history.
- Respect for security policies.
Points of Attention
Technical Limitations
- External users cannot retrieve their files after deposit.
- Group permissions are critical for proper operation.
Maintenance
- Periodic review of group members and
Specific-Internal-Users-Groupparticipants in the sharing space. - Implementation of file retention policies.
- Implementation of user retention policies.
Conclusion
This configuration allows creating a secure and traceable Template for Share File Repository system. External users can deposit files without seeing those of others, while internal users have access to all deposited files. The system ensures confidentiality while maintaining complete traceability for compliance and audit purposes.