
SaaS agent
This topic describes how RAC/M Identity as a Service (SaaS) customers deploy the ICF connector server (ConnId) on their own infrastructure using the racm-icf-server-agent container image. The console generates deployment steps for Docker, Podman, or Kubernetes (an example Helm chart). The agent synchronizes connector artifacts from RAC/M, registers with RAC/M, and then either opens a secure outbound tunnel or listens so RAC/M can reach ConnId directly—depending on the connection mode configured for the ICF server.
SaaS only
The ICF server agent feature applies only to RAC/M Identity as a Service (SaaS). It is not supported for on-premises or private-cloud RAC/M Identity deployments.
This page covers the two SaaS agent-based connection types (Agent and Direct). For Legacy and Internal servers and an overview of the configuration wizard, see ICF servers.
Connection modes
Available in3.21.0 +
Registration returns a connectionMode value of TUNNEL or DIRECT. The agent image (0.6.5 or later) must be paired with a RAC/M release that emits this field. In the console, these correspond to Connection type Agent and Direct.
| Mode | How RAC/M reaches ConnId | Network on the agent host |
|---|---|---|
Tunnel (TUNNEL) — Agent | Agent opens an outbound WebSocket tunnel to RAC/M; RAC/M connects through that tunnel. | No inbound publish of ConnId is required. Allow outbound HTTPS (and the tunnel WebSocket) to RAC/M. |
Direct (DIRECT) — Direct | The ICF server listens on the host and port you configure; RAC/M connects to it. The agent does not start the tunnel client. | Publish ConnId (container port 8759, TLS) with Docker -p hostPort:8759 (or the equivalent in Compose/Kubernetes). Open firewall / security-group rules so RAC/M can reach that host port. |
Use Agent when the agent host accepts no inbound connection from RAC/M. Use Direct when the host cannot open an outbound connection but RAC/M can reach it on the configured port (for example, on a shared network or with controlled port forwarding).
Firewall and network rules
An ICF server agent needs only outbound network access to RAC/M. On the agent host, open an outbound rule to your RAC/M endpoint on its HTTPS port (443 by default, or the port RAC/M is published on). The agent always initiates the connection to RAC/M, so no inbound rule to the agent host is required.
The exception is Direct: RAC/M connects to the connector server on the host and port you configured (default 8759), so you must also allow that inbound connection from RAC/M to the agent host. Agent needs the outbound rule only.
Create the agent server in RAC/M
The ICF server screen is a short guided wizard. The progress bar shows Configuration (sub-steps General and, when applicable, Connection), then Deployment, then Verification. During Configuration, use Next and Previous (or click a completed node). On Verification, Edit reopens Configuration from the first sub-step.
- Sign in to the RAC/M Identity management console with an account that can manage ICF servers.
- Open Configuration → Target system servers (ICF servers).
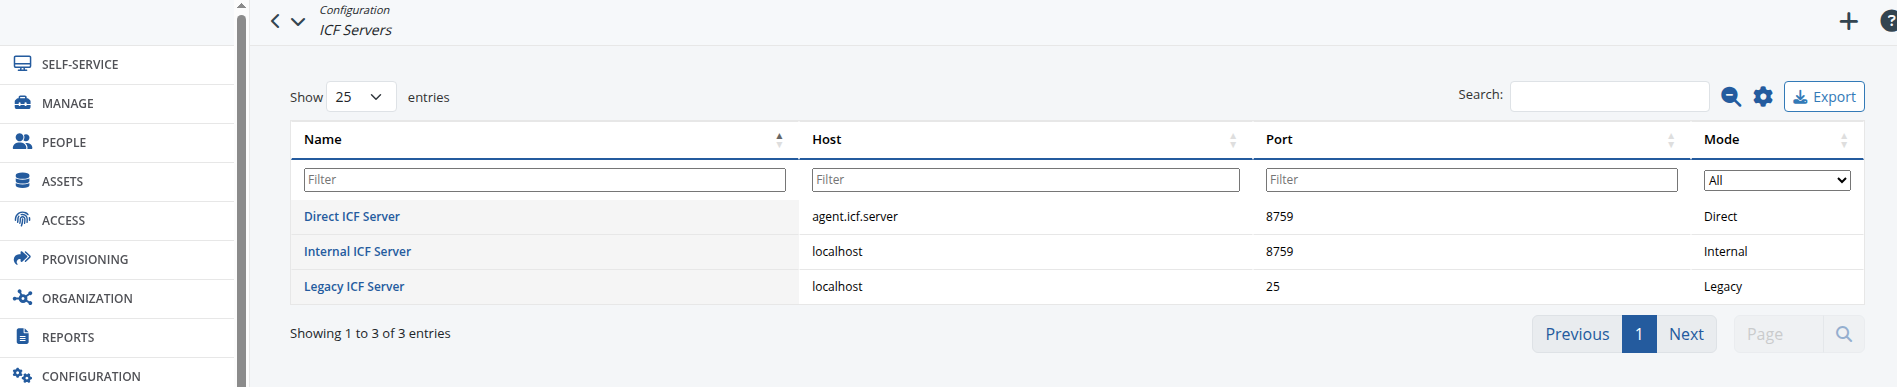
- Click + to create a new ICF server.
- On the General sub-step of Configuration, enter a Name for this server (for example, the environment or application it will serve) and choose a Connection type. Agent is preselected for a new server; the cards are ordered Agent, Direct, Legacy.
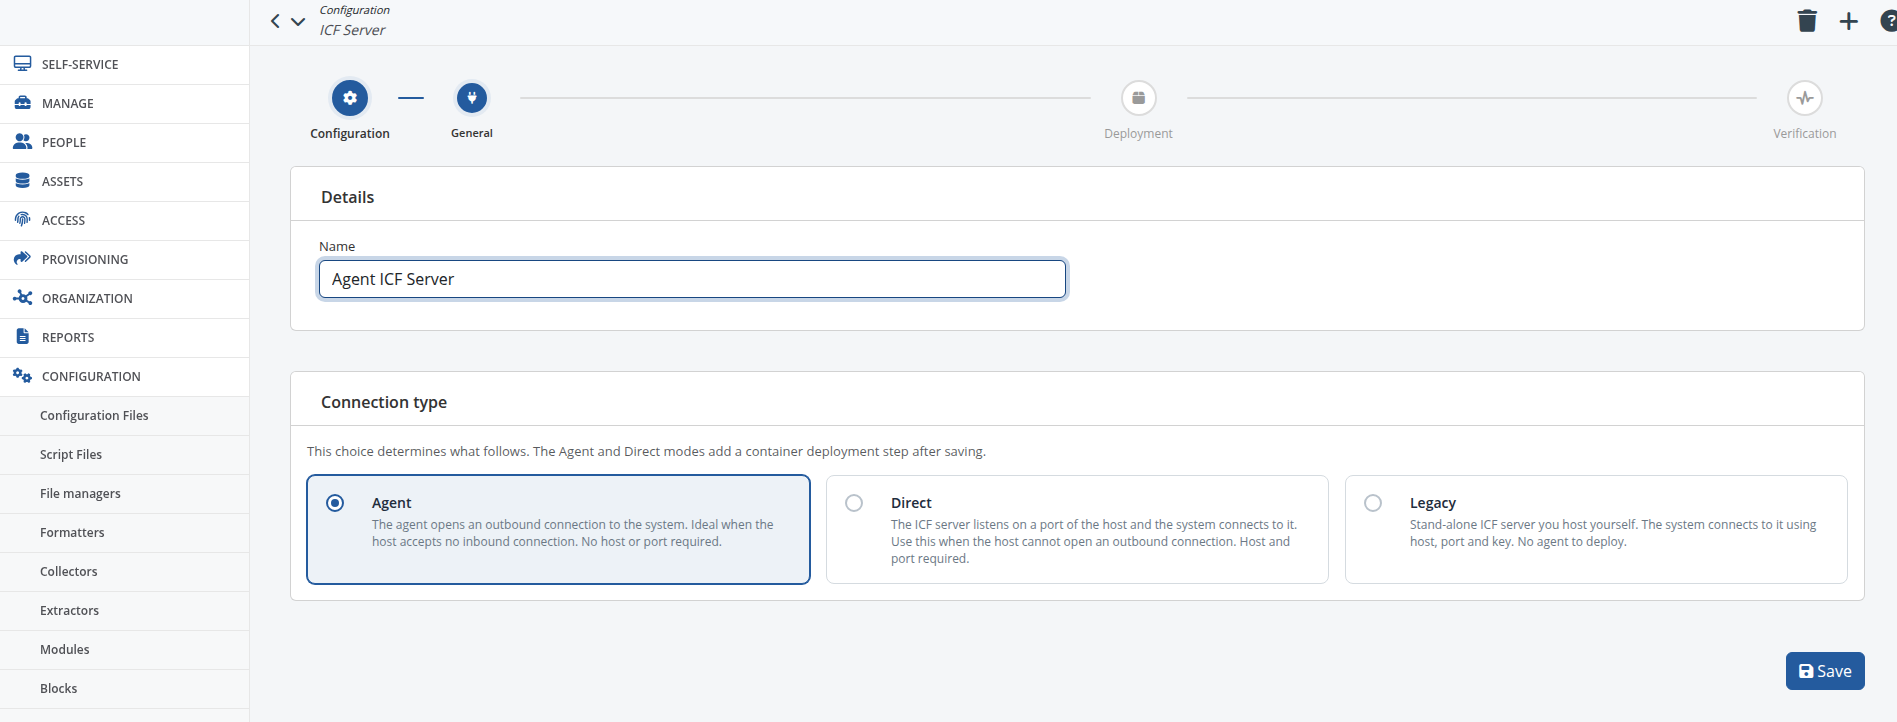
- Continue according to the connection type you chose:
- Agent: the Connection sub-step is skipped (RAC/M manages the host and port) — after General, save directly.
- Direct: on the Connection sub-step, enter the Host and Port (default 8759) where the ICF server listens so RAC/M can connect to it. The Why this is needed note explains that these values are reused when generating the deployment steps (the Docker/Podman port publish, and the Kubernetes Service port). Open that port in the host firewall (and any load balancer, security group, or Kubernetes Service) so RAC/M can connect inbound.
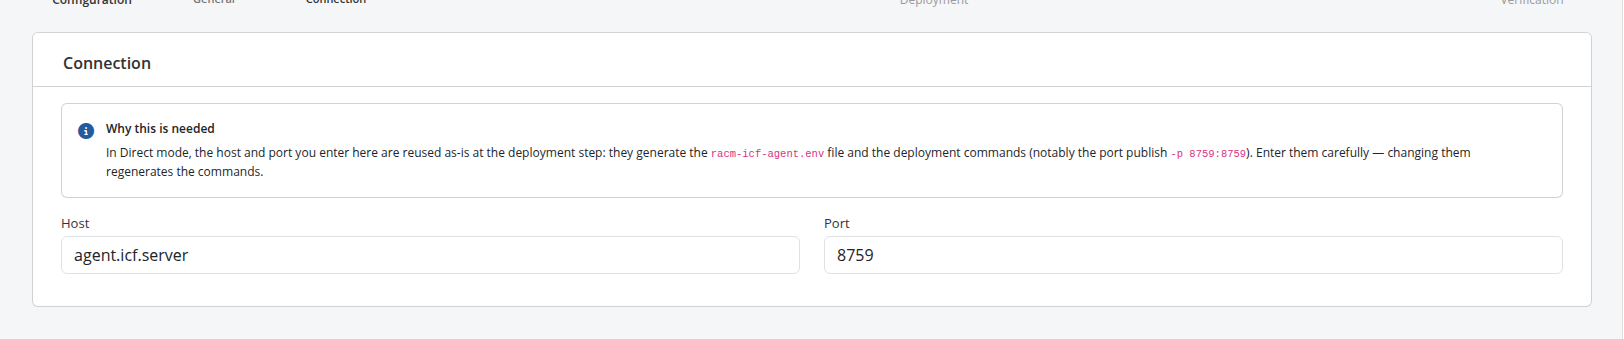
- Click Save.
After you save, the wizard opens the Deployment step. In Direct mode, the generated docker run includes -p hostPort:8759 so ConnId is published on the port you configured, and the Kubernetes example chart includes a Service on that port.
Obtain deployment steps and the bearer secret
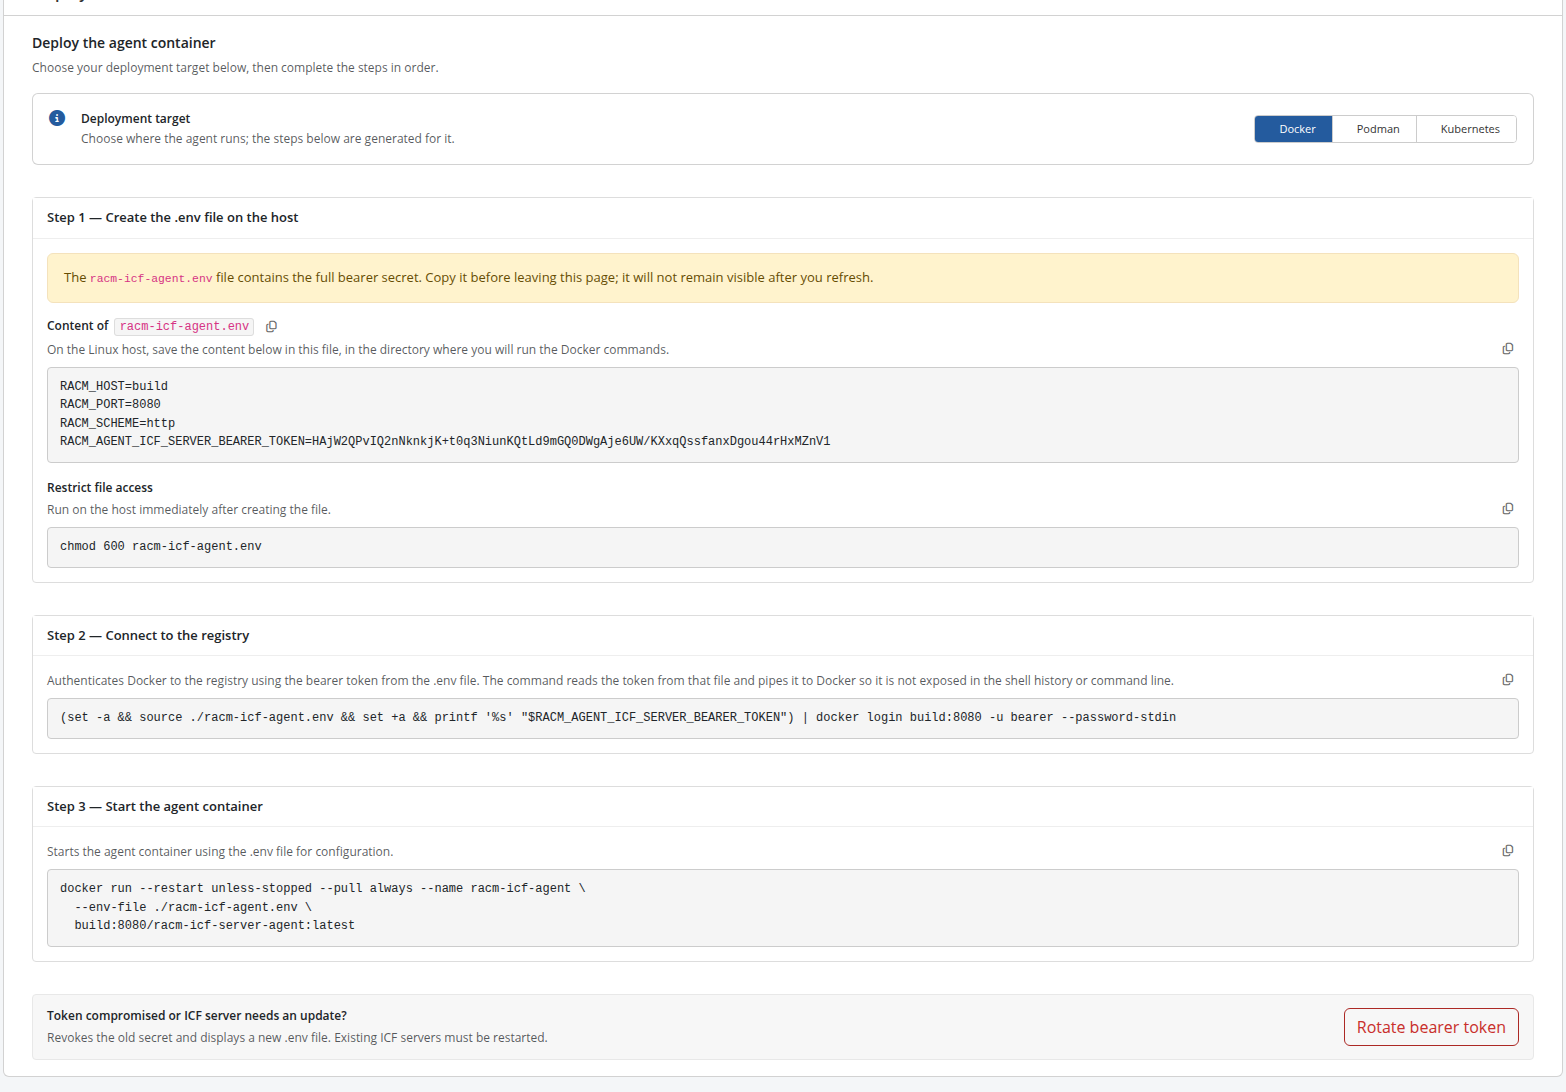
- After a successful save, the wizard opens the Deployment step with Deploy the agent container.
- Choose where the agent runs with the Deployment target toggle (Docker, Podman, or Kubernetes); the three steps below are regenerated for the target you select.
- Complete the three steps shown in order.
Docker and Podman
On a Linux host, complete the three steps in order.
Step 1 — Create the .env file on the host
- Copy the file content shown under Content of
racm-icf-agent.envand save it on the Linux host asracm-icf-agent.envin the directory where you will run the Docker commands. - Run the Restrict file access command (
chmod 600 racm-icf-agent.env) on the host immediately after creating the file.
The file contains RACM_HOST, optional RACM_PORT and RACM_SCHEME, and RACM_AGENT_ICF_SERVER_BEARER_TOKEN. Treat it as highly confidential: the bearer secret authenticates your agent to RAC/M (artifact sync, registration, tunnel when used, and the embedded image registry). Store it in a secrets manager or secure runbook, not in email or chat.
Step 2 — Connect to the registry
Run the Step 2 — Connect to the registry command on the host. It authenticates Docker to the RAC/M embedded container registry using the bearer token from racm-icf-agent.env. The command reads the token from that file and pipes it to Docker so it is not exposed in the shell history or command line. Use username bearer; the password is the bearer secret.
RAC/M serves the racm-icf-server-agent image from this registry. The image reference in step 3 uses your RAC/M hostname (and port, when not the default HTTPS or HTTP port).
Step 3 — Start the agent container
Run the Step 3 — Start the agent container command. It starts the agent with --env-file ./racm-icf-agent.env and pulls the image from the RAC/M registry (--pull always). For Direct, the command also publishes ConnId with -p hostPort:8759 (container port 8759, TLS); for Agent, that publish mapping is omitted.
Kubernetes
Select Kubernetes on the Deployment target toggle. The console then shows an example Helm chart prefilled with this server's settings. Treat it as a starting point to adapt to your cluster (or a compatible platform such as OpenShift), not as a supported chart.
The bearer token is not written into the chart. You keep it in a local file that Helm reads at install time with --set-file, so the chart files can be committed to a repository while the secret is not.
Step 1 — Create the bearer token file
- Copy the content shown under Content of
racm-icf-agent-bearer-tokenand save it in the directory where you will run the Helm command. The file holds the bearer token and nothing else. - Run the Restrict file access command (
chmod 600 racm-icf-agent-bearer-token) immediately after creating the file.
Keep this file out of the repository where you store the chart. The same one-shot rule as the .env file applies: the full secret may not remain visible after you refresh or navigate away.
If the secret is already masked, the page cannot regenerate racm-icf-agent-bearer-token. If you already installed the chart, continue with step 3; the secret already in the cluster stays valid. If you did not copy the secret, use Rotate bearer token to display a new file.
Step 2 — Create the example chart
Create the racm-icf-server-agent directory next to the token file. In that directory, save each file the console shows at the path indicated:
| File | Role |
|---|---|
Chart.yaml | Chart metadata. |
values.yaml | Image reference (the same one used for Docker/Podman), RAC/M host, scheme, and port, the image-pull secret name, and (in Direct mode) the Service port. The bearer token is deliberately absent so this file can be committed. |
templates/secret.yaml | Puts the bearer token in a Kubernetes Secret that is mounted as a file in the pod. The container reads it through RACM_AGENT_ICF_SERVER_BEARER_TOKEN_FILE; the token is never passed as a plain environment variable. |
templates/registry-secret.yaml | Builds the image-pull secret from that same token (registry username bearer), so no separate command has to put the secret on a process command line. |
templates/deployment.yaml | One replica, the secret mounted read-only, a non-root security context, and startup, liveness, and readiness probes that match the image health check. |
templates/service.yaml | Direct mode only: exposes the ConnId port so RAC/M can connect inbound. The example uses ClusterIP; change the Service type (or add a route) when RAC/M reaches the agent from outside the cluster. |
In Agent mode, no Service is generated: the agent opens the connection outbound.
The startup probe allows a long first start (the ConnId port opens only after the first artifact sync). Raise connId.startupFailureThreshold in values.yaml if the bundle is large or the link to RAC/M is slow.
Step 3 — Install the chart
Run the Step 3 — Install the chart command from the directory that contains both the token file and the chart directory:
helm upgrade --install racm-icf-agent ./racm-icf-server-agent --set-file bearerToken.value=./racm-icf-agent-bearer-tokenThe command reads the bearer token from the file created in step 1 and installs or upgrades the release. Run it again after you regenerate the token.
After you leave the page
The console warns that the full bearer secret (racm-icf-agent.env or racm-icf-agent-bearer-token) may not remain visible after you refresh or navigate away. Copy and secure the file content before leaving. If the secret is masked but you already have the file on the host (or the chart already installed), continue with the later steps. If you did not copy the secret, use Rotate bearer token to display a new file.
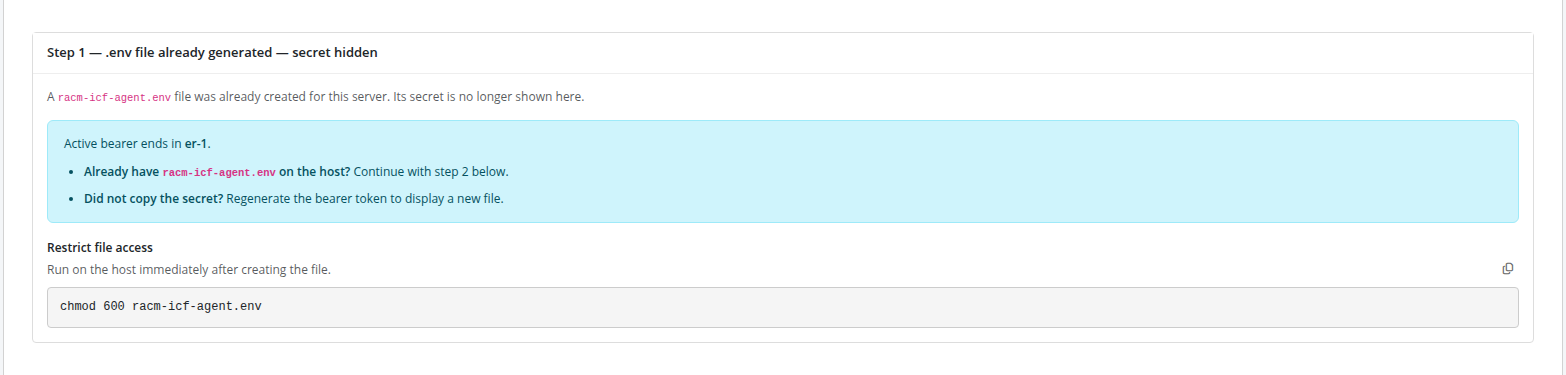
When you rotate the token, redeploy with the new secret so the agent picks it up; the previous secret stops working immediately. On Docker/Podman hosts, restart the agent containers with the new .env file and commands. For Kubernetes, save the new token file and run the Helm install command again.
After the agent has connected at least once, the page also shows Last connection to the system (or Never until the first successful contact). Use that timestamp together with Test on the Verification step to confirm the agent is reachable.
Run the agent in your environment
Prepare where ConnId should run: a Linux host with Docker or Podman, or a Kubernetes cluster with Helm.
Complete the three console steps for the Deployment target you selected. You can still translate the Docker or Podman commands into Docker Compose or your standard template, as long as you keep the same environment variables (or
RACM_AGENT_ICF_SERVER_BEARER_TOKEN_FILEfor a mounted token file), registry authentication, and (for direct mode) published ConnId port.Allow the container to reach RAC/M over HTTPS for sync and registration. On startup, the image waits for the agent-files HTTP endpoint (unless you disable the wait), runs artifact sync, then registration. In tunnel mode it then starts the tunnel client; in direct mode it skips the tunnel and runs ConnId so RAC/M can connect inbound.
For direct mode, confirm the host firewall (and any load balancer or Kubernetes Service) allows RAC/M to reach the published ConnId port. For tunnel mode, confirm outbound connectivity to RAC/M only.
Optionally monitor container logs for successful sync, registration, and (tunnel mode) tunnel startup. Registration logs include the active connection mode.
Agent image environment variables
The racm-icf-agent.env file from RAC/M supplies the required settings for Docker and Podman. The Kubernetes example chart sets the same RAC/M connection values in values.yaml and supplies the bearer token through a mounted file. The tables below list every environment variable the racm-icf-server-agent image recognizes if you need to add or override values (for example, in Compose or a chart you adapt).
RAC/M connection
The container will not start unless RACM_HOST is set and either bearer-token entry below resolves to a non-empty value:
| Variable | Description |
|---|---|
RACM_HOST | RAC/M hostname, or bracketed IPv6. Do not include scheme or port here. |
RACM_AGENT_ICF_SERVER_BEARER_TOKEN | Bearer secret for agent file access, registry authentication, and registration; treat as confidential. Used by the generated Docker and Podman commands. Required unless RACM_AGENT_ICF_SERVER_BEARER_TOKEN_FILE is set. Wins when both entries are set (a warning is logged and the file is not read). |
RACM_AGENT_ICF_SERVER_BEARER_TOKEN_FILE | Path to a file holding only the token (Kubernetes shape: mount a Secret read-only — the example chart sets this to the mounted Secret path instead of putting the token in RACM_AGENT_ICF_SERVER_BEARER_TOKEN). Surrounding blanks and a trailing newline are stripped; the token must be a single line without control characters (an embedded newline would inject an extra HTTP header). The variable above wins when both entries are set. A missing, unreadable, or empty file fails startup with the path named and no content disclosed. Required unless RACM_AGENT_ICF_SERVER_BEARER_TOKEN is set. |
Optional:
| Variable | Default | Description |
|---|---|---|
RACM_SCHEME | https | HTTP scheme for RAC/M (http or https). Used to build RAC/M HTTP(S) agent URLs. |
RACM_PORT | (scheme default) | HTTP(S) port for RAC/M. If unset or blank, defaults to 443 when RACM_SCHEME is https (the default) and 80 when http. If set, use decimal digits only (1–65535). |
HTTP readiness before agent-files sync (optional)
Before artifact sync runs, the image probes the RAC/M agent-files HTTP endpoint (bounded wait). Tune that behavior with:
| Variable | Default | Description |
|---|---|---|
RACM_SERVER_WAIT_SECS | 120 | Maximum seconds to wait for HTTP readiness; 0 skips the wait. |
RACM_SERVER_PROGRESS_SECS | 15 | Emit a progress line every N seconds while waiting; 0 disables. |
RACM_SERVER_READY_COUNT | 3 | After the first successful probe, require this many successive passes (1 s apart) before sync. Use 1 for “first success wins”. |
RACM_SERVER_SETTLE_SECS | 0 | Extra sleep (seconds) after readiness and before sync. |
RACM_SERVER_PROBE_DEBUG | (unset) | If 1, true, or yes (case-insensitive), failed probes use curl -S so stderr includes curl error detail. |
Periodic sync and ConnId restart (optional)
| Variable | Default | Description |
|---|---|---|
RACM_ICF_SYNC_INTERVAL_SECS | 300 | Seconds between incremental sync attempts. |
RACM_ICF_ICF_SIGTERM_WAIT_SECS | 60 | After SIGTERM to ConnId, seconds to wait before SIGKILL. |
Tunnel client (optional, tunnel mode only)
These variables apply only when registration returns connectionMode: TUNNEL. In direct mode the agent does not start the tunnel client, so they have no effect.
| Variable | Default | Description |
|---|---|---|
TUNNEL_CONTROL_URL | (from registration) | Override only. Full WebSocket control URL (path must be /agent/icf-server/tunnel). Replaces the registration URL when set. Omit from normal deployments; RAC/M does not emit this variable in the deployment steps. |
TUNNEL_EXTRA_ARGS | (unset) | Extra arguments appended to the tunnel client command. |
TUNNEL_SERVER_CONNECT_WAIT_SECS | 120 | Wait for the tunnel server TCP port (parsed from the control URL) before starting the client; 0 skips. |
TUNNEL_WAIT_PROGRESS_SECS | 15 | Progress line interval while waiting; 0 disables. |
TUNNEL_LOG_LEVEL | INFO | Tunnel client log level; detail is written to tunnel.log under ${ICF_AGENT_ROOT}/logs/ (default /opt/icf-agent/logs/). |
Install paths (optional)
| Variable | Default (image) | Description |
|---|---|---|
ICF_AGENT_ROOT | /opt/icf-agent | Agent install root. |
ICF_ROOT | /opt/icf-agent/icf-server | ConnId bundle directory. |
Using connectors with this server
Configure your ICF connectors to use this ICF server instance like any other server: Configuration → ICF Connectors, choose the connector, and select this server under ICF Server. See Connectors for the general workflow.