
ICF servers
An ICF server hosts the ConnId / ICF connector server that your ICF connectors call to reach target systems. You register server instances under Configuration → Target system servers, then select one when you configure each connector under Configuration → ICF Connectors.
The configuration wizard
Available in3.21.0 +
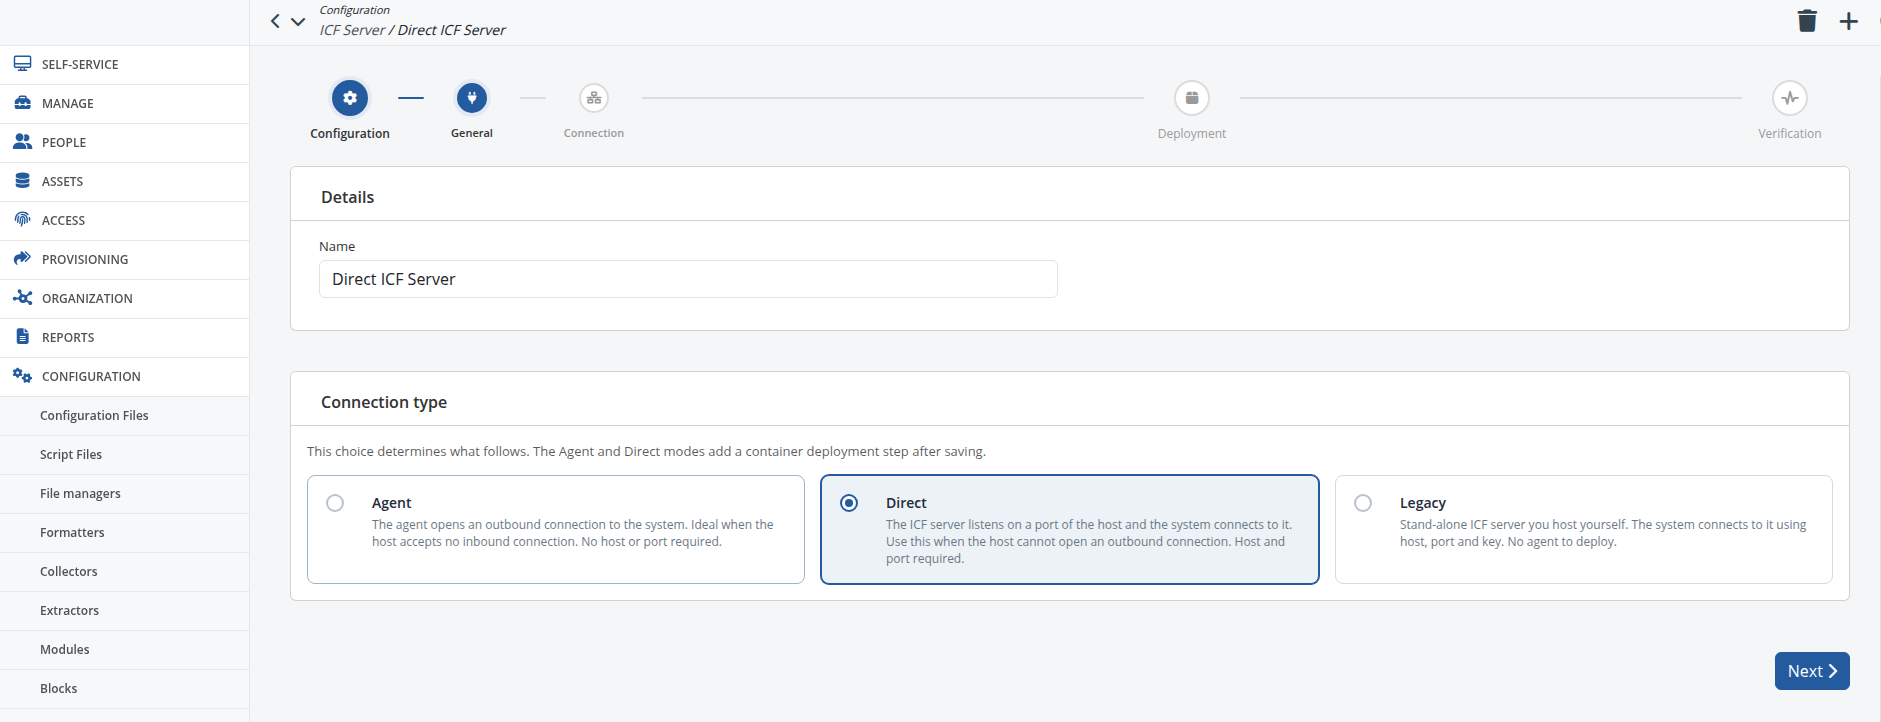
Creating or editing an ICF server is a short guided wizard. The progress bar shows the main steps Configuration (with sub-steps), Deployment (Agent and Direct types only), and Verification. During Configuration, move between sub-steps with Next and Previous, or by clicking a completed node. On Verification, the back control is labelled Edit: it reopens Configuration at the first sub-step so you walk through the settings again.
- Configuration
- General — name the server and pick its Connection type. On a new server, Agent is preselected when the ICF server agent feature is available; otherwise only stand-alone modes apply. The cards appear in this order: Agent, Direct, Legacy.
- Connection — the connection details for the chosen type. This sub-step is skipped for Agent (no host or port to enter). For Legacy, enter Host, Port, Key, and optional SSL. For Direct, enter Host and Port (default 8759); a Why this is needed note explains that those values feed the generated agent commands and, for Kubernetes, the example chart Service.
- Deployment — (Agent and Direct types only, after you save) the commands or example Helm chart to deploy the containerized agent.
- Verification — a read-only summary of the configuration and a Test button.
When you create a server, Save appears on the last Configuration sub-step. When you edit an existing server, that same place keeps Next while the form matches the saved values; Update replaces Next only after you change a field. Confirming Update warns that changing an ICF server already in use can break the connectors that rely on it until the server is reachable again with the new settings.
Connection types
The Connection type you choose on the General sub-step (shown above) determines how RAC/M and the connector server reach each other.
| Type | Who connects to whom | You provide |
|---|---|---|
| Agent | The agent opens an outbound connection to RAC/M | (nothing — managed by RAC/M) |
| Direct | The ICF server listens on the host; RAC/M connects to it | Host, Port (default 8759) |
| Legacy | RAC/M connects to a ConnId server you run | Host, Port, Key, optional SSL |
| Internal | Built-in server shipped with RAC/M | (read-only) |
Agent and Direct — SaaS
For RAC/M Identity as a Service (SaaS), you run the connector server yourself as the racm-icf-server-agent container, deployed near your target systems with Docker, Podman, or Kubernetes:
- Agent: the agent opens an outbound connection to RAC/M. Ideal when the host accepts no inbound connection. There is no host or port to enter, so the Connection sub-step is skipped.
- Direct: the ICF server listens on a port of the host and RAC/M connects to it. Use this when the host cannot open an outbound connection. Host and Port (default 8759) are required on the Connection sub-step. Open that port so RAC/M can reach it.
Both modes share the same Deployment step after you save (bearer token, generated deployment steps, and a Deployment target toggle for Docker, Podman, or Kubernetes). Network setup and whether you enter a host/port differ as above. See SaaS agent for the full deployment guide and the environment-variable reference.
Legacy
A stand-alone ICF server that you install, host, and manage yourself. RAC/M initiates the connection to it using the Host, Port, Key, and (optionally) Enable SSL / Server Certificate settings on the Connection sub-step. Use this when the ICF server is directly reachable from RAC/M.
Internal
The built-in ICF server shipped with RAC/M. Its configuration is read-only and managed automatically — you can view it (and run Test) but you cannot change its connection settings.
Choosing a type
- Use Agent (SaaS) when the agent host accepts no inbound connections.
- Use Direct (SaaS) when the host cannot open an outbound connection but RAC/M can reach it on a published port.
- Use Legacy when RAC/M can reach a ConnId server you host directly.
Verifying the connection
The last step of the wizard, Verification, shows a read-only Summary of the server — name, connection type, host and port when they apply (omitted for Agent), SSL for Legacy and Internal, and Last connection to the system for Agent and Direct servers — and a Test button. Testing is available for every connection type — including read-only Internal servers and saved Agent / Direct servers.
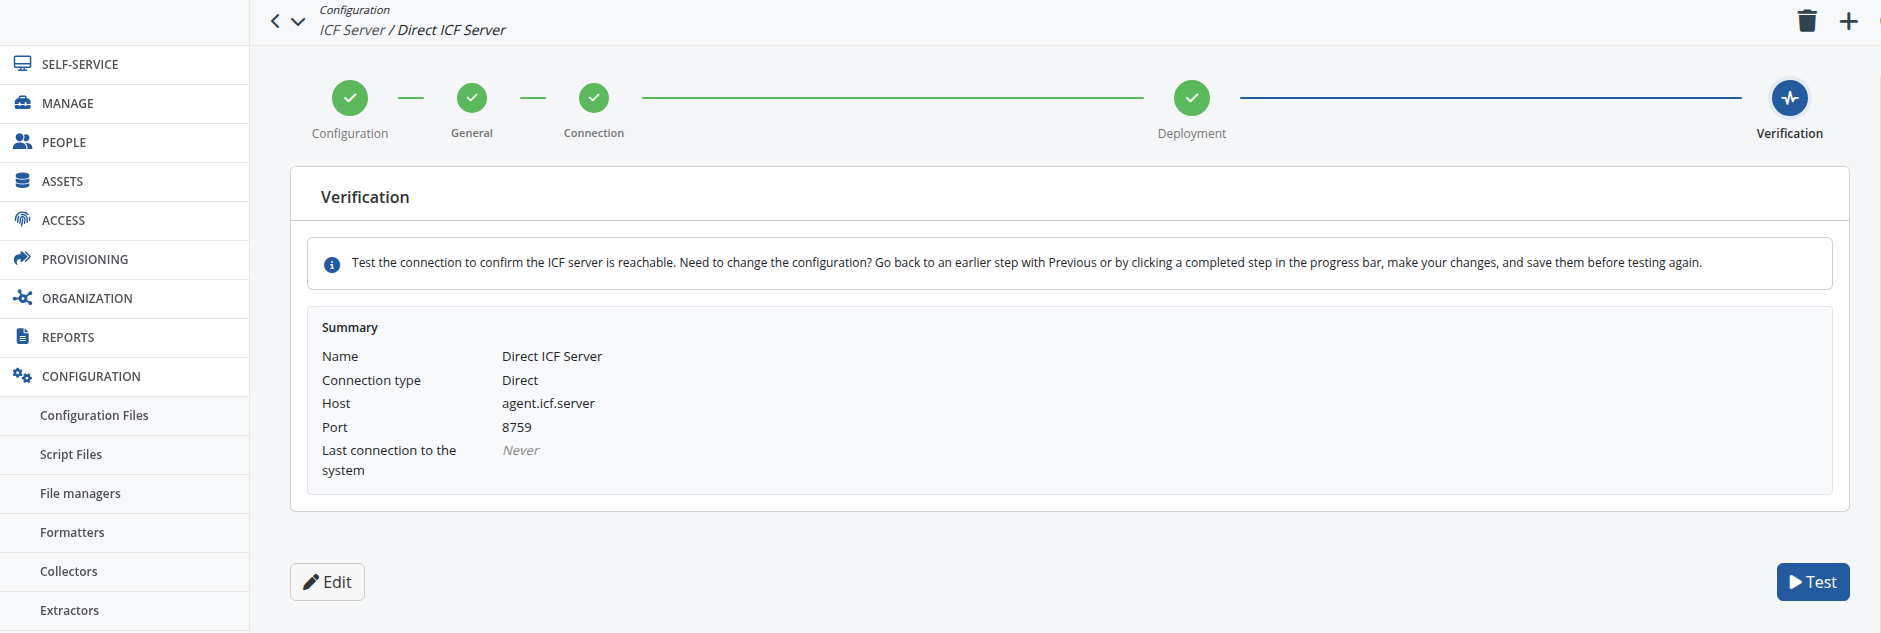
Click Test to check that RAC/M can reach the connector server (directly, through the agent, or over the tunnel). A successful test reports that the connection was established and marks Verification as done in the progress bar; a failed test flags the step in error. Use Edit to reopen Configuration from the start, fix the settings, Update (with confirmation) if you changed anything, and test again.
Connector configuration (choosing a server, connector types, parameters) is described in Connectors.