Administration guide
The following sections describe how to use the RAC/M Identity Management Console to perform the tasks of operating your IAM service, as well as how to configure and administer the solution.
The various topics are presented in the general order of the Management Console's main menu.
Note
The following instructions assume that you are logged into the RAC/M Identity Management Console with an administrator account with sufficient rights.
See Logging on for the first time for more information.
About operations management
The following sections describe how the RAC/M Identity Administration Console works. The various topics are presented in the general order of the main menu.
RAC/M Identity is designed to operate in a fully automated fashion, with minimal effort required from the operators and administrators. Once configured and fine tuned, the business logic allows the vast majority of processing to be automated.
As the operator, you must ensure that the solution is working properly and your tasks essentially consist of monitoring the indicators, reacting if you receive alerts indicating errors or anomalies, along with investigating and resolving the problems if necessary.
To do this, you will primarily use the Management function in the main menu.
The Management option on the main menu allows you to:
- Review and execute processing sequences
- View logs
- Manage local RAC/M Identity users
- Manage RAC/M Identity profiles
- View audit events
Reviewing and executing sequences
Typically, sequences are set up to run automatically on a schedule and timetable determined during sequence configuration.
Reviewing a sequence
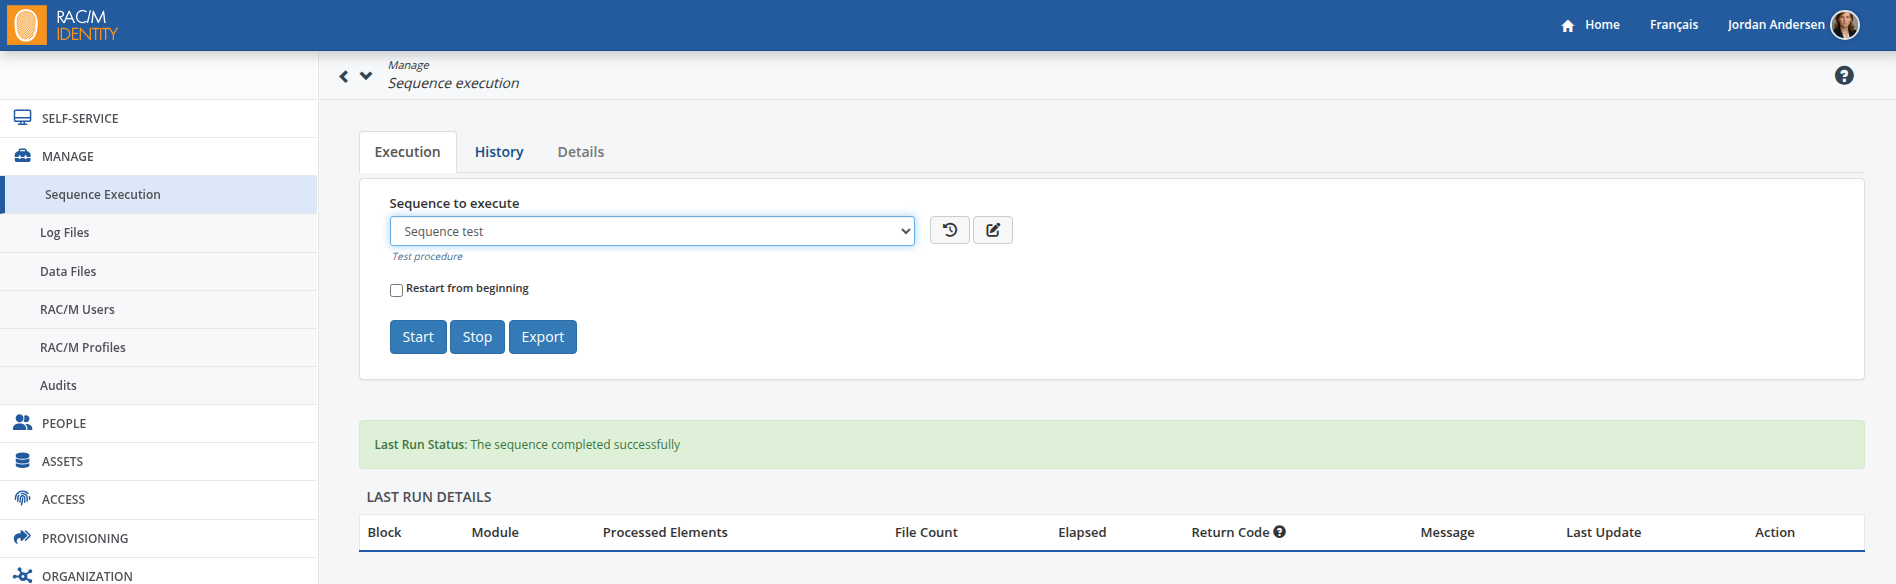
The window displayed when this menu option is opened reflects the results of the last sequence executed. You can also review the detailed results of any other previously run sequence.
To review a sequence execution:
- On the MANAGE menu, click Sequence Executions.
To review the execution of a sequence other than the one displayed, select the sequence to view from the drop-down list.
- In the Sequence to Execute list, select the sequence you want to review.
The last results appear in the LAST RUN DETAILS table. Each module in the sequence is listed along with the number of items processed and the time that it took to process them.
In the Return Code column, the code is 100 indicates that the module was successfully executed. Any other code indicates an error. Point to the question mark icon next to Return Code to view the list of error codes.
If there are any errors during processing, the status of the processing appears in orange or red.
To view error details, you must open the error log file for the module that failed. It is located in the directory that you have identified when configuring the module (see Configuring a Module).
Note
You can view all error logs from the MANAGE menu of the administration console. Choose Log Files to access the log viewing page.
Running sequences manually
Generally, a sequence is scheduled to run automatically (see Configuring a Sequence), but you may need to run it manually, especially when first testing new sequences.
To run a sequence manually:
- From the MANAGE menu, click Sequence Executions.
From the Sequence to Execute list, select the sequence you want to run manually.
To restart the processing from the beginning, click the check box Restart from beginning.
Click Start.
You can see the progress of each module as they run. You can review the results at the end.
Stopping and restarting a sequence
You can stop a running sequence by clicking on the Stop button and restart it by clicking on the Start button.
Viewing log files
To view the logs:
On the MANAGE menu, click Logs Files.
From the list, select the file you wish to view.
You can view the contents of the logs in raw format by clicking on the  icon located at the top right of the main screen.
Note
The content of the error logs is very technical and is mainly used to investigate the cause of problems. The logs are useful to OKIOK's technical support team as well as to integrators and technical experts of the solution.
Managing local users
There are two types of RAC/M user accounts: local users that are typically only used to initially configure and setup RAC/M Identity and federated user accounts that are used on a day-to-day basis by end users, operators, managers, approvers, reviewers, etc. to perform IAM operations and to manage an operational RAC/M Identity implementation.
Local accounts are created from the administrative console and are authenticated using the built-in password database. There should normally only be a very small number of local accounts, ideally only one. Local accounts are normally only used for the initial setup and configuration of RAC/M Identity.
Federated accounts do not need to be created manually because they are imported from an enterprise directory such as Active Directory or Entra ID. Federated accounts are authenticated using an external authentication mechanism such as Active Directory or a SAML authentication provider and assigned by business rules to the proper RAC/M Identity profile based on their responsibilities.
To create or edit a local user:
- On the MANAGE menu, click on RAC/M Users.
- At the top right of the page, click on the
 button.
 - Under Details, enter the required information as follows:
| Field | Description |
|---|---|
| Username | In the text box, enter the name that will be used to log in to RAC/M Identity. |
| Full Name | In the text box, enter the user's full name. |
| RAC/M Profile | From the list, select the profile you wish to assign to the user. This determines which menus and functions the user will have access to. If the desired profile is not listed, you can create it. |
| Associated Identity | This is used to associate an identity with this internal user. If necessary, select an identity from the list to associate with the new user. The user will then be able to authenticate using the ID and password of the associated identity instead of the internal ID and password. |
| New Password | Enter the password that will be used to log into RAC/M Identity. |
| Password Confirmation | Enter the password that will be used to log in to RAC/M Identity. |
- Click Save.
Important
Although this password is only used for the initial setup of RAC/M Identity, it is important that you choose a high quality password to ensure sufficient protection during the installation and setup process.
It will be possible (and recommended) to disable the use of built-in passwords once an authentication provider is configured.
To generate or revoke an API key
API keys are used to authenticate to the RAC/M Identity servers when using Web services. Once generated they must copied and pasted where they will be used.
To generate an API key:
1- Click on the Generate button.
To regenrate an API key:
1- Click on the Regenerate button.
To revoke an API key:
1- Click on the Revoke button and confirm when requested.
Important
API keys are sensitive cryptographic material that must be protected to prevent unauthorized access to the RAC/M Identity Web services. You must use utmost care to prevent the keys from being compromised.
Managing RAC/M Identity profiles
In RAC/M Identity, profiles let you define which menus and functionalities users will have access to. This is useful to limit what certain users can see and do within the management console based on their responsibilities.
To create a RAC/M Identity profile:
- On the MANAGE menu, click RAC/M Profiles.
- Click the Create new button .
- In the RAC/M Profile text box, type a name for the profile.
- In the Landing Page list, select the page that the users will see after logging on.
| Landing page | Description |
|---|---|
| Dashboard | The main landing page with a full dashboard with graphical indicators. This is the standard landing page for using the administrative console for operators and administrators of RAC/M Identity. |
| Self-Service | This is the landing page normally used for end-users, managers, approvers and reviewers who only need to perform IAM tasks such as issuing and approving requests or performing access review campaigns, but do not need access to RAC/M Identity management functions. |
- Under Items, select the check boxes corresponding to the permissions you want to grant to the profile.
- Click Save.
Note
Keep in mind that selections and changes apply to all users with this profile.
See Also
Viewing the audit trail
The audit trail displays, in chronological order, a detailed history of all requests, decisions and actions taken by RAC/M Identity whether initiated by the management console, the self-service portal, automated processing, web APIs or any other way.

The audit trail provides complete traceability of all events that may affect access and allows the determination of the accesses held by an identity at a given time.
The audit log is very detailed and therefore very large. To facilitate analysis and searches for specific events, elaborate filtering functions are available.
You can filter by date by clicking on the calendar icon at the top right of the filter and select or deselect the specific event categories or events you want to retain or remove.
Events that add rights are shown with a green circle, events that remove rights are shown with a red circle, while events related to automated processing are shown with a blue circle.
To view the audit log:
- On the MANAGE menu, click Audits. The main screen displays the latest audit events.
- Determine the date range you want to analyze and select or deselect the events you want to retain or eliminate for analysis.
The screen is split in two sections, one is the Activity Feed and the other section is the Filter

Activity feed
The section on the left, named Activity Feed, presents a timeline starting from the most recent record. Each of these records offers information about the event as well as a contextual tooltip about the entities involved in that record. Some of these records may have additional information that can be displayed by pressing the drop down icon .
| Icons | Description |
|---|---|
 | Expands the section to view more information in relation to a specific audit record. |
 | Reloads the audit list with the latest records in the database. |
If the records are related to sequence executions, icons help to quickly understand the event:
| Sequence Icons | Description |
|---|---|
 | Start of sequence |
 | End of sequence |
 | Start of module |
 | End of module |
Filters
The section on the right represents the filters that can be used to reduce the information that is displayed on the left. At the top of this section, two icons help you with the filters.
| Filter Icons | Description |
|---|---|
 | Represents the number of filters that have been selected. |
 | Allows for selection of a start and end date. |
The search box helps you find the filters you are interested in and makes it easier to select them. If you do a search with this filter box, you have two options.
- Select all search results. Allows you to select all visible items in the filter list.
- Add the selected items to the current filter. Allows you to make selections from this list and, when you press Apply, these selections will be added to the previous selection. If you don't choose this option, when you press Apply, the previously selected filters will be replaced by the ones chosen before you pressed this button.
When selections are made, click Apply to filter the list on the left.
Audit sidebar
When you open an entity detailed panel, the audit sidebar may be present which is identified by the label Activity Feed. If it is the case, it will look like this:

Click on the Activity Feed sidebar to expand it. Once opened, the right sidebar looks like this:

The Activity Feed sidebar functions like the Dedicated Panel described above with some exceptions:
- The sidebar shows the Activity Feed when initially displayed. If you click on the upper right filter icon, the sidebar will transition to the filter selection.
- In the filter context, you can make selections, and click on the Apply button. When the button is clicked, the context changes back to the Activity Feed with the selected filter affecting the list.
Protecting audit log events
Any action that affects identity or access data generates an audit event, which is recorded by a dedicated AUDIT recorder. The audit trail is retained in the database for the period required by contractual obligations and applicable regulations. Protection against tampering is ensured through strict database access controls, which prevent both users and OKIOK staff from having write access to the audit records, and through the forwarding of audit logs to an external SIEM platform.
Exporting to a SIEM solution
For RAC/M Identity as a Service (SaaS) instances, audit events are systematically forwarded to the OKIOK SIEM solution.
Audit events can also be forwarded to the customer's SIEM by configuring a Log4j appender to produce the required file format and using an appropriate log forwarder. Common integrations include Splunk, Microsoft Sentinel, QRadar, and other SIEM platforms.
The following example can be added to the configuration of the log4j2.xml file to create a file containing audit logs only:
<Configuration>
    <Appenders>
        ...
        <RollingFile name="Audit" fileName="logs/audits.log" filePattern="logs/audits.log.%i">
            <PatternLayout>
                <Pattern>%d [%X{request_id}] [%X{login}] [%X{user}] [%X{client_ip}] [%-5p] [%t] [%c] %x- %m%n</Pattern>
            </PatternLayout>
            <Policies>
                <SizeBasedTriggeringPolicy size="10MB"/>
            </Policies>
            <DefaultRolloverStrategy max="10"/>
        </RollingFile>
    </Appenders>
    <Loggers>
        ...
        <logger name="AUDIT" level="info" additivity="false">
            <appenderRef ref="console"/>
            <appenderRef ref="Audit"/>
            ...
        </logger>
    </Loggers>
</Configuration>
See also
Documentation for the Log4j library configuration can be found here: Log4j Configuration
About people
This section presents how to manage Persons, Identities and Accounts in RAC/M Identity
For this purpose, you will use the People function in the main menu.
We use the term People to refer to the human aspect in RAC/M Identity. In this context, Persons, Identities and Accounts are related to People.
The People option in the main menu allows you to:
- View, edit, add and remove Persons
- Match identities to Persons
- View, edit, add and remove Identities
- Match Accounts to Identities
The Approve Matching and Match Audits options are deprecated and should not be used.
Each person and identity object in the repository is assigned a permanent, system-generated unique identifier: a Universally Unique Identifier (UUID), also referred to as a Globally Unique Identifier (GUID). These values permanently distinguish each entity from every other, which avoids ambiguity when names or other attributes change.
Persons
Persons are physical persons who interact with information systems. They must be managed by the RAC/M Identity repository.
Identities
Identities are the business relations a person has with the organization. A person may have multiple simultaneous identities.
See also
Importing persons and identities
This section outlines the steps you need to take to import identity and access data, such as people, identities, accesses, and entitlements, into RAC/M Identity to perform identity management analysis and processing.
To import persons and identities:
- Review the IdentitiesImport collector that will import the data into the staging table. If the data is imported from a CSV file, the primitive used will be ModuleCopyCSVToTable. If the data is imported using an ICF connector, the primitive used will be ModuleICFImport Data.
- If required, use a formatter and additional modules if the source data needs to be adapted to fit the RAC/M table format.
- Review the IdentificationCopy module that will copy the data from the staging table into the RAC/M repository. The ready-made module is ModuleCopyColumnsAndInserts.
- Review the Imports and Copies blocks to run, among other objects, the IdentitiesImport collector and the IdentificationCopy module.
- Review the imports sequence to make sure that it contains the Imports and Copies blocks.
You can then execute this basic sequence to import data.
See also
Adding persons and identities manually
Normally, people (persons) and their business relationships (identities) are added to RAC/M Identity by importing data from identity sources (see About analyzing data). However, you may need to manually create an identity for a person, say a consultant.
Note
Since there are no autoritative sources for Persons, Identities are usually automatically converted to Persons by the business logic when they are first imported. This virtually eliminates the need to manually create people in RAC/M Identity.
This rare case should only occur if a person needs access to your systems but there is no identity source or way to import and convert one.
See also Converting an Identity to a Person
Adding a person
To add a Person:
On the Menu Bar, click PEOPLE> Persons.
At the top right of the page, click the
button.Enter the required information as follows: Under Details:
Last Name, Middle Name, First Name
Type all information pertaining to the person. The content of the Last Name text box will appear in the first column of the RAC/M identity table. The first name will appear in the third column.

Maiden Name, Full Name, Social Security Number
This information is not mandatory but can be useful to differentiate people with the same name.
Note
Be sure to comply with your policies and applicable privacy laws regarding the capture and use of user information such as date of birth and social security number. In most jurisdictions, this information is considered highly confidential and its use is governed by laws and regulations.
Date of Birth, Email, Optional Email
Date of birth opens a calendar from which you select the day, month, and year of the person's birth date.
At the bottom of the page, click the Save button. Continue entering the information and save the changes by clicking the Update button. Under More
Address
In the text box, type the address of the person.

Home Phone Number, Additional Phone Number, Cellular Phone Number, Pager Number
This information is not mandatory but can be useful if a person needs to be reached outside the organization.
Creation Date and Last Modified
These boxes indicate the creation date of the entry in RAC/M and when it was last modified. This is useful when actions need to be taken when a person no longer works with the organization or his/her status has changed.
Under Additional Information:
Languages
In the text box, type the person's preferred language for communications.
It is possible to enter a specific locale, for example "en_US" for American English. The chosen language is used for emails and the locale is used for displaying dates. Refer to Locale configuration for more information.

Identifier1 and Identifier2
These text boxes can be used to hold additional information that can be useful to the business logic in sequences, role modeling or access reviews.
Extended Attributes
This section displays the extended attributes that have been attached to the identity object. They may be used to hold comma separated list of values that are relevant to manage access to your information systems such as certifications, training, qualifications, interests, etc.
Click the Update button.
The person is added to RAC/M Identity. If the person is not associated with an identity, its Effective status is automatically set to "Terminated."
Note
The list of identities associated to the person, located at the bottom of the page, will remain empty until you match the person to an identity in the Identity Matching or Identities page.
Adding an identity
Note
Identities are typically imported from identity sources such as HR systems, student databases, or intern and contractor registries. This virtually eliminates the need to manually create Identities in RAC/M Identity.
This rare case should only occur if someone needs access to your systems but there is no source of identity or way to import it.
To add an identity:
On the Menu Bar, click PEOPLE> Identities.
At the top right of the page, click the
button.Enter the required information as follows: Under Details:
Last Name, Middle Name, First Name
Type all information pertaining to the identity. The content of the Last Name text box will appear in the first column of the RAC/M identity table. The first name will appear in the third column.

Employee Number, Source, Birth Date, and Email
In the text box, type the number of the employee; it is possible that there is no number if, for example, the person is an external consultant. The Birth Date opens a calendar from which you select the day, month, and year of the person's birth date. Type the person's email.
In the Source list, select the source where the identity information came from. This may be one of the existing sources (for example, when adding historical data) or you may have to create a new source.
Note
Be sure to comply with your policies and applicable privacy laws regarding the capture and use of user information such as date of birth. In most jurisdictions, this information is considered highly confidential and its use is governed by laws and regulations.
Associated Person
In the list, type the first or last name of the person and elect the person for which you are creating this new identity. If the person's status was "Terminated", it will become "Active" after you save the identity if it is active.
At the bottom of the page, click the Save button. Under Employment:
Organization and Department
In the Organization list, select the organization for which the person works under this new identity. In the Department list, select an existing department in which the person will be working as this new identity or type the name of the new department if one has been created for the identities that will work there.

Title, Work Location, Employment Status, and Employment Type
Open each list and select the items that apply to the new identity.
Cost Center, Hire Date, and Termination Date
In the Cost Center text box, enter the name of the department in charge of the person's payroll. The Hire Date opens a calendar where you select the day, month and year the person started working under this new identity. The End Date can be used to indicate the end date of employment to initiate the access revocation process.
Tip
It is a good practice to include an end date for contractors and external users to ensure that accesses are automatically revoked when their contract ends.
Supervisor, Reviewer, Approver Group and Group to be notified during provisioning
In each of the lists, type the first few letters of the name or click on the arrow to open the list and select the supervisors, the people responsible for reviewing and certifying access and the delegation groups that must approve access requests.
Under Additional Information:
Address, Country, Telephone, Mobile Type, Occupation, and Language
In each text box, type the required information.

Identifiers
These text boxes can be used to contain additional pieces of information such as identifiers that may be useful for business logic in sequences, role modeling or access reviews.
Account names
You can use these text fields to enter the basic access account names associated with an identity. For example, these account names can be used by business logic to facilitate account matching or to create accounts in target systems. These fields are typically populated automatically by the business logic.
Tip
For example, identifier and Account names fields can be used to enter accounts or account nomenclatures different from the primary account that must be used for certain legacy environments such as IBM mainframes. In this way the business logic will be able to create accounts according to arbitrary nomenclatures.
Extras
The extra information help you identify the identity when matching persons to them. You can enter any value in these text boxes.
Under Business Functions and Extended Attributes:
Business Function, Start Date, and End Date
In the Business Function list, type the first few letters of the business function that corresponds to a responsibility assigned to an identity and select it from the list or type the name of the business function to assign. The Start Date opens a calendar from which you select the day, month, and year when the person started, or will start, this function. In the End Date field, enter the date when this business function ends. If you need to add a business function, click the
 button.
See also
Extended Attributes
This section displays the extended attributes that have been attached to the Identity object. They can be used to contain a comma-separated list of values that are relevant to managing access to your information systems, such as certifications, education, qualifications, interests, etc.
Click Update.
The identity is added.
Note
The list of accounts associated to the person (located at the bottom of the page) will remain empty until accounts are matched, either automatically or manually in the Account Matching page.
Merging persons
If you realize that 2 or more persons created in RAC/M Identity correspond to the same physical person, you can merge them to correct the repository.
To merge people:
On the Menu Bar, click PEOPLE> Persons.
In the Search text box, type the name of the multiple entries.
In the list, select the Merge check box next to the entries to merge.

Click the Merge button located at the bottom of the page.
The Person Merge page opens, displaying the list of persons you selected.
In the Target column, select the person you want to keep. This will be the person that will remain and who will now combine all the information.
Note
The person selected as the target of the merge will be the authoritative source of information on that person. The other person's information will be discarded except for associated identities which will be copied.
Important
The merge cannot be undone. The next time data is imported the information will not be duplicated again.
Click the Merge button.
The persons have been merged.
Converting an identity to a person
If you have an orphan identity, that is, an identity that is not associated to a person, and there is no one to whom you can assign it, you can create a person based on that identity.
Note
In general, identities are automatically converted to persons by the business logic when identities are initially imported from authoritative sources. This manual procedure is only used in the rare case where the business logic cannot perform the conversion.
To convert an identity to a person:
On the Menu Bar, click PEOPLE> Identity Matching. The Account Matching page opens.

In the list on the left, select the identity for which you want to create a person.
Note
If the list is long, in the text box, type a few letters of the identity you are looking for and click the magnifying glass button.
Click the Create Person button.
The Person page opens and the information already contained in the identity is automatically entered. You can complete the person's record with the available information if necessary.
Click Save.
The new person is created and the status is set to "Active".
Note
The identity from which you created the person is automatically added to the list of identities located at the bottom of the page.
Matching identities to people
If the system was not able to automatically match some identities because there are no unique keys (see Determining Unique Identifiers), you will have to manually match them.
To match an identity to a person:
On the Menu Bar, click PEOPLE> Identity Matching. The Identity Matching page opens.
In the list on the left, select the identity to which you want to match a person and click the Create Person button. At the top of the list on the left, in the text box, type some letters of the name of the person you are looking for and click the magnifying glass button. A list of people identified by the selected matching algorithms is displayed in the right section.
Select the person you want.
At the bottom of the page, click the Match button.
The identity and the person have been matched. The identity now appears in the list at the bottom of the person's details page.
Note
If the list is empty, you can enter a few letters of the name of the person you are looking for in the search bar at the top of the right-hand area and click on the magnifying glass. A list of people matching the search criteria will be displayed. You can then continue the procedure from point 4 above.
If it is not there, you can create a person or convert an identity into a person as explained above.
Sometimes the system cannot automatically match identities because two people are so similar that it cannot tell them apart. In this case, you must look at the whole data set to determine the correct person.
Unmatching identities and people
If a match was made but you realize that the identity is associated to the wrong person, you can dissociate them.
Note
If this error occurs after an automated match, review the matching rules.
To unmatch an identity from a person:
On the Menu Bar, click PEOPLE> Persons. The Persons page opens.
In the list, select the name of the person from whom you want to remove an identity (see Performing a Search in a Selection Page).
In the Persons Details page, under Identities click the identity you want to remove.

In the Associated Person list, erase the name of the person that you do not want to be linked to this identity and click Update.

The identity is no longer matched to the person and it appears once again in the list of orphan identities in the Identity Matching page (see The Identity Matching page).
Managing the employment situation for an identity
The employment status of an identity is managed via the following fields:
- Employment status
- End date of employment
Employment status has an internal value (specific to the RAC/M Identity solution) and a source value (imported from the identity source), which can be different from each other. If the identity is managed by RAC/M Identity and not imported from an HR source (as may be the case for some contractors), the two values will always be identical.
The internal value is always the one that will be used in the business logic and serves as an override of the state in the HR source. This makes it possible to deal with situations where a departure needs to be processed before HR can enter the necessary information. The source value represents the actual value in the identity source.
The columns in the IDENTIFICATION table that manage the status are SOURCE_EMPLOYMENT_STATUS_ID and EMPLOYMENT_STATUS_ID. The employment end date is in TERMINATION_DATE.
Important information on employment status
Employment status can contain a large number of values from different identity sources. You need to use mappings to map all these states to one of the actual states (Active, Inactive or Completed) that the solution uses in its business logic.
Immediate termination
Immediate termination can be requested from the Self-Service Portal, or from the administration console by setting Employment status and End date of employment directly on the identity.
The preferred path is the Self-Service Portal: resolution workflows start immediately, and required actions can be specified as part of the request.
Relationship between different job fields
There is a precise relationship between the fields related to the employment situation, and this relationship dictates how the business rules are applied.
Employment end data (TERMINATION_DATE):This field is used by the solution to trigger an identity termination. The
ModuleHRTerminationDatemodule checks this date during execution and triggers termination by modifying the employment status. (EMPLOYMENT_STATUS_ID).Source employment status (HR_EMPLOYMENT_STATUS_ID): When this field changes following import from the HR source, it is automatically copied to the Employment Status field. (EMPLOYMENT_STATUS_ID).
This field also initiates employment status change processes when the effective employment status changes. For example, if an employee changes status from "Sick leave" (Inactive) to "Long-term leave" (Inactive), there is no change in effective employment status (Inactive -> Inactive) and therefore no process initiated. But if the employee goes from "Active" (Active) to "Retired" (Retired), the termination process will be launched.
Employment status (EMPLOYMENT_STATUS_ID): This field can change in several ways:
- Request of immediate termination in self-service
- When the end of employment date has arrived
- When source employment status changes
It is often used to temporarily replace (Override) the source employment status. Then, when the HR source changes to reflect the new status, the source employment status is copied to the employment status and the temporary replacement ends: both fields have the same value.
Employment status
The employment status of an identity can be modified directly in the administration page by changing its employment status or end date.
On the Identity details page, under Identities, consult the Employment status and Termination date fields.
It can also be modified by requesting a Employment Termination employee or a Employment Termination external contractor in self-service.
End of employment date allows you to change the status of an identity to Terminated by specifying the date on which it will no longer be employed. This is ideal for planning the departure of an identity and ensuring that its status is modified on the date of its end of employment.
Modification via import
Importing from the HR source to RAC/M Identity should only modify the HR fields, i.e. the source employment status (SOURCE_EMPLOYMENT_STATUS_ID). Similarly, RAC/M Identity will not modify the source field.
Connector and collector
See section Configuring an ICF connector and Creating a collector for data import
When a change in the source state is detected on import, RAC/M Identity compares the effective source state with the effective RAC/M Identity state. If they are not identical, this means a change in the state of the identity. A request for identity modification is therefore launched. In addition, the RAC/M Identity state is replaced by the source state just imported, and the event is audited.
Modification via a self-service request
It is possible to make requests in self-service, which may have the effect of modifying the status of an identity. For example, it is possible to request the end of employment of an identity. When these requests are approved and completed, the RAC/M Identity status is modified according to the request. In the case of an end-of-employment request, the end-of-employment date will be changed to the chosen date.
Modification via administrator interface
It is only possible to modify the RAC/M Identity status via the administrator interface. The source state cannot be modified.
Impact of deactivation
Identity deactivation is usually temporary. Examples include sick leave and seasonal workers.
When deactivating an identity, RAC/M Identity will attempt to deactivate all the accounts it owns. These accounts will retain all the groups associated with them. This will make it easier to reactivate them should the need arise. To do this, RAC/M Identity will launch deactivation requests for these accounts.
Impact of activation
In the case of identity activation, RAC/M Identity will launch activation requests for accounts that have been previously deactivated by the solution.
Accounts not reactivated
If accounts were already inactive before the identity deactivation process was started, they will not be reactivated. This is necessary to ensure that the identity has no more rights when it is reactivated than it had when it was deactivated.
One consequence of this is that if the identity has not been deactivated via the RAC/M Identity solution, no account will be reactivated, as the solution does not know which accounts were active or not at the time of deactivation.
Take, for example, an active identity with two accounts: techadmin, which is active, and labadmin, which is inactive. The identity is deactivated. Consequently, its techadmin account is also deactivated. When reactivating the identity, only the techadmin account is reactivated. To activate labadmin, you would have to request it explicitly.
Impact of job termination
The end of an identity's employment is usually definitive. This may be due to retirement or resignation, for example. If a person whose identity has been terminated returns to the company, a new identity is usually created.
Consequently, an end of employment initiates a process of account termination. This process varies widely, depending on company practices and the assets involved. It can range from simple account deactivation to complete deletion.
Termination process does not imply completed status
The actions taken on an account during the termination process depend on the integration made for this asset. In particular, it is possible that the termination process simply deactivates an account. In this case, the effective status of the account will be "Inactive" following termination.
This may seem counter-intuitive, but it actually reflects the flexibility the solution offers. The solution allows you to define two different processes for accounts (deactivation and termination), but if this distinction is not necessary for a given asset, the two processes can be identical and the account will have the same state at the end of both processes.
Processing concurrent requests
- When an identity modification request is processed, all other modification requests made previously for this identity are cancelled.
Diagram
About accounts
This section presents how to manage accounts in RAC/M Identity.
Accounts allow people, automation and devices to access systems and applications. They usually consist of a user ID and password and are associated with access rights to perform certain functions or access certain information. Accounts are assigned to identities; therefore, a person may have different accounts under different identities.
Example
A developer has access to his Windows workstation, the issue tracking solution, and a code repository solution. He has accounts in each of those solutions and these accounts have to be associated to this identity. This same developer is also in charge of the Christmas party and uses other accounts for this particular project. When the Christmas project is over, these other accounts are no longer needed and may be deactivated.
Accounts are added to the RAC/M Identity and access repository by importing the data from data sources (see Importing persons and identities).
Personal and impersonal accounts
Personal accounts are those that belong to identities associated with people. Impersonal accounts are not associated with an identity or a person. For example, technical, system, generic and other accounts are impersonal accounts.
Trustees
In order to ensure sound governance of impersonal accounts, which are often high privilege accounts, they must be assigned to trustees. Trustees are identities responsible for periodically reviewing the impersonal accounts assigned to them to validate their appropriateness.
If a trustee leaves the company or changes functions, the impersonal accounts assigned to the trustee must be reassigned to another trustee.
Impersonal accounts must be revoked as soon as they are no longer required.
Matched and unmatched accounts
During import, the business logic attempts to match accounts to identities using a set of algorithms to identify matching identities to accounts with as much certainty as possible. If a match can be made unequivocally, the account goes to the matched state. However, in some cases it is not possible to match an account to an identity with certainty, so the account is placed in the unmatched state.
The business logic can be iteratively refined to improve the level of automated matching until only a small number of accounts remain to be manually matched. It is these accounts, which have not been automatically matched, that appear in this list and must be manually matched.
Note
Since impersonal accounts cannot be matched to identities, they will appear in the list of unmatched accounts until they are assigned to trustees.
The account matching page
The account matching page allows you to:
- Match personal accounts to identities
- Label accounts to organize them into categories
- Assign technical accounts to trustees

To facilitate navigation, search filters are available. On the left side of the screen are the account search filters, while the identity search filters are located on the right side of the screen.
Account Search Filters
The Label/Status field is used to determine which subset of accounts are displayed in the list. By default, unmatched accounts are displayed. If accounts have already been labeled, they can be displayed by selecting the appropriate label.
The Asset Grouping and Asset fields allow you to select a subset of accounts associated with the selected assets.
The list of accounts displayed can be narrowed down by selecting Show Only Active Accounts or by typing in a few letters of the accounts being searched. Finally, the Advanced Search button allows you to refine the search criteria.
Identity Search Filters
The list of identities proposed in the list on the right is based on the filters selected in the Suggestions section. These filters are used to suggest subsets of the displayed identities to facilitate matching.
| Filters | Description |
|---|---|
| Account Trustees | Proposes identities that are already account trustees. |
| Nicknames | Suggests identities whose nicknames (e.g., "Mike" instead of "Michael") may match the accounts to be matched. |
| Soundex | Suggests identities based on homophones of the last name. |
| Last/First Name Permutation | Suggests identities that can be matched by permutating the last name and first name. |
| Surname | Suggests identities based on the surname only. |
| Multiple Soundex | Proposes identities based on the homophones of the first and last name. |
Note
Based on the filters selected, RAC/M Identity will attempt to identify the most plausible identity for the match. If such an identity can be determined with a sufficient level of certainty, it will be pre-selected.
Tagging accounts
To facilitate the work of matching accounts, unmatched accounts can be grouped and tagged. Once tagged, they can be displayed in blocks and the business logic can be set up to perform specific processing based on the tags. The account matching page provides a number of standard tags at the bottom of the left window. In addition, you can define and assign your own tags.

Note
The Unmatched button affects the status of the account. Accounts can be in either the Matched or Unmatched state and tagged with the labels below.
| Tag | Description |
|---|---|
| Unmatched | Places accounts in the unmatched state. This can be used to return one or more accounts that have been marked matched to the original state. |
| Technical | Designates technical accounts. These accounts will be assigned as trustee accounts to identities. |
| Orphan | Denotes accounts that cannot be associated with an identity. These accounts may represent some risk and should be revoked. |
| Untrusted | Accounts that cannot be quickly matched to an identity and require further investigation. |
| Homonym | These are accounts that cannot be quickly matched to an identity because there is more than one identity that may match the account. These accounts require further investigation. |
| Generic | Generic accounts are accounts that are used by multiple people. They cannot be matched to a single person. These accounts must be assigned to trustees. |
| Client | Refers to accounts that are owned by an entity other than the organization that is setting up the IGA service. This label is used in the context of outsourced services, where users of client organizations also have accounts in the IT systems. These accounts must be assigned to trustees. |
The drop-down list displays tags customized to your organization. It allows you to tag selected accounts with tags that are specific and relevant to your organization.
Example
Custom tags can be used to mark high-privilege accounts, for example, to help define high-privilege access review campaigns.
You can create custom tags in the CONFIGURATION>Mapping menu.
See also
To tag accounts:
On the menu bar, click PEOPLE> Account Matching.
By default, unmatched accounts are displayed in the list on the left.
Use the filters and the account search bar to refine the list of accounts to be tagged
Select the accounts you want to tag.
Click on one of the buttons at the bottom of the left hand section to tag the selected accounts or choose a tag from the drop down list at the bottom of the page and click Tag.
Matching accounts to an identity
If the system was not able to automatically match some accounts and identities because there are no unique identification keys, you will have to manually match them.
To match an account to an identity:
On the Menu Bar, click PEOPLE> Account Matching.
By default, the unmatched accounts are displayed in the list on the left. Use the filters and the account search bar to refine the list of accounts to match.
Select the account you want to match with a person.
Use the identity filters in the right-hand section to display potential identities.
Select the person and click the Match button.

The account and the identity have been matched. The account now appears in the list at the bottom of the Identity Details page.
Note
If several accounts with the same nomenclature are detected, a panel will be displayed that will offer you to match all similar accounts in bulk. This makes the manual matching work much easier and faster.
Unmatching accounts from an identity
Inversely, if a match has been made and you find that it should not have, you can remove an account from an identity.
To unmatch an account from an identity:
- Click PEOPLE> Identities.
- In the Search text box, type a few letters of the name or first name of the identity for whom the account has been linked to and click the magnifying glass.
- In the list, click on the identity. The Identities Details page opens.
- Under Accounts, click the
 button next to the account you want to remove.

- Click OK to confirm.
The account is no longer matched to the identity and is moved to the list of orphan accounts in the Account Matching page.
Assigning accounts to trustees
In the menu bar, click PEOPLE> Account Matching.
By default, unmatched accounts are displayed in the list on the left.
Select the unmatched Technical or Generic accounts.
Use the filters and search bar to refine the list of accounts to be assigned.
Select the accounts you wish to assign. Use the identity filters in the right section to display potential identities.
Select an identity from the list and click the Match button.
See also
Transferring an account
When you already know who the account belongs to, you can transfer it directly from one identity to another instead of removing it and then matching it again.
To transfer an account:
- On the Menu Bar, click PEOPLE> Identities.
- In the list, click the person whose account you want to transfer to another identity. The Identities Details page opens.
- Under Accounts, click the
 button next to the account you want to transfer.

In the Account Transfer dialog box, in the Identity selection list, type the name of the identity to whom you want to assign the account or select it in the list.
Click Transfer.
The account now appears in the list of accounts in the identities's "details" page.
About assets
This section presents how to create and manage assets in RAC/M Identity.
In RAC/M Identity, an Asset is any component owned by the organization that people use to conduct business and that requires access privileges, whether logical or physical. Assets can be, for example, systems, applications, infrastructure components, or even physical items.
In this context, the payroll system, business software, messaging system, wireless network, cloud applications, doors, etc. are all examples of assets.
To create and manage assets, you will use the ASSETS option in the main menu.
The ASSETS option on the main menu allows you to:
- View, modify and add Asset Groupings
- View, modify and add Assets
- View, modify, add and remove Access Accounts
- View, modify, add and remove Groups
- View, modify, add and remove Items
- View, modify, add and remove Permissions
- View, modify, add and remove Delegation Groups
Asset grouping
In order to facilitate management, assets are always associated with an Asset Grouping. By default, assets are associated with the Default grouping. You can create as many asset groupings as desired and assign all the required assets to them.
Example
If your company has several independent entities that use similar IT systems such as Active Directory or Microsoft 365, it may be useful to create asset groupings by entity. This way, there will be no collision on asset names, even if the assets are the same in the different entities because the assets are referred to by the canonical form "Asset Grouping/Asset".
Provisioning strategies
The Provisioning Type drop-down list allows you to define and configure the provisioning strategy used by the system to create, modify, disable, or delete accounts on target systems. These strategies allow you to configure the rules to be applied and the actions to be taken depending on the provisioning mode, such as manual or automated.
The drop-down list offers several strategies, including Manual Provisioning, None, ICF Connector, and Logic.
The strategies selected at the asset grouping level apply to all assets associated with the grouping if specific strategies have not been assigned to the assets. However, if a strategy has been assigned to an asset, that strategy will be applied.
The configuration settings differ depending on the strategy selected.
Manual provisioning
This strategy is used to perform provisioning manually by an operator or support team, rather than by an automatic connector.
The system creates a ticket (or task) describing the actions to be executed on the target system, and can notify the relevant parties according to the options defined below.
Manual provisioning configuration
The drop-down list allows you to choose the template of the email to be sent when a manual provisioning request is made. You can define as many templates as required. Email templates allow you to customize the recipients, structure, visual appearance, and dynamic content of emails. Templates are configured in the CONFIGURATION> Manual Provisioning section.
Ticket routing parameters
Allows you to enter a value that will be included in the email. This value can be used to route the ticket to the teams or groups responsible for its execution. This is especially useful when the email is sent to a ticketing system inbox to automatically open a ticket.
Provisioning account selection strategy
Specifies how the system chooses the target account(s) when creating or activating an account.
When access to an asset is granted to an identity, an account must be created, and when access must be revoked, accounts must be revoked. RAC/M Identity integrates several strategies for creating or selecting accounts in an automated provisioning and deprovisioning context. In general, strategies that return multiple accounts or all accounts are more appropriate for deprovisioning, while provisioning strategies should select or create only a single account.
Here are some of the available options:
Use asset grouping configuration
The strategy specified at the asset grouping level will be displayed to the right of the text and will be used for the current asset.
Select any active account
Selects an active account that can be found on any asset to which the targeted identity has access. If no account is found, an account will be created using the account creation policy associated with the asset.
Select all accounts
Selects all accounts, both active and inactive, belonging to the targeted identity on assets associated with the grouping. This strategy is typically used to remove all accounts from an identity during deprovisioning.
Select all active accounts
Selects all active accounts belonging to the targeted identity on assets associated with the grouping. This strategy is typically used to remove all accounts from an identity during deprovisioning.
Select an active account or create/activate one based on the primary account of the identity
Selects an active account if there is only one, otherwise an error will be returned. If there are none, a new account will be created or reactivated using the content of the Primary Identity field of the targeted Identity object. If this field is empty, a new account will be created using the account creation policy associated with the asset. This strategy is recommended for provisioning.
Select an active account or create/activate one based on the identity's email address
Will select an active account if there is only one, otherwise an error will be returned. If there are none, a new account will be created or reactivated using the content of the Email field of the targeted Identity object. If this field is empty, a new account will be created using the account creation policy associated with the asset. This strategy is recommended for provisioning.
Note
The contents of the drop-down lists may change as RAC/M Identity evolves. Refer to the contents of the drop-down lists and the associated description to choose the appropriate strategies.
Deprovisioning account selection strategy
Defines how accounts are identified during deactivation or deletion. In general, strategies that return all active accounts or all accounts are used. See the available options in the section Provisioning Account Selection Strategy.
Provisioning without target system reconciliation
In this mode, the solution sends a request to perform the provisioning manually according to the selected mechanism. The solution assumes that there will be no reconciliation of the target system, so it represents the changes directly in the repository as soon as the request has been sent.
Notifications
Notifications allow you to inform the parties concerned (requester, target, supervisor, provisioning group) at different stages of the account lifecycle.
For each of the following situations:
When creating or activating an account
When modifying access
When changing a password
Please select one of the following notification options:
Use asset grouping configuration
If this box is checked, the choices made at the asset grouping level will be used, as indicated to the right of the text.
Do not send notification
If this box is checked, no notification will be sent.
Send notification to:
Check the boxes below to send a notification email to the corresponding recipients.
Recipient Description Target The identity for which the request is issued, also called the subject. Requester The identity that made the request that generated the query Target Supervisor The identity specified as the target's supervisor. Target Provisioning Notification Group All delegates that are part of the notification group assigned to the target.
Send password separately
Specifies whether the password should be sent in a separate message to enhance security. Ideally, the password should always be sent in a separate email.
None
This strategy performs no provisioning, either manual or automated. This strategy is mainly used for demonstration, training, and non-production environments. It can be useful to ensure that no provisioning action is taken for certain assets in specific circumstances.
ICF Connector
This strategy is used to perform automated provisioning of accounts and access. It takes advantage of ICF connectors configured to allow the addition, removal, and modification of accounts and access to various information assets.
Provisioning ICF connector
The drop-down list shows the ICF connectors that have been configured for your environment. You must choose the appropriate connector based on the target asset. See Configuring an ICF Connector.
Provisioning instruction
The list offers choices to determine whether specific implementation instructions are required.
| Instruction | Description |
|---|---|
| None | No specific instruction required. |
| Manual Provisioning | Uses the ICF connector in manual provisioning mode. See Manual Provisioning |
Provisioning account selection strategy
Deprovisioning account selection strategy
Notification
These fields are similar to those described in the Manual Provisioning section. See Manual Provisioning for more details.
Logic
This strategy is used when applications outsource their authentication and authorization to an AD directory.
In this case, most of the details are defined at the asset level; only the fields for selecting accounts during provisioning and deprovisioning are displayed.
Provisioning account selection strategy
Deprovisioning account selection strategy
Notification
These fields are similar to those described in the Manual Provisioning section. See Manual Provisioning for more details.
See also
Creating an asset grouping
To create an asset grouping:
In the menu bar, click ASSETS> Asset Groupings.
At the top right of the page, click the
button.Enter the required information as follows:
Name
Enter the name of the asset grouping. Choose a name that is meaningful and representative of the grouping.
Description
Enter a brief description of the grouping. It will help operators distinguish between the different asset groupings.
Status
In the list, select Enabled to enable the assets associated with this grouping. This means that they will be visible to the business logic, which can process the access data associated with these assets and take action if necessary.
Select Disabled to disable all assets associated with this grouping. In this case, the assets will not be visible to the business logic and no analysis will be performed or action taken.
Tip
The Disabled state can be useful when the assets associated with the grouping are in the process of being integrated or if the grouping represents separate environments that should not be activated momentarily.
Technical Name
Enter a name that will be used by RAC/M Identity as a unique key. A good technical name should be unique, permanent and reflect the associated object. example: Medusa_prod_Mtl.
Provisioning
Under Provisioning, select the most appropriate provisioning strategy. See Provisioning Strategies.
If extended attributes have been added to the Asset Grouping object, you can enter the appropriate values there.
Click Save.
The asset grouping is added to RAC/M Identity. This grouping is now available to associate with assets.
Modifying an asset grouping
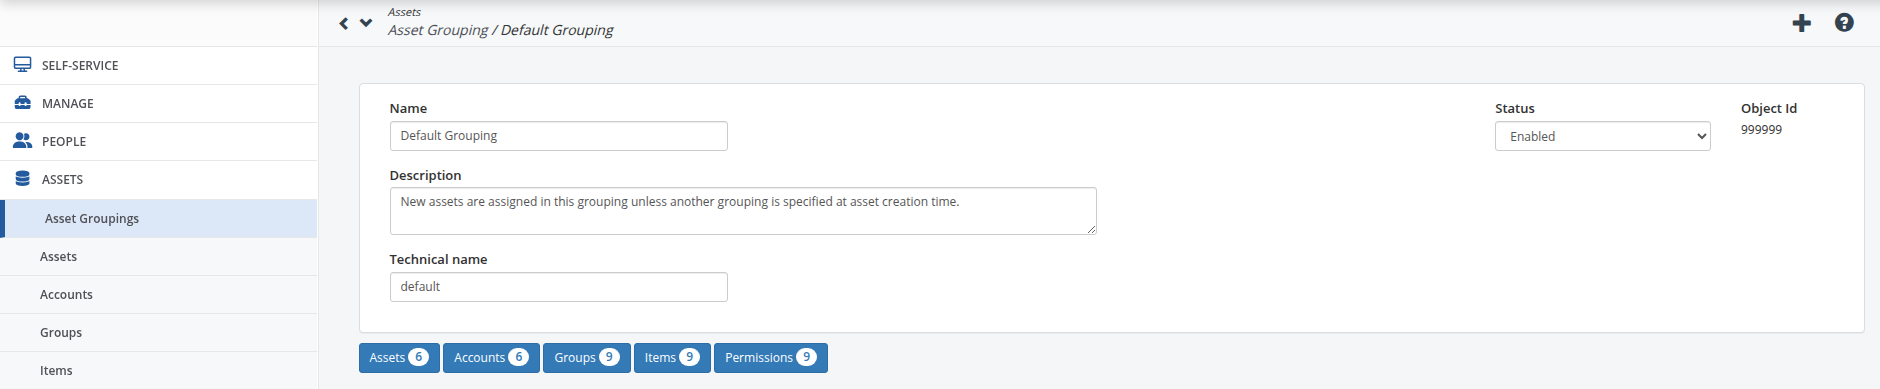
To modify an asset grouping:
In the menu bar, click ASSETS> Asset Groupings.
Select the asset grouping you want to modify. You can navigate directly to the lists of Assets, Accounts, Groups, Items and Permissions associated with the selected grouping by clicking on the respective buttons.
Make the necessary changes.
Click Save.
Removing an asset grouping
It is not possible to remove an asset grouping.
Creating an asset
In most cases, assets must be created manually, directly in the management console. However, there are a few situations where assets can be added to the RAC/M Identity repository by importing data from data sources (see Data Analysis).
This is the case, for example, for servers or applications that use a common flat file format to extract accounts and associated access. This is also the case for servers or equipment whose configuration is documented in a configuration management database CMDB. In both cases, assets can be created automatically in the repository without human intervention.
When creating an asset you can enter the metadata and configuration items that determine the level of integration as well as the details of how the business logic works with respect to that asset. Of course, the level of integration may evolve over time as your organization matures with respect to IAM processes. The configuration details of the targeted assets will need to be adjusted accordingly.
To manually create an asset:
In the menu bar, click ASSETS> Assets.
At the top right of the page, click the
button.Enter the required information as follows:
Name
Enter the name of the asset. Choose a name that is meaningful and representative of the asset.
Technical name
Enter a name that will be used by RAC/M Identity as a unique key. A good technical name should be unique, permanent and reflect the associated object. example: Medusa_AD_MTL.
Status
In the list, select Enabled to enable the asset. This means that it will be visible to the business logic, which can process the access data associated with this asset and take action if necessary.
Select Disabled to disable the asset. In this case, the asset will not be visible to the business logic and no analysis will be performed or action taken.
Description
Enter a brief description of the asset. It will help operators distinguish between the different assets.
Asset Grouping
Select or enter a few letters to search for the asset grouping you want to associate the asset with. (See also Creating an asset grouping)
Password synchronization source
If you plan to implement password synchronization, you can select the Asset that will serve as the source. That is, when a password change is made on the source asset it will be propagated to all assets that use it as a source. Typically, the recommended sources are Active Directory or Entra ID.
To register a source asset, select or enter a few letters of the asset you are looking for.
Leave the field blank if you do not plan to implement password synchronization.
Category
Categories allow assets to be logically grouped for specific analysis and processing. Categories can be defined arbitrarily which provides a lot of flexibility to represent a structure relevant to your organization.
For example, categories can be defined to group assets by criticality level. Another possibility is to group assets by type of system such as financial systems, HR systems, business systems, etc.
Select a category from the drop-down list to categorize the asset if desired. You can leave the field blank if categorization is not required.
Note
Categories must have been previously created in the CONFIGURATION Mappings section to be available in the drop-down list.
DN
DN stands for Distinguished Name. This field is used mainly with LDAP and X500 directories. You can leave this field blank for common assets.
System Type, OS and Identifiers
These fields are optional informational fields that can be used to provide additional information to the business logic. You can use them to identify the nature of the system or a server as well as the operating system if relevant. The identifiers fields can be used for any additional information that may be useful to the business logic.
Leave the fields blank if not required.
Date of last validation, date of last modification and date of last validation.
These fields are indicators, updated by RAC/M Identity to reflect the dates of events involving the asset.
Access Service Provider
This checkbox is used to indicate that the asset is used to control access to other assets. LDAP directories and databases can be used as Access service providers. For example, Active Directory or Entra ID groups are often used to control access to assets that outsource authentication and authorization, such as Citrix, BitWarden, etc.
This allows the business logic to handle the asset's security groups in a way that controls access for the assets that depend on them.
This box is typically checked for an Active Directory or Entra ID directory used to control access to assets configured as Logical Applications. Leave the box blank for all other cases.
See also
Entitlements Available through Self-Service
When you check this box, you allow access requests to this asset to be made via the RAC/M Identity self-service portal.
Click Save at the bottom of the page to save the asset.
The asset is added to the repository.
Note
It is recommended to save the asset being created even if the configuration is not completely finished.
Accounts, Groups, Items, Permissions buttons
These buttons direct you to list pages that display the items represented by the buttons. As the asset is being created, these lists are empty and of no interest at the moment. You can go directly to the Provisioning section.
Provisioning
Under Provisioning, in the drop-down lists, select the most appropriate provisioning strategy. See Provisioning Strategies.
Owner
In the list, type the first few letters of the name of the owner and select it.
An owner must be designated for each asset. The owner is responsible for the sound management of the asset and may be involved in approving access requests and/or reviewing and certifying access, especially for high privilege access.
Select the asset owner by entering a few letters of the owner's name in the drop-down list.
Administrator Group
This field allows you to assign a delegation group that corresponds to the team responsible for managing the asset, especially for executing access requests and revocations. It is the members of this group who will receive access requests once they are approved, as well as access revocation requests, in cases where provisioning and deprovisioning are not automated.
Select the asset's administrator group by entering a few letters of the group in the drop-down list.
Tip
It is recommended to register an administrator group when implementing a new asset to ensure the creation, modification and removal of access until provisioning and deprovisioning can be fully automated.
Note
Administrator groups must be created beforehand. See Creating a delegation group
Reviewer Group
This field allows you to assign a delegation group that corresponds to the team responsible for reviewing the asset. Members of this group will be responsible for approving or rejecting elements within review campaigns.
Select the asset's reviewer group by entering a few letters of the group in the drop-down list.
Extended attributes
If extended attributes have been added to the Asset object, you can enter the appropriate values.
Define approval flow
RAC/M Identity includes an advanced and highly flexible approval flow feature that allows you to define a mode of operation with up to three levels of approval by simple configuration.
The activation of each level is optional, and can be determined based on the level of risk associated with the asset itself and the underlying groups. Each level corresponds to a step that must be completed in order to proceed to the next. Each level can invoke delegation groups to ensure that approvals are completed as quickly as possible, even in the event that stakeholders with approval responsibilities are unavailable.
For each of the following levels, indicate whether the level is required and complete the information indicating who will be required to approve the requests, if applicable.
Identity-Based Approval
Select Required if the person responsible for the person requesting access must approve access to this resource. In this case, the Approver Group defined at the identity level will be used.
Group approval
Select Required if the resource owner (asset or group) or a delegation group must approve access to this resource.
If a delegation group must approve the request, select it from the drop-down list.
Note
Delegation groups must be created beforehand. See Creating a delegation group
Special approval
Select Required by this special approval group if you need a third level of approval.
This can be useful, for example, to grant access to a critical resource for which specific training or certification is required.
If a delegation group must approve the request, select it from the drop-down list.
Note
Delegation groups must be created beforehand. See Creating a delegation group
Click Save to save the asset.
Viewing or modifying an asset
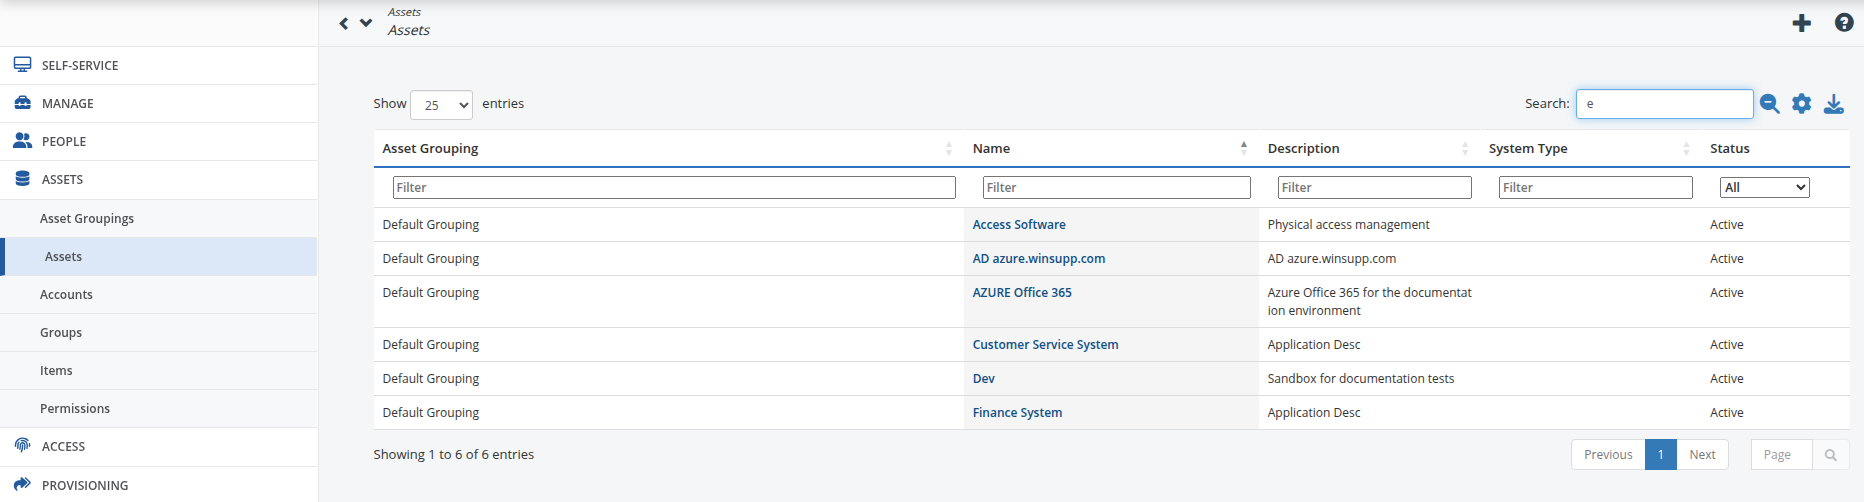
To view or modify an asset:
- In the ASSETS menu, click Assets.
- In the list, under the Assets column, select the asset you want to view or modify. Make the required changes
- Click Save to save your changes.
Adding an existing asset to an asset grouping
To add an existing asset to an asset grouping:
In the ASSETS menu, click Assets.
In the Asset Grouping list, select the asset you want to add to the grouping. Assets for which an asset grouping has not been specified will be in the Default grouping.
On the Asset Details page, in the Asset Grouping drop-down list, select the grouping you want to add the asset to.
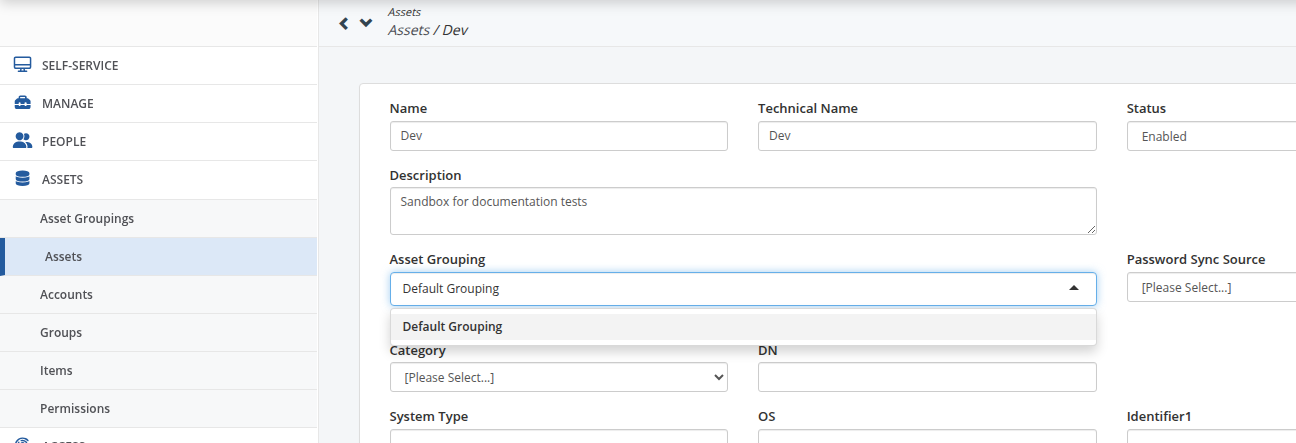
Click Save.
The asset is now associated with the asset grouping. You can view all asset details and associated access and permissions on the Asset Grouping Details page.
Creating a group
A Group represents a logical collection of access on an asset, such as an Active Directory security group, an LDAP group, an application role, or any similar construct used by the target system to grant privileges to its users.
Groups are typically imported from the target system by the collectors configured for each asset. However, they can also be created manually, which is useful when the target system is completely disconnected.
Note
In most cases, groups are imported automatically from the target systems and only require that any missing information be completed the first time they are imported. Default settings are applied during import to ensure proper functionality, so manual intervention is usually limited to refining descriptions, ownership, approval flows or availability as needed.
See Viewing or modifying a group to adjust the parameters of a group after it has been imported.
To create a group:
In the menu bar, click ASSETS> Groups.
At the top right of the page, click the
button. The Add Group dialog opens.Under Details, enter the required information as follows:

Asset Grouping
In the drop-down list, select the asset grouping that contains the asset to which the group belongs.
Asset
In the drop-down list, select the asset to which the group will be attached. The list is filtered by the selected Asset Grouping.
Name
Enter the name of the group. Choose a name that is meaningful to the end users who will see it in access requests, role definitions and review campaigns.
Tip
When possible, use the same name as the group in the target system to make reconciliation easier when the group is later collected.
Description
Enter a brief description of the access or privileges granted by the group. This description is displayed to requesters, approvers and reviewers, and should help them decide whether the group is appropriate.
Technical name
Enter a name that will be used by RAC/M Identity as a unique key. A good technical name should be unique, permanent and reflect the associated object. example: AD_APP_FIN_READONLY.
Category
From the drop-down list, select the category that best describes the group. Categories are used to classify groups for reporting and filtering purposes.
Logical group
Check this box when the group represents a privilege whose access is granted exclusively through membership in a group on another asset. This is typical, for example, of an application privilege whose access is actually controlled by a security group in Active Directory.
When Logical group is checked, a Source group field appears. Use it to document the group that actually controls access to this logical group. The source group belongs to an Access provider application — typically an Active Directory group. You can select the Access provider application and its source group on the next screen.
Tip
Logical groups are particularly useful to model privileges of applications that rely on Active Directory, LDAP or another centralized directory for authentication and authorization. Membership is then managed in a single place (the source group) while the self-service portal presents end users with the friendly names of the business application (logical application) and of the associated permissions or functionalities (logical group) that they may request access to.
Note
By default, a group inherits its Owner, Administrator Group, Reviewer Group and approval workflow parameters from its parent asset. You can override each of these individually if the group requires specific responsibilities or a different approval workflow, by enabling the corresponding checkbox described below.
Owner is different from asset owner
Check this box if the group has a different owner than the asset. When checked, select the owner identity in the Owner Name field.
The owner is responsible for the sound management of the group and may be involved in approving access requests and/or reviewing and certifying access.
Administrator is different from asset administrator
Check this box if the group is managed by a different team than the asset. When checked, select the delegation group in the Administrator Group field. Members of this group will receive the access requests and revocations associated with the group when provisioning is not automated.
Note
Administrator groups must be created beforehand. See Creating a delegation group
Reviewer is different from asset reviewer
Check this box if the group must be reviewed by a different team than the asset. When checked, select the delegation group in the Reviewer Group field. Members of this group will be responsible for approving or rejecting the group within review campaigns.
Note
Delegation groups must be created beforehand. See Creating a delegation group
Define approval flow
RAC/M Identity allows you to define, at the group level, an approval flow specific to the group. This is useful when the group grants access that is more sensitive than the rest of the asset and therefore requires additional approval, or conversely when the group grants access that can be approved with less oversight than the asset default.
For each of the following levels, you can either inherit the configuration defined at the asset level, or override it for the group.
Identity-Based Approval
- Select Use the asset configuration to inherit the Identity-Based Approval setting from the parent asset. The value currently configured on the asset is displayed next to the option.
- Select Not Required if the person responsible for the requester does not need to approve access to this group.
- Select Required if the person responsible for the requester must approve access to this group. In this case, the Approver Group defined at the identity level will be used.
Group approval
- Select Use the asset configuration to inherit the Group approval setting from the parent asset.
- Select Not Required if no owner-level or delegation-group approval is required for this group.
- Select Ask the approval of this owner to have the owner of the group approve access requests. The owner is the identity selected under Owner Name, or the asset owner when no group-specific owner is defined.
- Select Ask the approval of another group to have a specific delegation group approve access requests. Select the delegation group from the drop-down list.
Note
Delegation groups must be created beforehand. See Creating a delegation group
Special approval
- Select Use the asset configuration to inherit the Special approval setting from the parent asset.
- Select Not Required if no special approval is required for this group.
- Select Required by this special approver group to require an additional level of approval. This is useful, for example, for groups that grant access to critical resources for which specific training or certification is required. Select the delegation group from the drop-down list.
Note
Delegation groups must be created beforehand. See Creating a delegation group
Extended attributes
The Extended attributes area contains the technical identifiers used to reconcile the group with the target system (Identifier1, Identifier2, DN, GUID), the generic fields Extra1 through Extra20, and any additional attributes that have been configured on the Group object for your organization.
When a group is created manually to be provisioned later, you typically only enter values that are meaningful for the target system (for example, the distinguished name that the provisioning connector will use to create the group). For logical groups, these fields are populated automatically during collection.
Provisioning additional instructions
Enter any free-form instruction that should be transmitted to the provisioning operator or automated connector when an identity is added to the group. This value is included in the notification or ticket generated by the system.
Deprovisioning additional instructions
Enter any free-form instruction that should be transmitted when an identity is removed from the group.
Notifications
Notifications allow you to inform the parties concerned (requester, target, supervisor, provisioning notification group) when an identity is added to or removed from the group.
- Select Use the asset configuration to inherit the Notifications setting defined at the asset level. The value currently configured on the asset is displayed next to the option.
- Select Do not send a notification to suppress notifications for this group, regardless of the asset setting.
- Select Send a notification to send notifications for this group, and check the recipient boxes below:
Recipient Description Target The identity for which the request is issued, also called the subject. Requester The identity that made the request that generated the query. Target Supervisor The identity specified as the target's supervisor. Target Provisioning Notification Group All delegates that are part of the notification group assigned to the target. See Manual Provisioning for a detailed description of the available recipients and options.
Availability in access requests
- Select Use the asset configuration to inherit the availability setting defined at the asset level.
- Select Available to make the group available in access requests. Requesters will be able to search for the group and add it to a request.
- Select Not available to hide the group from access requests. This is useful, for example, for groups that are assigned automatically by roles, or for groups that should not be requested through the self-service portal.
Availability in role modification requests
- Select Use the asset configuration to inherit the availability setting defined at the asset level.
- Select Available to allow the group to be added to roles through role modification requests.
- Select Not available to prevent the group from being added to roles through role modification requests.
Click Save to save the group.
Viewing or modifying a group
To view or modify a group:
In the ASSETS menu, click Groups.
Use the Search field, the per-column filters (
 icon) or the column sort to locate the group. You can also change the number of groups displayed per page and use the
  icon to show or hide columns such as Technical Name, Insights or Source Profile.
In the Group column, click the group you want to view or modify.
Make the required changes.
From the Details page, you can also navigate to the related sections using the buttons or anchors at the bottom of the page:
- Parent Groups: shows the groups of which the current group is a member, which is useful to understand nested group hierarchies.
- Children Groups: shows the groups that are members of the current group.
- Access rights by this group: lists the Items and Permissions granted through the group.
- Group Members: lists the identities that currently hold the group, either directly or through a role.
Note
For logical groups collected from a source system, most fields are read-only. The Change Source Group dialog on the details page can be used to associate the current group with a different source group when the source object has been renamed or replaced.
Click Save to save your changes.
Deleting a group
To delete a group:
- In the ASSETS menu, click Groups.
- In the list, click the group you want to delete.
- At the top of the page, click the
 Delete button and confirm the deletion.
Note
Deleting a group removes it from RAC/M Identity along with any direct group-to-identity assignments managed by the solution. Before deletion, remove the group from any active role version that includes it, and cancel or complete any pending access requests that target the group.
Groups collected from a source system should normally be removed in the source system first and then re-synchronized, so that RAC/M Identity reflects the actual state of the target.
Creating a delegation group
A delegation group is a group of identities to which the group owner has delegated responsibilities. For example, members can approve an access request if the group owner is not available to do so.
To create a delegation group:
In the menu bar, click ASSETS> Delegation Groups.
At the top right of the page, click the
button.
Under Details, enter the required information as follows:
Name
Enter the name of the group. Choose a name that is meaningful and representative of the nature of the delegation group.
Tip
It is a good practice to use a standardized syntax for delegation groups that includes the use and the name of the owner. ex: GD-APP-Charles Tremblay.
Description
Enter a brief description of the delegation group's responsibilities.
Group Type
From the drop-down list, select a delegation group type. RAC/M Identity includes two basic types of delegation groups, SIMPLE_GROUP and CASCADE_GROUP.
SIMPLE_GROUP groups direct requests to all members simultaneously. In this mode, all members receive notifications and see the tasks in the self-service portal. As soon as one member approves a request, it is removed from the list. This approach ensures the fastest resolution of requests.
CASCADE_GROUP groups direct requests sequentially to each member according to the priority specified in the Priority field associated with each member and the configuration settings. This approach is useful for defining a gradual strategy for approving requests.
The two types of groups exist in two versions, the basic versions that include the group owner, and the SIMPLE_EXCL_OWNER and CASCADE_GROUP_EXCL_OWNER versions that exclude the group owner, i.e. requests are forwarded to all members except the group owner.
These versions are useful for delegation groups whose owners are executives with little or no availability for operational tasks.
Group scope
Delegation groups with a scope of Generic can be used for all approval or certification tasks. They are available in the drop-down lists of the various objects that require delegation groups.
Delegation Groups with a scope of Self Service are used to specify that individual members can see the accesses held by an individual in the self-service portal.
Delegation Groups of type Self Service must belong to members of Approver Groups assigned to identities in order for them to see the accesses currently held by those identities.

Note
If the requester is not a member of the Approver Group nor a member of a Self-Service delegation group belonging to one of the members of the Approver Group of the person whose rights he wants to view, he will be able to make the access request but will not be able to view the existing accesses or remove them.
Technical name
Enter a name that will be used by RAC/M Identity as a unique key. A good technical name should be unique, permanent and reflect the associated object. example: GD_APP_CT.
Owner
In the list, select the arrow to open it or enter the first few letters of the owner identity name, then select it.
Delegates
Under Delegates, in the Search for Delegates list, enter the first few letters of the name of the identity you want to add to the members and click the Add button.
Priority
The Priority field allows you to implement a progressive escalation strategy by staggering notifications to different group members after a number of reminders determined by the value of the Priority field.
Example
A value of "1" means that the member will be notified at each reminder, while a value of "3" means that the member will be notified after three reminders.
Click on Save.
Viewing, modifying or removing a delegation group
To view, modify or remove a delegation group:
- In the ASSETS menu, click Delegation Groups.
- In the list, select the delegation group you want to view, modify or remove. Make the required changes or click on the button to remove it.
- Click Save to save your changes.
About managing access rights
This section describes how to manage access rights in RAC/M Identity.
In RAC/M Identity, Access is a generic term that represents an access right, privilege, or permission that allows a user to access an asset or function of an information asset, or to access a physical asset such as a key or access to a door.
To create and manage accesses, you use the ACCESS option in the main menu.
The ACCESS option in the main menu allows you to:
- View, modify, create and delete Access Review Campaigns.
- View, modify and create Roles.
- View, modify and create Role Versions.
- View, modify and create Role Modeling Sessions.
- View, modify, add and remove Task Segregation Rules.
- View, modify, add and remove Business Functions.
About access review campaigns
During an access review, designated reviewers review all accesses and determine if they are still valid or if they should be removed. This way the accesses are certified as valid.
RAC/M Identity offers a great deal of flexibility in defining access review campaigns to allow for a sustainable and efficient process that is well suited to each organization's needs.
Campaigns can be configured to determine the content and level of detail to be reviewed, the reviewers involved and the scope in terms of identities and assets included.
The exact behavior of the campaigns as well as the capabilities of the reviewers are also fully configurable.
Access review campaigns can be scheduled so that they launch automatically on a predetermined cadence, when specific events or conditions occur, or on an ad hoc basis, depending on organizational needs. Different campaign types can be set to run on a yearly, monthly, or weekly basis, or as often as required to meet compliance or risk objectives.
Campaign templates capture how each campaign is defined: what is reviewed, the level of detail, the scope (including which identities and assets are in scope), the intended frequency or timing, and the events or conditions that can trigger a review campaign. This is distinct from the email templates you configure under Notification for campaign reminders and escalations.
In addition, incremental campaigns reduce review efforts by focusing on changes made since the last review.
Note
Access review is also often called recertification, access validation or access verification.
Note
To perform access review after the campaign has been launched, see Access Review Tasks.
For how decisions are applied when reviewers submit, when a campaign is canceled, or when a campaign manager ends a campaign, see Outcomes and applying review decisions.
Outcomes and applying review decisions
When a reviewer finishes their assigned items and submits their review (for example using the Complete button in the Self-Service Portal), RAC/M Identity applies the changes they requested automatically. Application does not wait for the entire campaign to close.
If a campaign is canceled, any reviews that were not completed and submitted are canceled, and no access changes are applied for those reviews.
If the campaign manager ends the campaign (for example using End Campaign) while some reviewers have not yet completed and submitted their work, RAC/M Identity asks whether those incomplete reviews should be treated as completed and taken into account, or canceled and ignored.
Creating or modifying filter rules (filters)
This section describes how to define filter rules using the Rule Editor. The rule editor is used in several places in RAC/M Identity.
The purpose of filter rules is to produce a subset of objects on which processing will be performed by the business logic. The objects selected are determined based on the conditions you define and the content of the attributes evaluated by the conditions.
Filters are built by combining simple rules, each evaluating a single condition using the Boolean operators AND and OR. Rules can be grouped and subgroups combined in the same way. All rules and subgroups within a group or subgroup use the operator associated with the group.
Filtering rules are used in two main cases:
- To filter identities, or
- To filter assets.

Rules
The rules are built with a simple syntax:
[Boolean Operator]
	[Attribute Source] [Attribute] [Equality Operator] [Value] Rule 1
									Rule 2...
- Boolean Operator applies the selected function to all rules and subgroups within a group.
- Attribute Source contains a drop-down list that refers to an attribute source:
Basic Filter offers the attributes of objects:
- People and Identity (identity filters) or
- Asset grouping*, Assets, Accounts, Groups, Items (asset filters)
- Other attributes*, (asset filters).
Extended attributes xxx The list also proposes the extended attributes associated with the objects in the list. Only objects relevant to the filters to be built are displayed in the list.
- Attribute Select the attribute you want to evaluate in the rule.
- Equality Operator select = or != depending on whether the attribute should have a value equal or different to the value determined.
- Value enter the desired value.
Note
The = operator also acts like the contains operator if the attribute contains a list of values.
Example
If the extended identity attribute Certifications contains the values: "HIPAA", "FDA", "NERC", the rule:
Expanded identity attributes Certifications = FDA is true.
To create a filter rule:
Navigate to the page of the object you want to add a filter rule to, such as Access Review Campaigns and Roles. Click on the buttons to add or edit the rules.

Select the equality operator you want to use for the associated group:
- AND : The result is true when all rules and subgroups are true.
- OR : The result is true when any of the rules or subgroups are true.
Click the
 button to add rules to a group.
Click the
 button to add a subgroup of rules.
Click Save. The filter rules are saved to the repository.
Creating an access review campaign
To create an access review campaign:
On the Menu Bar, click ACCESS> Review Campaigns.
At the top right of the page, click the
button.Under Campaign, enter the required information as follows:
Name
Type the name of the campaign.

Description
Type the description and goal of the campaign.
Click Save.
Start Date and End Date
The Start Date displays the date the campaign will be started. The End Date opens a calender in which you select when the campaign will end.
Mode
Select Interactive Campaign to process the campaign online. The Offline Campaign option produces PDF reports that reviewers review. This option is obsolete and will be removed in a future version.
Under Campaign Type and Scope, you can define the nature of the accesses to be reviewed, the level of detail and the scope. Enter the required information as follows:
Campaign Type
Access review campaigns are organized into three themes:
- Identity reviews
- Role content reviews
- Trustee Account Reviews
For Identity Reviews
- All entitlements: Allows you to review all accesses and permissions granted to identities.
- Excess Roles and Entitlements: Allows you to review the roles granted to identities as well as all accesses and permissions granted in addition to those granted by the roles.
- Only excess role entitlements: Allows you to highlight and review accesses and permissions granted to identities in addition to those granted by roles.
- Only segregation of duties conflicts: Allows you to review access and permissions granted to identities that violate segregation of duties rules.
- Only show accounts (entitlements assigned to accounts are excluded): Allows for a simplified review of access accounts held by identities without further detail on groups and permissions.
For Role Content Reviews
- Included roles and entitlements: Allows you to review all access and permissions associated with roles.
For the Trustee Account Reviews
- All entitlements: Allows you to review all access and permissions associated with impersonal accounts.
- Show Accounts Only (rights for these accounts are not displayed): Allows you to perform a simplified review of impersonal accounts without further detail on groups and permissions. This allows trustees to quickly confirm the validity of impersonal accounts.
Trustee accounts
Check this box if you want to include impersonal accounts in an identity review campaign.
Note
This option is only available when Identity Review - All entitlements or Identity Review - Show Accounts Only... is selected.
Additional Filter
Check this box to include inactive identities in an identity review campaign.
Note
This option is only available when Identity Review - All entitlements is selected.
Reviewers
To determine who will review and certify accesses, select one of the following options:
Identity reviewers when you want the reviewers to be those assigned to the identities.
Example
The reviewer can be the line manager or any other relevant identity depending on the hierarchical level and organizational structure.
Asset Reviewers when accesses are to be reviewed by asset reviewer.
This type of campaign is particularly useful for conducting high privilege access review campaigns.
Designated reviewer when you want to specify a specific reviewer for the entire campaign.
A reviewer can be explicitly assigned to each identity by business logic that can apply custom business rules to determine who to assign.
This type of campaign is particularly useful for conducting highly targeted, limited scope access review campaigns.
Reviewers of the entitlements given by the roles (assets, groups or included roles)
Available only for campaigns type Role Content Review, Included roles and entitlements
When this option is selected, the reviewer will be determined according to the elements contained in the role, which will have to be reviewed to determine whether their entitlement should be included in this role. These entitlements will be assigned to an identity when the role is assigned to it.
Identity and Asset Filters
To create an identity filter
Click the Edit button to add rules to filter the identities you want to include in the campaign. For example, you can perform access reviews by department, organization, or any other logical way to determine which identities to review.
Leave the field blank to include all identities.
Click the Delete button to delete the rules.
See also
To create an asset filter
Click the Edit button to add rules to filter the assets you want to include in the campaign. For example, you can perform access reviews for all systems or for a subset of assets.
Leave the field blank to include all assets.
Click the Delete button to delete the rules.
Role campaign scope
Select one of the following options to specify the scope of role reviews.
- Active Roles The campaign will focus on active roles only.
- Latest role versions The campaign will include the latest versions of all roles, whether they are active or not.
- Roles included in role modeling sessions The campaign will include all roles, organized by role modeling session.
- Role versions The campaign will include all roles organized by version.
Advanced Configuration
This section allows you to configure several settings that define how campaigns work as well as the options available to reviewers.

Items without Reviewers
This option allows you to determine how items for which reviewers could not be resolved are handled.
Under Entitlements Without Reviewer, select one of the following options:
- Excluded from Campaign if you want to exclude items for which an approver could not be determined.
- To Review by Campaign Manager if you want items for which a reviewer could not be determined to be reviewed by the Campaign Manager.
Note
These options are not available if the reviewer choice is Designated reviewer.
Approval
These options determine the choices available to reviewers when approving items during access review. Check the appropriate options.
End of Campaign
Check this box if you want reviewers to authenticate when completing their campaign. This option increases the assurance level of the certification process by using explicit authentication as proof of presence.
Allow reassignment of items to be reviewed
These checkboxes determine whether, and to whom, reviewers can transfer review items that they cannot review for any reason. Check the appropriate boxes.
- To the Campaign Manager allows certificants to transfer review items to the Campaign Manager.
- To other reviewers in the campaign allows reviewers to transfer items to other reviewers in the campaign.
- To any identity allows reviewers to transfer items to any identity.
Incremental Campaign
This section allows you to determine which campaigns to use as the baseline for incremental campaigns.
Incremental campaigns are based on campaigns that are similar in three criteria:
- The Campaign Type
- The Approvers
- The campaigns must be Completed.
The campaigns that match these three criteria appear in the list at the bottom of the section.
Use the parameters and the search field to display the desired reference campaigns. In general, it is best to select the most recent campaigns.
Select which campaigns to use by checking the boxes to the left of the campaign names. The incremental campaign will highlight changes that have occurred since the set of campaigns that make up the baseline.
Note
A revision campaign becomes incremental by selecting reference campaigns.
Notifications
Under Notification, you can determine the email template to use as well as the callback and escalation settings.
Template
In the Template field, you can choose the email template to use for reminders. You can use the basic template provided with the solution or you can use a custom template based on your company colors, logos and messages.
Select the desired template from the drop-down list. A preview of the selected template is displayed in the right window.
See also
See the RAC/M Identity - Personalization Guide for more details on how to create or modify email templates.
Email Reminder Interval (days)
In the Email Reminder Interval (Days) field, enter the number of days between sending reminder emails to approvers who have not completed their access reviews.
Escalation
This field is used to determine if reminders will be escalated to the supervisor of approvers who are late in completing their access review. From the list, select:
- No if no escalation is desired;
- Last Notification if an email should also be sent to the supervisors of certificants who have not yet completed their review at the last scheduled reminder;
- Last two notifications if the escalation email should also be sent if the reviewers have not yet completed their access review at the time of the next to last scheduled callback.
Note
The configuration of the reminders (delay and type) is done in the configuration file config.properties (CONFIGURATION> Configuration file).
Click on:
- Save to save the campaign without changing its status.
- Save and Preview to save the campaign and view the campaign's reach and impact
- Save and Start to save and start the campaign.
Important
You cannot make changes to a campaign once it has been launched, except to extend the end date.
We strongly suggest that you use the Save and preview mode in order to view and validate the content that the reviewers will have to review. If everything is in order, you can start the campaign.
Starting and tracking a review campaign
Starting an access review campaign only requires a few steps.
To start the review campaign:
- On the Menu Bar, click ACCESS> Review Campaigns.
- On the Campaigns Selection page, click the campaign you want to start.
- At the bottom of the Review Campaign Details page, click Start.
The campaign starts, its status is In Progress.
On the right of the Campaign section, click the  button to open the description of what was used to create the campaign.

The top of the section displays the time left on the campaign, its status, and percentage of completion.
Statistics about the evolution of the campaign are shown as a dashboard. Next to the dashboard, there is a list of the reports generated for this campaign. These reports are generated when you click the Reports button at the bottom of the page.
The last part of the panel presents one of two possibilities:
Online campaign: A list of reviewers showing their phone number, email, and progress. You can click a reviewers to access his campaign information Details page.
The Actions list allows you to do two things:
- Transfer reviewer's tasks: Opens the dialog box which allows you to choses someone to transfer the tasks to.
- Send reminder email: Instantly sends a reminder email to the reviewer.

The Transfer Reviewer's Task dialog box
- Offline campaign: A list of Excel and PDF documents. Columns show the icon representing the document type, name, and creation date (day/month/year format).
Ending a review campaign manually
By default, an access review campaign is automatically ended when the end date is reached. If you see, however, that all the accesses were reviewed before that date, you can close the campaign manually.
To stop a review campaign:
On the ACCESS menu, click Review Campaigns.
On the Campaigns Selection page, click the campaign you want to stop.
At the bottom of the Review Campaign Details page, click End Campaign.
The campaign status becomes Ended. Managers and resource owners can no longer accept or revoke accesses within that campaign.
If some reviewers have not yet submitted their review when you end the campaign, RAC/M Identity prompts for how to handle those incomplete reviews; see Outcomes and applying review decisions.
For more information on tracking accesses and accounts, refer to Access Review Tasks.
Canceling a review campaign
You can cancel an Access Review Campaign.
To cancel a review campaign:
On the ACCES menu, click Review Campaigns.
On the Campaigns selection page, click the campaign you want to cancel.
At the bottom of the page click Cancel.
The status of the campaign changes to Cancelled. Managers and resource owners can no longer accept or revoke access within this campaign.
Reviews that were not completed and submitted are canceled, and no access changes are applied for those reviews. For details, see Outcomes and applying review decisions.
Viewing or modifying a review campaign
To view or edit a Review Campaign:
- On the ACCES menu, click Review Campaigns.
- On the Campaigns selection page, click on the campaign you want to view or edit.
- Make the required changes
- Click Save to save your changes.
About role modeling
The goal of role modeling is to develop an optimal model, in which the majority of entitlements are granted by the minimum number of roles without increasing the security risk by giving too broad accesses.
Role modeling is essentially done in two complementary ways:
- By mining
- By manual refinement, often also called modeling.
Role mining takes advantage of the analytical functions of the repository to determine common accesses held by multiple individuals, represented by identities. Commonly held accesses become the basis for roles defined by mining.
Manual fine-tuning allows the exact content of roles to be determined to properly define the required access.
There are several schools of thought and just as many role modeling strategies that can be used depending on the human, organizational and technological context of each organization.
RAC/M Identity contains the necessary functions to model roles according to the RBAC model in accordance with the ANSI/INCITS 359-2012 standard. The solution also offers advanced features for automatic role assignment, meeting the objectives of the ABAC model.
See also
Creating a role modeling session
In RAC/M Identity, the Role Modeling Sessions page allows you to experiment with the role model without impacting production until you are ready to deploy the new role.
Important
Only click the Activate button when the role is satisfactory. If you want to make other changes, you will have to start over with another version of that role or create a new one.
To create a role modeling session:
In the ACCESS menu, click on Role Modeling Sessions.
At the top right of the page, click the
button.
On the Role Modeling Sessions page, in the Session text box, type the name of the session.
In the Description text box, type a description of this session.
Click Save.
The new session is created.
The next step is to create roles associated with this session.
See also
Once the roles have been created and refined, you need to complete the assignment of the roles to the session.
Assigning roles to a modeling session
The Roles section allows you to determine which roles are associated with a modeling session. The selected roles can then be activated or deactivated as a whole if desired.
Note
You must have created roles before you can assign them to a modeling session.
To assign roles to the modeling session:
If you are already on the Details page of a modeling session, go directly to step 4.
On the ACCES menu, click Role Modeling Sessions.
Select the desired session from the list.
The Details page for the role modeling session will open.
By default, the Available Roles list displays all available roles in the repository.
You can narrow the list by either displaying the roles associated with a selected modeling session in the Session Role Selection drop-down list or by applying an advanced filter as follows:
- Filter By Select the RAC/M Identity object or associated extended attributes to use as a filter.
- Additional Filter Select the attribute to use
- Value Enter the value of the attribute that matches your search criteria.
Click Apply Filters to perform the search.
Select the role(s) to be assigned in the area on the left.
Use the arrows in the left area to move the desired roles to the right area. You can remove selected roles from the right area by using the arrows on the right
Click on Save to save the session.
You can also remove a selected role by clicking the button.
Creating a new role by mining
To create a new role by mining
If you have just created a role modeling session, go directly to step 4.
Otherwise,
On the menu bar, click ACCES> Role Modeling Sessions.
Select the modeling session to which you want to add a role.
To the right of the Role Mining section, click the
button.Click on the New Role button.

In the Role Name text box, enter the name of the role.
In the Entitlement Inclusion Threshold field, enter a percentage. This percentage determines the percentage of identities, from the selected population, that must have access in order to be included in the role.
Example
You want to create a role for cardiologists working at St-Gabriel hospital. Several cardiologists use the PCS application and you set the Inclusion threshold to 90.
When you generate the session, if 90% or more of the cardiologists working at this hospital share this access, then the PCS access will be included in the role. If less than 90% of the cardiologists at St-Gabriel have this access it will not be included in the role.
Tip
Choose a very low value (e.g. 1%) to include all (or the majority) of the accesses held by the selected identities.
Choose a high value (e.g. 99%) to include only the accesses held by all the identities.
A value of 60% to 80% is a good starting point.
Caution
Pay particular attention to the results obtained if the number of identities analyzed is very small. For example, if only 3 identities meet the filtering criteria and the inclusion threshold is set to 80, only the accesses held by all the identities will be included.
Check the Include Inactive Accounts box if you want the role drill to consider inactive accounts and associated access.
Scope
You need to define which identities and assets to mine the role.
Click the Identity hyperlink or the corresponding Edit button to edit the identity filter.
Click the Assets hyperlink or the corresponding Edit button to edit the asset filter.
Click on the Clear button to clear the filters.
For the complete procedure on how to set filters, see Creating or Modifying Filter Rules.
Click the Generate button to generate the role.
RAC/M Identity scans its repository and builds the role by mining all identities and assets that match the selected filters and settings.

Click the Click here to edit this role link located in the green band at the top of the screen to complete the role definition.
This action opens the Details page which allows you to complete, edit and revise the newly created role.
The role is created and added to the modeling session. You can continue to refine the role until it is satisfactory.
For more information on editing and revising roles, see Editing a Role.
Creating multiple roles by mining
This button allows you to generate multiple roles according to specific criteria. For example, you can automatically drill down to all the roles of a department, a division, an organization or even the entire company.
In general, the best results are obtained by limiting the mining of multiple roles to relatively small, homogeneous entities.
Example
You can drill down and automatically generate all the roles in a department. For example, in a hospital you could mine all roles in the cardiology department at once.
To generate several roles at once:
If you have just created a role modeling session, go directly to step 4.
On the ACCES menu, click Role Modeling Sessions.
Select the modeling session to which you want to add roles.
To the right of the Role Mining section, click the
button.Click on the Multiple Roles button.

Enter the information in the fields as follows:
In the Role Name Prefix text box, enter a prefix that will be added to all role names that are created.
This is used to identify them on the Role Versions page.
Note
Do not add spaces or punctuation characters after the prefix. The "-" characters will be inserted automatically between the prefix and the role name derived from the value of the variable attributes.
In the Entitlement inclusion threshold field, enter a percentage. This percentage determines the percentage of identities, from the selected population, that must have a specific entitlement in order for it to be included in the role.
See Creating a new role by mining for more details on the Entitlement inclusion threshold.
Check the Include Inactive Accounts box if you want the role mining to consider inactive accounts and associated accesses.
Scope
In the Criteria: Filters dialog box, in the lists, select the filter type and validate or edit the rules.
Under Variable Attributes for Multiple Role Creation, next to Identity, click the Edit button.
Enter the name of the attribute whose values will be listed to create the set of roles.
Example
If in the cardiology department of St-Gabriel hospital, there are three different titles such as "Cardiologist", "Attendant" and "Generalist".
The identity filter could be:
Organization = St-Gabriel
Department = Cardiology
And the variable attribute: Title
This would generate the following roles:
- St-Gabriel - Cardiology - Cardiologist
- St-Gabriel - Cardiology - Attendant
- St-Gabriel - Cardiology - Generalist
For the complete procedure on how to define filters, see Creating or modifying filter rules.
When the selection is complete, click Generate.
RAC/M Identity will browse its repository and build roles by mining the identities and assets that match the selected filters and settings.

Click on the Click here to reach the role list panel link located in the green band at the top of the screen to complete the role definition.
This action opens the page that allows you to complete, edit and review the newly created roles.
The roles are created and added to the modeling session. You can continue to refine the roles until they are satisfactory.
For more information on editing and reviewing roles, see Editing a Role.
Creating an empty role
This button allows you to add an empty role to a role modeling session. An "empty" role is essentially a shell role that you can add to later. The role will be created with just its name.
This approach is useful for creating roles that will be modeled manually, without mining.
To add an empty role:
If you have just created a role modeling session, go directly to step 4.
On the menu bar, click ACCES> Role Modeling Sessions.
Select the modeling session to which you want to add roles.
To the right of the Role mining section, click the
button.Click on the Empty Role button. In the Role Name text box, type the name of the role.
Click on Generate.
Click the Click here to edit this role link located in the green band at the top of the screen to complete the role definition.
This action opens the page that allows you to complete, edit and revise the newly created role.
For more information on editing and revising roles, see Editing a Role.
Creating a new role from a template
You can create a new role from a template role.
Note
The name of the new role will be created from the name of the template role followed by a unique number. You can rename the role and adjust the description and all parameters as you wish.
To duplicate a role:
Click on ACCES> Role Versions.
In the list, select the role you want to duplicate
Click on the Clone Role button.
The Role Edit page will open on the Details tab.
Adjust the settings for the new role and click Save at the bottom of the page.
A new role will be created. The name will be constructed from the name of the sample role and a unique, automatically generated number to distinguish it.
See Editing a role for more details.
Creating a new role version by mining
You can mine an existing role with different parameters, which will automatically create a new version of the role and add it to the modeling session.
To create a new version by mining:
If you have just created a role modeling session, go directly to step 4.
On the ACCES menu, click Role Modeling Sessions.
Select the desired session from the list.
The Role Modeling page will open on the Details tab.
To the right of the Role Mining section, click the
button.Click on Existing Role.
Select a role from the Select Role list.
You can use the Starts with and End with checkboxes to refine the search.
In the Entitlement inclusion treshold field, enter a percentage. This percentage determines the percentage of identities, from the selected population, that must have a specific entitlement in order for it to be included in the role.
See Creating a new role by mining for more details on the Inclusion threshold.
Check one of the buttons to determine how directly assigned members will be assigned.
Check Assign members directly based on mining criteria to directly assign identities that meet the asset filtering criteria.
Note
This option uses the existing role assignment rule to identify the identities to directly assign to the role, i.e. once assigned they will remain so unless manually removed.
Check Do not assign any members directly if no directly assigned member should be automatically assigned.
Check Keep existing directly assigned members so that the existing directly assigned members of the role are preserved.
Check the Include Inactive Accounts box if you want the role drill down to take into account inactive accounts and associated access.
Scope
In the Criteria: Filters dialog box, in the lists, select the filter type and validate or edit the rules.
For the complete procedure on how to define filters, see Creating or modifying filter rules.
Under Variable Attributes for Multiple Role Creation, next to Identity, click the Edit button.
For the complete procedure on how to define filters, see Creating or Modifying Filter Rules.
When the selection is complete, click Generate.

RAC/M Identity crawls its repository and builds roles by mining identities and assets that match the selected filters and parameters.
Click the Click here to edit this role link located in the green band at the top of the screen to complete the role definition.
This action opens the Details page which allows you to complete, edit and review newly created roles.
The roles are created and added to the modeling session. You can continue to refine the roles until they are satisfactory.
For more information on editing and revising roles, see Editing a Role version.
Creating a new role version from a template
You can create a new version of a role independently of a modeling session from an existing role version.
To create a new version from a template:
On the ACCES menu, click Roles or Role Versions.
Select the role version to duplicate.
The role editing page will open on the Details tab.Click the Clone Role Version button at the bottom of the page.
The role edit page will open on the Details tab.
Adjust the parameters for the new role version and click Save at the bottom of the page.
A new role version will be created and added to the role. A unique number to distinguish it will be automatically generated and associated with the version.
See Editing a Role for more details.
Editing a role version
You can make changes to a role at any time either to refine a role version or to evolve it to reflect changes in your organization.
See also
To edit a role version:
On the ACCES menu, click Roles or Role Versions.
Select the role version to edit or revise.The role editing page will open on the Details tab.

Note
If the role version is active, very few fields can be modified.
Besides the name and description, only directly assigned members and the availability of the role in the self-service portal can be changed.
To change other fields such as assignment rules, you must first disable the role version.
Caution
To modify a role version without affecting the operation, you have to create another role version.
See Creating a new role version for details.
Make the required changes as follows:
Name
Adjust the role name if required.
Description
Adjust the description of the role if required.
Role version
The list displays the different versions of this role. You can select a new version of the role if desired.
The status of the selected version as well as the last activation and deactivation date and time are displayed.
Description of changes in this version
This field is automatically initialized with the content of the Description field. It can be edited as desired to reflect changes that will be made to the role version.
Role Modeling Sessions
Displays the role modeling sessions that include this role version. You can click a modeling session to open it.
Owner
Select a delegation group that will be responsible for the role. If required, members of the designated group will receive approval requests for role assigment and will be responsible for performing role content review campaigns.
Assignment Criteria
If the role version is Inactive, you can click the Edit button to edit the filter rules used to assign the role.
Note
These rules are used to automatically assign the role to identities that match the criteria.
These rules are initialized to the value of the identity filter rules used during mining if the role was mined.
Role available in self-service
Check one of the two boxes below to set the availability of this role in the self-service portal request pages:
- Can be requested in an access request
- Can be added to a role modification request
Approvers
It is possible to configure approvals for identity access requests and role modification requests.
For each of the following approval levels, indicate if the level is required and complete the required information, if applicable.
Identity Approver Approval Required
For access requests, check this box if the manager of the person requesting access must approve the assignment of this role.
For role requests, check this box if the manager of the directly modified members in the request must approve the change of identity within this role.
In both cases, the Approver Group defined at the identity level will be used.
Role Owner Approval Required
Check this box if the role owner, represented by its delegation group, must approve the role assignment.
Special Approval
Select the checkbox if a third level of approval is required to assign this role.
If a delegation group other than the identity or role owner group must approve the request, select it from the drop-down list.
Note
Delegation groups must be created beforehand. See Create a delegation group
Groups
If the role version is Inactive, this section allows you to manually add or remove groups from the role. If the version is Active you will only be able to view the groups included in the role.
The groups included in this version of the role are displayed in the list on the right. You can remove them using the buttons on the right.
You can open the details page of a selected group by clicking on the
 .
.
To add groups to the role:
Select an asset from the Asset drop-down list. The groups associated with that asset will appear in the Available list.
You can also search for groups in the existing set of groups by using the Search for Group field.Select one or more groups from the Available list.
Use the
 arrow to add them to the role.
You can use the
to open the group.Access rights
If the role version is Inactive, this section allows you to manually add or remove access rights to the role. If the version is Active you will only be able to view the access rights included in the role.
Access rights are permissions that can be associated with items associated with assets that are different from groups.
Example
Permissions associated with directories and files on *NIX systems are represented by access rights.

To add access rights to the role:
Select an asset from the Asset drop-down list. The access rights associated with that asset will display in the Available list.
You can also search for access rights in the existing set of access rights by using the Search for Access field. Select one or more access rights from the Available list. Use the
arrow to add them to the role. You can use the to open the access right.Directly assigned members
If you are using a hybrid role template (see - About Roles), you can add members to the role manually, regardless of the assignment rules that apply to automatically assigned members.
The identities to which the role has been assigned are displayed in the list on the right. You can remove them using the buttons on the right.
You can open the details page of a selected identity by clicking on the
.
To add members directly:
In the Search for Identity text box, type a few letters of the name of the identity you are looking for. In the list of available identities, select the desired identity and click the arrow to move it to the Selected list.
Automatically assigned members
This section displays all identities that are assigned the role automatically according to the assignment rules you have defined.

If the role version is active, you can click on one of the members to display the revision tab to view the role assignment for the selected member.
Note
If the role version is not active, the revision tab will not contain any information.

Include Roles
This section allows you to include roles to the current role. Directly and automatically assigned members of the current role will also receive the groups and access rights associated with the included roles.
See About Group and Role Hierarchies for details.
The included roles are displayed in the list on the right. You can remove them using the buttons on the right.
You can open the details page of a selected role by clicking on the
.
To add included roles:
In the Role Search text box, type a few letters of the name of the role you are looking for. From the list of available roles, select the desired role and click the arrow to move it to the Selected list.
Click Save to save the changes to the role.
Reviewing a role version
You can review the settings of an active role version as well as the assignment of the role to directly and automatically assigned members.
To review a role version
If you are already editing a role, go directly to step 3.
On the ACCES menu, click Roles or Role Versions.
Select the role version you want to review.
The role editing page will open on the Details tab.
Click on the Revision tab.
Note
If the role version is not active, the revision tab will not contain any information.
Role version
The list displays the different versions of this role. Select the version of the role to be reviewed.
The Role Information section displays detailed information about this role version.
Membership
The Membership section displays the effect of the role on its members.
You can view, for each member, the groups and access rights they hold in relation to the role's content. Accesses held in agreement with the role are displayed in green, accesses held in excess of the role are displayed in red while accesses that are part of the role but not held by the member are displayed in blue.
Select a member from the drop-down list to view their accesses.
The Filter Groups with Role Criteria checkbox allows you to filter the assets scanned to prevent accesses associated with assets that do not match the role from appearing in the lists as excess accesses.
The box is checked by default and is the recommended choice.
Example
An identity has access to office applications and business applications whose accesses are managed by different roles. If we review the office role and the box is not checked, the accesses related to the business applications will appear as excess accesses in red.
At the end of the review, if the role configuration is satisfactory, go back to the Details tab and click on the Enable button to make the role effective.
See also
Note
Make sure the last changes were saved by clicking the Save button.
Activating one or more role versions
Specific versions of roles can be activated individually or in combination.
To activate a single role version:
- On the ACCES menu, click Roles or Role Versions.
Select the role version you want to activate.
The Role Edit page will open on the Details tab. - Click the Activate button at the bottom of the page. A window will open for the activation options.
- Choose whether provisioning should be performed during activation or not.
- Click the Activate button at the bottom of the window.
To activate multiple role versions:
On the ACCES menu, click Role Modeling Sessions. Select the desired session from the list.
The Role Modeling page will open on the Details tab.In the Roles section, ensure that all roles you want to activate are in the Selected Roles list.
At the top of the page, click the Enable button.
Note
If all the roles you want to activate are not in the list of selected roles, you can add them either by creating the missing roles or by adding existing roles.
See also Assigning Roles to a Modeling Session for details.
Deleting a role version
To delete a role version:
Click ACCESS> Role Versions.
From the list, select the role version you want to delete
Click on the
button.Note
Role versions must be inactive to be deleted. Active role versions cannot be deleted.
About segregation of duties
Segregation Of Suty (SOD) rules are determined by organizational policies. RAC/M Identity allows you to define and enforce these rules.
Task segregation rules are validated in several circumstances. The indicator business logic periodically analyzes the repository for anomalies and high risk situations, including SOD rule violations. In this case, violations are reported by indicators and buttons are used to navigate directly to the problematic situations in order to resolve them quickly.
SOD rules are also validated during access review campaigns. Violations can be included in access review campaigns. Violations can also be documented in standard and customized reports.
As a preventive measure, SOD rules are also validated during access requests issued from the self-service portal. If a request contains entitlements that would cause a violation, the request is automatically routed to a designated stakeholder, or their delegation group, to resolve the conflict.
In this case, the request can be conditionally ou unconditionnaly accepted, rejected or modified as appropriate.
RAC/M Identity allows you to define the nature of task segregation rules by defining exclusion rules on five types of objects and attributes:
- Asset: For example, the organization does not allow anyone to have an account in the order entry application and the order fulfillment application.
- Group: For example, a member of an Active Directory group representing external contractors cannot be a member of a group representing managers.
- Role: For example, a member of the Manager role must not also have the Union Representative role.
- Organizational Structure: For example, an identity assigned to the Accounts Receivable department must not also be assigned to the Audit department.
- Title: For example, an identity with the title of Nurse cannot also hold the title of Cardiologist.
Note
RAC/M Identity analyzes the accesses held by all identities associated with a person to detect violations of separation of duties rules.
That is, a person associated with multiple identities cannot hold accesses that would violate separation of duties rules, even if the conflicting accesses are assigned to separate identities.
This section presents the steps for creating one or more segregation of duties rules as well as viewing and editing them.
Creating a segregation of duty rule
To create a Segregation Of Duty rule:
On the ACCES menu, click Task Segregation. The Task Segregation page opens with a list of existing rules related to assets.

Select the type of rule to create by clicking on the desired tab (Asset, Group, Role, Organizational Structure or Title).
Click on the Definition tab.
At the top right of the page, click on the
button. In the Name text box, enter the name of the rule. In the Description text box, enter a description of this rule. In the Approval Group text box, double-click to open the list or enter the name of a delegation group. This is the delegation group that will be responsible for reviewing this access segregation rule. In the two Mutually Excluded Items boxes (the excluded item depends on the tab selected in step 2.), double-click to open the list or type in the name of the items that should be mutually excluded.Click Save.
The rule is now available on the Task Segregation selection page, in the list of the selected category tab (Role tab in our example).

Segregation of Duties selection page, list of rules associated with roles
To edit the rule configuration, in the list, click the rule to open its Details page.
Editing a segregation of duty rule
To modify a Segregation Of Duty rule
In the ACCESS menu, click on Segregation of Duties. The Segregation of Duties page opens with a list of rules related to assets.
Select the type of rule you want to modify by clicking on the desired tab (Asset, Group, Role, Organizational Structure or Title).
Click on the desired rule to open its details page. Make the desired changes
Click Save at the bottom of the page to save your changes.
Generating multiple segregation of duty rules
To generate multiple Segregation Of Duty Rules
On the Segregation of Duties details page, click the Generation tab.
Click the tab of the category for which you want to create rules (see Step 3. of Creating a Segregation of Duty Rule.

Segregation of Duty details page, multiple rule generation
In the Role list (in our example), click on the arrow or type in the name to open the list, and select the role from which other segregation rules will be created.
In the Name text box, type the name that will be used as a prefix for all rules.
In the Description text box, enter the reason for these rules.
In the Reviewer text box, enter the name of the delegation group responsible for reviewing the rules.
Under Exclude, in the Roles to Exclude list (in our example), enter the name or click on the magnifying glass to open the list and select the roles that should be excluded from the role you selected as the "Item to Isolate".
In the list on the left, select the roles and click on the arrow to move them to the list on the right.

Segregation of Duty details page, selection of excluded items
Click Generate.
The rules are available in the Segregation of Duties Details page, in the list of the selected category tab (Role tab in our example).

The Segregation of Duty selection page, list of rules related to roles
To modify the configuration of a rule, in the list, click on the rule to open it.
Creating a business function
An business function is a simple mechanism to reflect additional or complementary responsibilities to those corresponding to a person's roles in the company. For example, an individual may be assigned the responsibilities of "Team Leader - Development" for a specific or indefinite period of time. This chapter presents the procedure for creating an business function.
To create a business function:
On the ACCESS menu, click Business Functions.
At the top right of the page, click the
button.On the Business Functions Details page, in the Name text box, type the name of the identity.

In the Description text box, type a description of the function.
In the External Object ID text box, enter a unique identifier for the new additional function. This identifier is a technical name that must be unique and permanent.
Click Save
The additional function can be added to an identity and used by business logic to assign roles dynamically or as a filter parameter.

About the organization
Although it is preferable to build the organizational structure automatically from authoritative sources and processing sequences, you can maintain it manually.
This section describes how to define your organization’s structure by describing departments and divisions, the person responsible for each level, and other complementary information such as location and cost centers. It focuses on the ORGANIZATION > Structure screen; other entries under ORGANIZATION, if available in your deployment, are covered in their respective topics.
RAC/M Identity provides three structural element types, and you can add multiple levels of organizations and departments to reflect your organization. The structural elements are:
- Enterprise: This element sits at the top of the hierarchy. It represents the highest level of your organization as a whole.
- Organization: A sub-level under the enterprise, for example divisions within a company, campuses of a university, or hospitals within a health network.
- Department: A sub-level under an organization, for example departments within a division, faculties, or clinical units. In the example below, it corresponds to hospital departments or units.
See also
- About the Organizational Structure in RAC/M Identity concepts
Creating the organizational structure
On the ORGANIZATION menu, click Structure. The organizational structure appears in the section on the left.
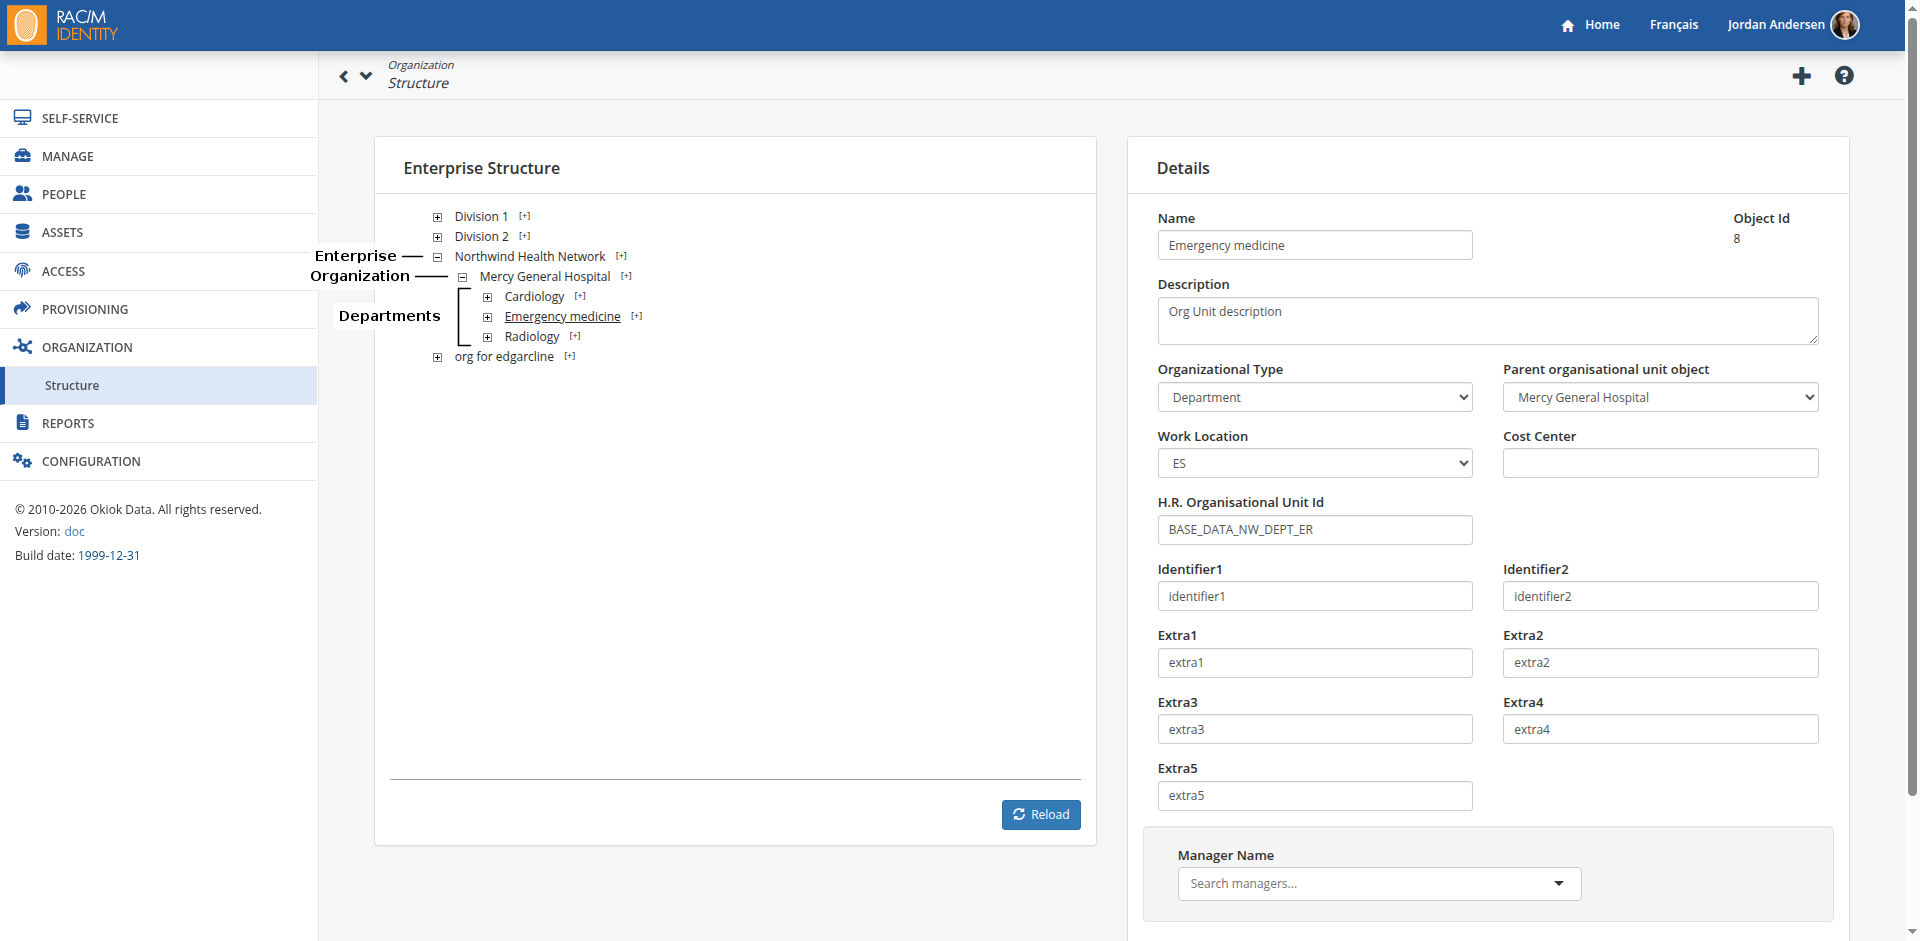
When you open the page, only the enterprise is shown. To expand the tree, click the plus sign to the left of each structural element. When you select an element, its details appear on the right.
Note
Although you can edit information directly on this page, changes may be overwritten when the structure is updated through a sequence.
Click the + to the right of existing elements to add further elements.
The details page opens. Enter the available information in the appropriate fields.
Note
Although only Name, Organization type, and Organizational unit name are required, you should complete the other fields whenever data is available. The more accurate and complete the structure, the more useful it is for business logic and automation.
For example, Manager name is commonly used to route the first level of approval for requests. It is strongly recommended to populate this field, ideally from automated imports so the RAC/M Identity repository stays authoritative.
Name
Enter the name of the entity to add.
Description
Enter a description for the entity.
Organization type
Select the type of entity to add from the drop-down list. The new entity is placed in the structure according to the selected type.
Work location
Select the work location where the new entity is based. The list is built dynamically from data imported into the repository.
Organizational unit name
Enter a unique name that identifies this organizational unit.
Identifier and Extra
These free-form fields can hold information relevant to your IGA processes. Business logic and filters can use them to drive automated processing.
Manager name
Select the manager of the new entity from the drop-down list. The list is built dynamically from data imported into the repository.
Last modified date
This read-only field shows the last modification date for the entity.
Click Save to store the new entity.
Modifying the organizational structure
On the ORGANIZATION menu, click Structure. The organizational structure appears in the section on the left.
Select the item to edit. The details page appears on the right.
Apply the changes you need.
When editing, the Parent organizational unit field is shown. It indicates the parent unit of the item being edited.
You can move the item under another entity by selecting it from the drop-down list.
Click Save to store your changes.
About provisioning
This section describes how to track the progress of provisionning workflows, tasks, and queries resulting from requests from the self-service portal or other sources.
The various screens allow you to view the status of requests and sub-requests, diagnose potential problems and remedy them if necessary.
You can view the status of queries by:
- Tasks, to view approval or manual create/remove/edit tasks
- Identity Requests, to view access requests made through the self-service portal
- Identities, to view requests for identities
- Roles, to view requests for roles
- Accounts, to view requests for accounts
- Groups, to view requests to add or remove groups
- Written requests, to view requests made in free fields in the self-service portal
- Role Requests, to view role requests made through the self-service portal
In each screen, you can click on the links to navigate the chain of related queries and subqueries.
All screens display similar information, but the fields displayed vary depending on the nature of the list.
| Column | Description |
|---|---|
| Request | Automatically Generated Query Number |
| Identity | Identity associated with the query |
| Role | Role associated with the query |
| Asset | Asset that is the subject of the query |
| Account | Account associated with the query |
| Group | Group to be added or removed by the query |
| Type | Type of query or subquery Add, Remove, Change |
| Status | Query status Pending, Provisioned, Completed, Completed (closed) |
| Comment | Detailed information about the request |
| Description | Additional information if available |
| Date request created | Date request created |
| Approval | Approval Status Pending, Approved, Rejected |
Note
For access requests, the status of the requests will change from Completed to Completed (closed) once the requested changes are detected in the target systems, which confirms that the request is completed correctly.
The possible values of the query types, states and approval states may change over time. The values shown in the table are for informational purposes only.
To view the progress of current queries:
In the PROVISIONNING menu, click on the type of requests you want to view. The list of current queries is displayed.

You can filter the list of queries to show only queries with errors for example, or filter on any other keyword using the search box on the right of the screen.
Click on the hyperlinks to navigate through the chain of queries and subqueries and open the details page.

About reports
This section describes how to generate standard, custom, and anomaly reports.
Note
For access review campaigns, the reports are generated within the activity, refer to Starting and Tracking a Review Campaign.
In addition, you can use data visualization tools such as Tableau, PowerBI and others to generate reports and produce customized dashboards and indicators.
Generating standard reports
RAC/M Identity includes more than 50 standard reports covering dormant accounts, orphaned accounts, high-risk situations, role coverage, entitlement assignments, joiners, leavers, and other key governance metrics. These reports provide the supporting artefacts commonly required for regulatory and compliance frameworks such as PCI, ISO 27001, SOC 2, and HIPAA. Reports are generated in PDF and XLS format and support configurable filtering and scoping parameters.
To generate standard reports:
In the REPORTS menu, click Reports.
In the Reports list, select the type of report you want to generate. A description of the report appears in the Description text box. Depending on your choice of report, different text boxes and lists become available.

Click Generate Report.
The report appears as a PDF and an Excel file in the list on the right. If the list is long, type a key word in the List Filter text box.

Click the PDF file to view it in your browser or click the Excel file to download it to your workstation.
Generating custom reports
If none of the standard reports meet your needs, you can create custom reports using the JasperReport format via JasperSoft Studio.
Important
For your custom report to appear in the RAC/M interface, they must be created using the JasperReport format.
To create custom reports, you must have a basic knowledge of SQL and query syntax. You must also have access to the RAC/M repository and it is strongly recommended that you use an SQL script generator to test your queries before using them in the query editor of JasperSoft Studio.
RAC/M Identity also allows you to add fields to the Reports page. These are used as additional criteria when generating the custom report. These fields can be:
- A drop-down list: A drop-down list is created if the field gets its data either from the
Application_IDcolumn or theApplication_Group_IDcolumn. - A text box: A text box is created if the field gets its data from any other column.
For a field to appear in the RAC/M interface, make sure that Use as prompt is selected in the field parameters.
See Also
For a step-by-step guide on setting up JasperSoft Studio and creating custom reports, see Creating Custom Reports with JasperSoft Studio.
To generate a custom report:
On the REPORTS menu, click Reports.
In the Reports list, select Custom Report.
In the Custom Report list, select your custom report. Depending on your choice of report, different text boxes and lists become available.
Click Generate Report.
The report appears as a PDF and an Excel file in the list on the right. If the list is long, type a key word in the List Filter text box.
Click the PDF file to view it in your browser or click the Excel file to download it to your workstation.
Generating anomaly reports
The list of standard reports includes reports that can be used to examine anomalies. The following are examples of reports to use to find anomalies:
- Accounts Associated with an Identity with Different Name
- Accounts of Identities Terminated between Two Dates
- Identities Associated with a Person with Different Date of Birth
- Identities Associated with a Person with Different Name
- Identities Logged after Termination Date
- Identities with Multiple Accounts in a Given Asset
- Identities with Supervisor in Different Departments
- Identities without Supervisor
- Identity Discrepancies
- Identity Terminated between Two Dates
- Etc.
These reports are generated the same way as standard reports (see Generating Standard Reports).
About RAC/M Identity configuration
RAC/M Identity is a highly flexible IGA solution, designed to adapt to organizational and technological environments of all sizes without programming, solely through configuration. This is the Low-Code / No-Code approach: automated processing is built by assembling configurable components, rather than by developing code or scripts.
This section explains how to configure the business logic of RAC/M Identity to automate all identity and access management processes.
Important
Configuration operations modify the business logic of your IGA service. They must be performed by architects, integrators or technical experts who master RAC/M Identity and your environment.
Incorrect configuration could result in non-compliant operation of the IGA service.
Global configurations page
Under Configuration → Global configurations, installation-wide settings are grouped in expandable panels. Locate the section you need, adjust values according to your permissions, then save pending changes from the page action.

Tip
Access to this page is controlled by the dedicated Global configurations permission in RAC/M profiles (see Authorization).
TIP
Unless a setting explicitly says that a restart is required, saved values take effect immediately (hot reload). Where the page indicates that a restart is needed, follow it and apply changes in line with your organization’s deployment and verification practices when applicable.
About business logic
The business logic of RAC/M Identity enables all processing related to identity and access management.
It is based on three hierarchical levels:
Modules
Smallest unit of processing. Each module implements a primitive chosen from a catalog of dozens of specialized operations (analysis, validation, transformation, import/export, notifications, etc.). No code required.
Blocks
Coherent set of modules executing a complex processing (e.g.: import and reconcile data from a source).
Sequences
Orchestration of several blocks. They can be executed automatically (scheduled time) or manually.
Certain families of modules are specialized, for example:
- File Managers
- Formatters
- Collectors
- Extractors
This architecture allows to easily compose complex processes while maintaining a clear and structured reading of the logic.
Simplified integration of identity sources and target systems
To achieve quick results and simplify business logic configuration, OKIOK provides a set of predefined elements, including modules, blocks and fully functional sequences that only require minimal parameterization to be used in your technological environment.
These elements make it possible to perform the various processing tasks related to identity and access management, such as:
- preparing the repository
- importing identities
- importing access data
- resolving roles
- generating automated and manual access requests
- executing access requests
- sending alerts and notification emails
- analyzing the repository to detect risky situations or anomalies
- several other specialized processing tasks
In addition, OKIOK provides several examples of processing sequences that are commonly used by customers and that can serve as a quick starting point.
You can view the modules, blocks and sequences included with RAC/M Identity to better understand how to configure modules and tailor blocks and sequences.
Refer to the Reference Documention for additional details.
One-click integration
To accelerate integration projects, RAC/M Identity offers block and sequence templates that already include all the business logic required to perform complex operations related to identity and access management processes.
These templates include the logic necessary to:
- establish a connection with a specific asset (connector)
- perform data import, validation and enrichment
- perform automated provisioning (creation, activation, modification, deactivation and removal of accounts and accesses)
Using templates allows you to quickly integrate common identity sources or target systems, with minimal effort and without repetitive configuration.
The resulting business logic can also be customized to align with policies, standards and practices by adjusting policies and strategies or by adding or removing processing elements as needed.
To this end, the CONFIGURATION function in the main menu allows you to:
- View and edit RAC/M Identity configuration files and scripts
- Create, modify, duplicate and delete modules (File Managers, Formatters, Collectors, Extractors, Modules)
- Create, modify, duplicate and delete Blocks and Sequences
- Create, modify and delete Mappings
- Create, modify and delete manual provisioning strategies
- View and manage registered ICF server instances (Configuration → Target system servers)
- Create, modify and delete ICF Connectors
- Create, modify and delete Policies (account, username and password)
- Validate email notifications
Editing a configuration file or script
To view or edit a configuration file or script:
In the CONFIGURATION menu, click on Configuration Files or on Script Files.
In the list, select the file that you want to view or edit. You can navigate to the beginning or end of the file using the buttons at the top right.
You can view the file in raw format by clicking on the button
Make the required changes to the file.
Click on Save to save your changes.
Note
You must have the required permissions in your RAC/M Identity profile to be able to edit a configuration file or script
See Permission Reference of RAC/M Identity Profiles for more information.
Important
If you modify a configuration file, the RAC/M Identity service must be restarted for your changes to take effect.
Configuring a file manager
File managers are used to transfer files between RAC/M Identity and servers, such as FTP sites. They can use different transfer protocols, such as FTPS, SFTP or SCP as well as different authentication mechanisms.
They can also be used to manipulate files located on the local file system of your RAC/M Identity instance.
To create a File Manager:
In the CONFIGURATION menu, click on File Managers. The File Managers page opens.

At the top right of the page, click on the button
.Under Details, in the Name text box, enter the name of this new file manager.
The name must be distinctive as it will appear in a list of file managers.
In the Source File text box, enter the path and name of the source file. Use the wildcard character "*" to designate multiple files.
In the Destination File text box, enter the path in which the destination files will be dropped. These will bear the same names as the source files.
Note
The path of CSV source and result files must be relative to the RAC/M Identity working directory, as defined by the path.source.csv property in the config.properties file.
In the Error File text box, enter the path of the error file. Leave blank to use the default error file.
In the Description text box, enter a sufficiently detailed description of the new file manager.
Under Behavior on error click on the desired option:
- Stop sequence to stop the processing sequence
- Skip remaining operations... to stop processing the current block and continue with the next block
- Continue with the next operation to continue processing
Under Primitive, in the Name dropdown list, select the Primitive that you want to use.
In general, primitives whose name contains the word External are used to transfer files between an external server and your RAC/M Identity instance, while primitives whose name contains the word Local are used to manipulate files on the local file system of your RAC/M Identity instance.
The other primitives are used to perform specific processing, see the primitives description or consult the Technical Reference Guide for more details.
If you have selected a primitive whose name contains the word External, such as ModuleExternalSCPGet, ModuleExternalSCPPut, ModuleExternalSFTPMove, or ModuleExternalSFTPMoveArchive, you must complete the information under Connection.
Field Description Host Enter the IP address or name of the server host. Port Enter the port that you must use to connect to the server. Account Enter the username used to connect to the server. Password Enter the password used to connect to the server.
The password will be automatically encrypted as soon as you save the changes.Private Key Enter the private key used by the server. You will have generated this key using a third-party application. Public Key Enter the public key used to connect to the server. You will have generated this key using a third-party application. Click the Test button to test the connection.
If you have selected a primitive such as ModuleIdentityEventHandler or ModuleProfileEventHandler, you must complete the information under Event Tables.
Field Description Target Event Table Select the RAC/M table into which data is sent. Source Event Table Select the import table from which data is obtained. Under DATA MAPPING, enter in which fields and how the information must be deposited if required.
Field Description Target Table Name of the repository table in which data will be deposited.
You can import data into different repository tables. For more information on RAC/M Identity database tables, consult Repository objects and tablesCriteria In the list, select the asset or identity source to fill in based on the selected target table.
If you select APPLICATION_ACCOUNT, the Criteria dropdown list will propose assets while if you select IDENTIFICATION the dropdown will propose identity sources.Target Table Column This list proposes the column headers of the target table.
You can add a column with the same name by clicking on the button. This allows you to concatenate several columns in the source file. For example, the RAC/M column HR_Department_ID could take its value from the Hospital and Department columns in the source file, which you would separate using a hyphen.Source Data Type In this list, select the data type that will feed the column.
Constant : The value will be that specified in the Constant text box.
Date : The value will be the date obtained from the source, converted according to the format indicated in the Format text box (ex: yyyy-mm-dd HH:MM:ss). Make sure to match date formats.
Cur_User : The mapping will use the user that you specify in the Constant/Value text box.
Column : The value is obtained directly from the Source Column. In our example, for Account_Name, select Column.
Column_with_Default : The mapping will use the content directly from the source (column, file or connector). If no value is present in the source, a default value is used from the Constant/Value parameter.
Cur_Time : The value will be the date and time at the time of execution.
File_Name : The mapping will use the source file name as value (applicable only for modules that process files).
COLUMN_HASHED: The value obtained from the source is transformed by hashing to obtain an anonymized value.
COLUMN_MASK : A value is obtained from the source according to the Target System Attribute parameter and then masked using a regular expression specified in the FORMAT parameter.Source In the list, select the name of the source table column from which you want to extract data.
If you select a column with the suffix "_ID", the icon appears, allowing you to browse the RAC/M repository and find the precise column that you want to use. When you click on the icon, the target table opens in a dialog box. Click on a column to select it. To navigate to a secondary table, click on this same icon next to the "_ID" column that refers to the secondary table.
Constant If you have selected Constant or Column_With_Default as the source data type, enter the value to use in this field. Format If the source type uses a specific format, enter it in this field; otherwise, leave the field empty.
For example, a date can use the format yyyy-mm-dd.
The format can also contain regular expressions, to specify a mask to apply to values for example.
Example 1 :
Format: ^d{7}[a-zA-Z0-9]
For source value: 00430022887
We obtain the result: *******2887
Example 2 :
Format: [a-zA-Z0-9].{3}$
For source value: 00430022887
We obtain the result: 0040002*****Unique Check this box if the value must be unique. At the bottom of the page, click on the Save button.
The REFERENCED BY section displays the list of sequences and blocks in which this file manager is used. The list is empty when the manager is created.
Configuring a formatter
Formatters are used to process data in flat and CSV files in order to correct or transform them. For example, formatters can be used to decode fields encoded in BASE 64 or HEX, repair and harmonize date formats, manipulate, add or remove columns.
In general, formatters process a CSV source file as input and create a CSV result file as output. Formatters can also be used to convert flat files to CSV format so that they can be processed by RAC/M Identity.
Example
Formatters allow to separate the first name and last name of an identity into two columns when the data source contains the full name in a single column.
To create a Formatter :
In the CONFIGURATION menu, click on Formatters.
The Formatters page opens.
At the top right of the page, click on the button
.Under Details, in the Name text box, enter the name of this new formatter. The name must be distinctive as it will appear in a list of formatters.
In the Description text box, enter a description of the use of this formatter.
Enter the following fields
Field Description Error File Enter the path where you want to save the error file. Leave blank to use the default file. Separator Enter the type of separator that you want to use (for example, " :", " Nb Columns Enter the number of columns desired in the destination CSV file. File encoding Enter the encoding type corresponding to the source file. UTF-8 and ISO-8859-1 are the most frequently used. Under Behavior on error click on the desired option:
- Stop sequence to stop the processing sequence
- Skip remaining operations... to stop processing the current block and continue with the next block
- Continue with the next operation to continue processing
Under Primitive, in the Name list, select the name of the primitive to use.
Primitives whose name contains the words ToCSV are used to convert LDIF, XLS, XLSX or other files to CSV format so that they can be processed by RAC/M Identity.
For a detailed description of the primitives, see the Technical Reference Guide.
Under File Selection, enter the following fields:
Field Description Source CSV File Enter the path and name of the file to process. Type Select the type of file to process or leave at Automatically detect to let RAC/M Identity automatically determine the type of file to process. Result File Enter the path and name of the CSV file that will contain the formatting result.
The path of CSV source and result files must be relative to the RAC/M Identity working directory, as defined by the path.source.csv property in the config.properties file.Header Type Select either Header or Index.
Header will display the name of the columns
Index will display the number of the columns in the DATA MAPPING section below.Source Template File Select the template file if one is available, corresponding to the file to be processed.
If a template file is selected, the header type selection applies to the template file rather than the source file.Note
Template files must contain at least one line. If the template file contains column headers, they can be used to identify the columns in the DATA MAPPING section.
Template files must have the word template in their name to be recognized as template files, must be of the same type as the source file to be processed, such as .XLSX or .CSV. and must be dropped into the RAC/M Identity working directory or a sub-directory.
Example: GRA-template.csv
Click on the Save button before proceeding with the next steps.
Click on the Load column headers from tables button.
The DATA MAPPING section is displayed.

For each line corresponding to the source file columns, enter a Regular expression as well as the desired encoding.
UTF-8 and ISO-8859-1 are the most frequently used.Example
If you use a primitive to remove a character string such as the prefix TH- from the content of a column, you must enter TH- in the Regular expression text box next to the column in question.
Note
The parameters that can be used vary depending on the Primitive that you have selected. For more information on primitives and their parameters, refer to the Technical Reference Guide.
Click on Save, the formatter is created.
Configuring a CSV collector
Collectors are specialized modules used to import data from a CSV file or from a data source via an ICF connector to an RAC/M repository import table.
In all cases, collectors allow to map data from the source to the corresponding fields of the RAC/M Identity repository import table.
In addition, processing can be applied during data import such as inserting constants, combining the content of several fields and many others.
Note
Attribute mappings configured within a collector designate that collector as the authoritative source for those attributes. If the same attribute is populated by multiple collectors, the final value is determined by the processing order of the collectors within the relevant blocks and sequences, with the last value written taking precedence.
To create a collector to import data from a CSV file:
In the menu bar, click on CONFIGURATION> Collector.
At the top right of the page, click on the button
. Under Details, in the Name text box, enter the name of the collector. The name must be distinctive as it will appear in a list of collectors.In the Description text box, enter the description of the use of this collector.
Enter the following fields:
Field Description Destination File This field is not used for a collector Error File Enter the path to the directory for the error file. Leave blank to use the default file. Separator Enter the type of separator that you want to use, for example, "," comma, ":" colon, " File encoding Enter the desired encoding type. ISO-8859-1 and UTF-8 allow to represent accented characters. The default value is ISO-8859-1. Under Behavior on error, select how you want RAC/M to react when an extraction error occurs.
- Stop sequence to immediately stop the execution of the current sequence.
- Skip remaining operations... to stop processing the current block and continue with the next block.
- Continue with the next operation to ignore the error and continue processing
Under Primitive, in the Name dropdown list, select a primitive whose name contains CSV.
Primitives whose name contains CSV are used to import data from a CSV file into the RAC/M Identity repository. The different versions of primitives also allow to determine how to handle the fact that data already exists or not in the import tables.
Example
The following primitives differ in the way data is created, updated and inserted into import tables.
ModuleCSVUpdateOrInsertTable updates existing data in the import table and creates them if they do not already exist
ModuleCSVConcatAndUpdateOrInsertTable concatenates imported data with existing data and updates them in the import table and creates them if they do not already exist
ModuleCopyCSVToTable inserts values from the CSV file except if they already exist in the table
ModuleCSVUpdateTable updates existing data but does not create them if they already exist in the import table.
For our example, select ModuleCopyCSVToTable.

For more information on primitives, please consult the Technical Reference Guide.
At the bottom of the page, click on the Save button before proceeding with the next steps.
 The collector is added to the list of the Collectors Details page.
Under Data Import, enter the information as follows:
Field Description Target Table In the list, select the import table into which you want to import data.
Import tables have the word IMPORT in their name.
For more information on import tables, refer to Description of the import table.Source File In the list, select the CSV file that you want to import. For our example /RH/*.csv. Source Template File In the Source Template File text box, select a file that will serve as a template to build the target file.
Template files serve to define the file structure in terms of columns. They can be of type CSV, XLSX, or XLS. They must be deposited in the directory determined in the config.properties configuration file.
In addition, template files may or may not contain a first header line.Column Header Type In the list, select Header to fill the table using the header name or Index using the index number.
For our example, choose Header.At the bottom of the page, click on Save.
Note
Template files must contain at least one line. If the template file contains column headers, they can be used to identify the columns in the DATA MAPPING section.
Template files must have the word template in their name to be recognized as template files, must be of the same type as the source file to be processed, such as .XLSX or .CSV. and must be deposited in the RAC/M Identity working directory or a sub-directory.
Example: GRA-template.csv
Click on the Load columns from table and source files button.
You can now match the imported data to the RAC/M table columns in the Data Mapping section.
Under Data Mapping, match data according to the following parameters:
| Field | Description |
|---|---|
| Target Table Column | This list proposes the column headers of the target table. You can add a column with the same name by clicking on the button . This allows you to concatenate several columns from the source file into the same target table column. For example, the RAC/M column HR_Department_ID could take its value from the Hospital and Department columns in the source file, which you would separate using a hyphen. |
| Source Data Type | In this list, select the data type that will feed the column. Constant : The value will be that specified in the Constant/Value text box. For example, the content of the HR_Work_Location_Name column could be set to "Montréal". Date : The value will be the date obtained from the source, converted according to the format indicated in the Format text box (ex: yyyy-mm-dd HH:MM:ss). Make sure to match date formats. Cur_User : The mapping will use the user that you specify in the Constant/Value text box. Column : The value is obtained directly from the Source Column. In our example, for Account_Name, select Column. Column_with_Default : The mapping will use the content directly from the source (column, file or connector). If no value is present in the source, a default value is used from the Constant/Value parameter. Cur_Time : The value will be the date and time at the time of execution. File_Name : The mapping will use the source file name as value (applicable only for modules that process files). COLUMN_HASHED : The value obtained from the source is transformed by hashing to obtain an anonymized value. COLUMN_MASK : A value is obtained from the source according to the Target System Attribute parameter and then masked using a regular expression specified in the FORMAT parameter. |
| Source Column | In the list, select the name of the source table column from which you want to extract data. If you select a column with the suffix "_ID", the icon appears, allowing you to browse the RAC/M repository and find the precise column that you want to use. When you click on the icon, the target table opens in a dialog box. Click on a column to select it. To navigate to a secondary table, click on this same icon next to the "_ID" column that refers to the secondary table. |
| Constant/Value | If you have selected Constant or Column_With_Default as the source data type, enter the value to use in this text box. |
| Format | If the source type uses a specific format, enter it in this text box; otherwise, leave the text box empty. For example, a date can use the format yyyy-mm-dd. The format can also contain regular expressions, to specify a mask to apply to values for example. Example 1 : Format: ^d{7}[a-zA-Z0-9] For source value: 00430022887 We obtain the result: *******2887 Example 2 : Format: [a-zA-Z0-9].{3}$ For source value: 00430022887 We obtain the result: 0040002***** |
| Unique | Check this box if the value must be unique. |
- Click on Save. The collector is completed.
Configuring an ICF collector
An ICF collector allows to import or export data using an ICF connector configured specifically for an identity source or a target system. ICF connectors must be configured beforehand. See Configuring an ICF Connector for more details.
Note
Attribute mappings configured within a collector designate that collector as the authoritative source for those attributes. If the same attribute is populated by multiple collectors, the final value is determined by the processing order of the collectors within the relevant blocks and sequences, with the last value written taking precedence.
To configure a collector to import or export data from an ICF connector:
In the menu bar, click on CONFIGURATION> Collector.
At the top right of the page, click on the button
. Under Details, in the Name text box, enter the name of the collector. The name must be distinctive as it will appear in a list of collectors.In the Description text box, enter the description of the use of this collector, in particular if it serves to import data or to perform provisioning to a target system.
Enter the following fields:
Field Description Destination File This field is not used for a collector. Error File Enter the path to the directory for the error file. Leave blank to use the default file. Separator Enter the type of separator that you want to use, for example, "," comma, ":" colon, " File encoding Enter the desired encoding type. ISO-8859-1 and UTF-8 allow to represent accented characters. The default value is ISO-8859-1. Under Behavior on error, select how you want RAC/M Identity to react when an error occurs.
- Stop sequence to immediately stop the execution of the current sequence.
- Skip remaining operations... to stop processing the current block and continue with the next block.
- Continue with the next operation to ignore the error and continue processing
Under Primitive, in the Name dropdown list, select a primitive whose name contains ICF.
Primitives whose name contains ICF use an ICF connector configured for a specific identity source or target system to import or export data.
Primitives whose name includes "IMPORT" allow to import data, while those whose name includes "Provisioning" serve to export (provision) data to an identity source or a target system. The name also indicates the types of objects to process such as Identities (Identity), accounts (Account), or groups (Profile). Those that do not include an object type can be used to import or provision any type of objects.
The Description field describes the primitive and the configuration to use.
For our example, select ModuleTableToCSV.
For more information on primitives, please consult the Technical Reference Guide.
At the bottom of the page, click on the Save button before proceeding with the next steps
The collector is added to the list of the Collectors Details page.Under Data Import, enter the information as follows:
Field Description Target Table In the list, select the import table into which you want to import data.
Import tables have the word IMPORT in their name.
For more information on import tables, refer to Description of the import table.Source File In the list, select the CSV file that you want to import. For our example /RH/*.csv. Source Template File In the Source Template File text box, select a file that will serve as a template to build the target file.
Template files serve to define the file structure in terms of columns. They can be of type CSV, XLSX, or XLS. They must be deposited in the directory determined in the config.properties configuration file.
In addition, template files may or may not contain a first header line.Column Header Type In the list, select Header to fill the table using the header name or Index using the index number.
For our example, choose Header.At the bottom of the page, click on Save.
Note
Template files must contain at least one line. If the template file contains column headers, they can be used to identify the columns in the DATA MAPPING section.
Template files must have the word template in their name to be recognized as template files, must be of the same type as the source file to be processed, such as .XLSX or .CSV. and must be deposited in the RAC/M Identity working directory or a sub-directory.
Example: GRA-template.csv
Click on the Load columns from table and source files button.
You can now match the imported data to the RAC/M table columns in the Data Mapping section.
Under Data Mapping, match data according to the following parameters:
Field Description Target Table Column This list proposes the column headers of the target table.
You can add a column with the same name by clicking on the button. This allows you to concatenate several columns in the source file. For example, the RAC/M column HR_Department_ID could take its value from the Hospital and Department columns in the source file, which you would separate using a hyphen.Source Data Type In this list, select the data type that will feed the column.
Constant : The value will be that specified in the Constant/Value text box. For example, the content of the HR_Work_Location_Name column could be set to "Montréal".
Date : The value will be the date obtained from the source, converted according to the format indicated in the Format text box (ex: yyyy-mm-dd HH:MM:ss). Make sure to match date formats.
Cur_User : The mapping will use the user that you specify in the Constant/Value text box.
Column : The value is obtained directly from the Source Column. In our example, for Account_Name, select Column.
Column_with_Default : The mapping will use the content directly from the source (column, file or connector). If no value is present in the source, a default value is used from the Constant/Value parameter.
Cur_Time : The value will be the date and time at the time of execution.
File_Name : The mapping will use the source file name as value (applicable only for modules that process files).
COLUMN_HASHED: The value obtained from the source is transformed by hashing to obtain an anonymized value.
COLUMN_MASK : A value is obtained from the source according to the Target System Attribute parameter and then masked using a regular expression specified in the FORMAT parameter.Source Column In the list, select the name of the source table column from which you want to extract data.
If you select a column with the suffix "_ID", the icon appears, allowing you to browse the RAC/M repository and find the precise column that you want to use. When you click on the icon, the target table opens in a dialog box. Click on a column to select it. To navigate to a secondary table, click on this same icon next to the "_ID" column that refers to the secondary table.Constant/Value If you have selected Constant or Column_With_Default as the source data type, enter the value to use in this text box. Format If the source type uses a specific format, enter it in this text box; otherwise, leave the text box empty.
For example, a date can use the format yyyy-mm-dd.
The format can also contain regular expressions, to specify a mask to apply to values for example.
Example 1 :
Format: ^d{7}[a-zA-Z0-9]
For source value: 00430022887
We obtain the result: *******2887
Example 2 :
Format: [a-zA-Z0-9].{3}$
For source value: 00430022887
We obtain the result: 0040002*****Unique Check this box if the value must be unique. Click on Save. The collector is completed.
Configuring an extractor
Extractors are used to extract data from the RAC/M Identity and access repository and convert it to a standard format (for example, a CSV file).
To configure an extractor:
In the menu bar, click on CONFIGURATION> Extractor.
At the top right of the page, click on the button
. Under Details, in the Name text box, enter the name of this new extractor. The name must be distinctive as it will appear in a list of extractors.Enter the following fields:
Field Description Error File Enter the path to the directory for the error file. Leave blank to use the default file. Separator Enter the type of separator that you want to use, for example, "," comma, ":" colon, " File encoding Enter the desired encoding type. ISO-8859-1 and UTF-8 allow to represent accented characters. The default value is ISO-8859-1. Under Behavior on error, select how you want RAC/M Identity to react when an error occurs.
- Stop sequence to immediately stop the execution of the current sequence.
- Skip remaining operations... to stop processing the current block and continue with the next block.
- Continue with the next operation to ignore the error and continue processing
At the bottom of the page, click on the Save button.
Under Primitive, in the Name dropdown list, select an extraction primitive.
For our example, select ModuleTableToCSV.
 The fields displayed depend on the selected primitive.
Note
In general, primitives whose name includes SQL allow to access repository data through SQL queries offering maximum flexibility, while others use parameterizable filters to select repository tables and columns.
The following fields are relevant to the ModuleTableToCSV primitive according to our example.
See also
For more information on RAC/M Identity database objects and tables, consult Repository objects and tables.
Under Data Import, enter the required information as follows:
Field Description Target File In the list, select the file in which you want to export data in CSV format. Source Table In the list, select the RAC/M table from which you want to extract data.
For our example, Identification.Template File In the dropdown list, select the template file that will serve as a model to generate the target file.
The template is a file that contains at least one line containing column titles, allowing to define the target file structure.
The Data Mapping zone will only be available if a template is selected.
For our example, RH/gabarit/template_employes.xlsx.Column Header Type In the dropdown list, select Header to fill the table using the header name or Index using the index number.
For our example, choose Header.Note
Template files must contain at least one line. If the template file contains column headers, they can be used to identify the columns in the DATA MAPPING section.
Template files must have the word template in their name to be recognized as template files, must be of the same type as the source file to be processed, such as .XLSX or .CSV. and must be deposited in the RAC/M Identity working directory or a sub-directory.
Example: GRA-template.csv
Click on Save before proceeding with the next steps.
Click on the Load table columns from CSV button to fill the data mapping zone.
Use the Criteria section to add filters to the extraction.
These filters are built from the columns of the selected table and each line constitutes an evaluated criterion.
For example, a criterion can be EXPIRATION_DATE < 2025/12/01 to extract all accounts that expire before December 1, 2025.Field Description Column Select the desired column from the dropdown list. Operation Enter "=", ">", "<" or "<>" for the filter to be equal, greater than, less than or different from a specific value. Value Enter the filter value. If you enter text (or a character string), make sure to surround it with single quotes (for example, 'Nurse'). You can use an SQL query format to enter more advanced values. To add an additional criterion, click on the Add criteria button.
The Data Mapping section allows to determine how data is extracted and to apply processing as needed to build the target file. For example, target file columns can be set to a constant value. You can add as many rules as required with the button
.
Field Description Target File Column This list proposes the column headers of the target file.
You can add a column with the same name by clicking on the button. This allows you to concatenate data from several columns in the source table.Source Data Type In this list, select the data type that will feed the column.
Constant : The value will be that specified in the Constant/Value text box. For example, the content of the HR_Work_Location_Name column could be set to "Montréal".
Date : The value will be the date obtained from the source, converted according to the format indicated in the Format text box (ex: yyyy-mm-dd HH:MM:ss). Make sure to match date formats.
Cur_User : The mapping will use the user that you specify in the Constant/Value text box.
Column : The value is obtained directly from the Source Column. In our example, for Account_Name, select Column.
Column_with_Default : The mapping will use the content directly from the source (column, file or connector). If no value is present in the source, a default value is used from the Constant/Value parameter.
Cur_Time : The value will be the date and time at the time of execution.
File_Name : The mapping will use the source file name as value (applicable only for modules that process files).
COLUMN_HASHED: The value obtained from the source is transformed by hashing to obtain an anonymized value.
COLUMN_MASK : A value is obtained from the source according to the Target System Attribute parameter and then masked using a regular expression specified in the FORMAT parameter.Source Column In the list, select the name of the source table column from which you want to extract data.
If you select a column with the suffix "_ID", the icon appears, allowing you to browse the RAC/M repository and find the precise column that you want to use. When you click on the icon, the target table opens in a dialog box. Click on a column to select it. To navigate to a secondary table, click on this same icon next to the "_ID" column that refers to the secondary table.Constant/Value If you have selected Constant or Column_With_Default as the source data type, enter the value to use in this text box. Format If the source type uses a specific format, enter it in this text box; otherwise, leave the text box empty.
For example, a date can use the format yyyy-mm-dd.
The format can also contain regular expressions, to specify a mask to apply to values for example.
Example 1 :
Format: ^d{7}[a-zA-Z0-9]
For source value: 00430022887
We obtain the result: *******2887
Example 2 :
Format: [a-zA-Z0-9].{3}$
For source value: 00430022887
We obtain the result: 0040002*****Unique Check this box if the value must be unique. Once the mapping of all target file columns is completed, click on Save, the extractor is completed.
Configuring a generic module
The term module used alone refers to generic modules used to analyze, transform, enrich, import or export data from the repository, send alerts or email notifications, or perform any other required processing.
Example
The module IdentificationCopy takes data from an import table and transfers it to a main repository table. It can therefore be used to copy data from the IDENTITY_IMPORT table to the IDENTIFICATION table after data has been imported from an identity source.
To obtain a complete list of available predefined modules and primitives, refer to the Technical Reference Guide.
To configure a Module:
In the CONFIGURATION menu, click on Modules.
At the top right of the page, click on the button
. Under Details, in the Name field, enter the name that you want to give to the module. The name must be distinctive as it will appear in a list with several other modules.In the Description text box, enter a description of the module. This will help you know what it does.
Enter the following fields:
Field Description Result File Enter the path to the directory in which you want the execution results (a .log file) to be saved. The file is saved in: RACM Identity/logs. Error File Enter the path to the directory in which you want the error file (a .log file) to be saved. The file is saved in: RACM Identity/logs. Leave blank to use the default file. Under Behavior on error, select how you want RAC/M Identity to react when an error occurs.
- Stop sequence to immediately stop the execution of the current sequence.
- Skip remaining operations... to stop processing the current block and continue with the next block.
- Continue with the next operation to ignore the error and continue processing
Under Primitive, in the Name dropdown list, select the appropriate primitive to perform the required processing. A brief description of the selected primitive is displayed.
The fields displayed below the description vary depending on the selected primitive
For an up-to-date list of available primitives, refer to the Technical Reference Guide.
Use the Scope section to add filters to the processing. These filters are built from the columns of the selected table.
Field Description Criteria column Enter the title of the column that you want to use as a filter. Operation Enter "=", ">", "<" or "<>" if you want the filter to be equal, greater than, less than or different from a specific value. Value Enter the filter value. If you enter text (or a character string), make sure to surround it with single quotes (for example, 'Nurse'). You can use the SQL query format to use more advanced values. Under Table Selection, enter the names of the target and source tables of the data to process.
Field Description Target Table In the dropdown list, select the identity and access repository table into which you want to import data from the staging table. If you use the module to manipulate data without necessarily importing it into the repository (for example, to find accounts that cannot be trusted), leave this list empty. In this case, the data mapping section will not appear. Source Table In the list, select the import table from which you want to import data. If you use the module to perform normalization or correlation tasks, the source file will be a table located in the RAC/M repository. Click on Find table column headers to load the column names of the source and target tables. The data table opens under DATA MAPPING. Use the table to map data; if no mapping is necessary, scroll down to the bottom of the page and click on Save.
Field Description Target Table Column This list proposes the column headers of the target table. Source Table Column In this list, you will find all the columns of the data in the source table. For each value of the Target Table Column, select the source table column that you want to match to this target value. Data Type In the list, select Date if the value is a date and String for another value. Format Enter the format if necessary, otherwise, leave the field empty. For example, a date can have the string yyyy-mm-dd. Processing Type In the list, select:
SRC_EMPTY_OVERIDE_BY_NULL to force a null value if the value is empty and
TARGET_IS_NOT_EMPTY_THEN_NO_OVERIDE if you do not want to replace the target value in the case of a null value in the source column.Unique Identifier Check this box if the value must be unique. Example
A module to copy imported identities to the repository could be configured as follows:
- In the menu bar, click on CONFIGURATION> Modules.
- Click on the button . The module configuration page opens
- Under Details, enter the required information.
- Under Primitive, in the Name list, select ModuleCopyColumnsAndInsert.
- Under Table Selection, in the Target Table list, select Identification.
- In the Source Table list, select IDENTITY_IMPORT.
- Click on Find table column headers. The Data Mapping zone opens.
- In the Source Table Column list, next to Employee_ID, select Employee_ID.
- In the Data Type list, select String.
- Match the next Target Table Column entry and so on until all values are matched.
- Click on Save.
The module is created and added to the list of modules.
Configuring a block
Blocks are made up of components, which can be formatters, collectors, or modules. When these components are assembled to perform a task, they become blocks.
Example
If the information contained in an Excel spreadsheet needs to be added to the Identity and Access repository, you can create a block that would contain a formatter (to convert the Excel spreadsheet to CSV format), a collector (to transfer the data from the CSV file into a RAC/M staging table), and a customized module (to normalize the data).
When more elaborate tasks need to be executed, blocks can be grouped to form sequences.
To configure a block:
In the CONFIGURATION menu, click on Blocks.
At the top right of the page, click on the button
.Under Details, in the Name text box, enter the name that you want to give to the block. The name must be distinctive as it will appear in a list with several other blocks.
In the Description text box, enter a description of the block. This will help you know what it does.
Under Selected components, click on a component on the left to select it and click on the button
to add it to your block.When a component is selected, its description opens to the right of the page. (When several components are selected, only the description of the first one is displayed.) To select several components in the same group, use the Ctrl key.

Once you have added all the necessary components in the Selected components list, click on the Save button to create the block and add it to the list of available blocks. Subsequent changes will be saved by clicking on the Save button.
You can continue to work on your block by adding, removing and modifying components:
To move the components up and down the Selected components list, use the buttons ![]() and
and  . This determines the order in which the components are executed.
To temporarily disable a specific component, select the component and check the Disable box.
To modify a component, select the component and click on the button . The corresponding Configuration page opens.
Note
You can create a completely new component by clicking on the button . This opens an empty configuration page for the corresponding component type. It is the same as going through the CONFIGURATION menu, component and clicking on the button at the top of the page.
Configuring a sequence
Sequences constitute the business logic used to:
- integrate identity sources and target systems
- analyze the repository to detect anomalies and risk situations
- detect trigger events such as hires, departures, lateral moves, promotions and other relevant events and execute the appropriate actions for identity lifecycle
- transmit alerts and notifications as needed
- perform any other required processing.
They are built from blocks, themselves made up of modules, assembled to perform a set of processing aimed at accomplishing a complex task such as synchronizing identity sources and target systems, launching provisioning flows, etc.
Sequences are normally executed according to determined schedules and frequencies but can also be launched manually by drivers.
To simplify the configuration of complex tasks, RAC/M Identity offers fully functional sequence templates, thus reducing the required configuration to the strict minimum.
To configure a sequence:
In the CONFIGURATION menu, click on Sequences.
At the top right of the page, click on the button
.A panel containing tiles representing available sequence templates is displayed. You can reduce the number of templates displayed by using the filters under Categories on the left side of the screen.

Select the tile that best corresponds to the identity source or target system that you want to integrate. To integrate a source or target system that does not appear in the list, you can select a tile similar to the source or target system and you can modify the sequence, blocks and modules that constitute it to customize the processing according to your needs.
Select Empty Sequence to configure a new sequence distinct from those presented.
In this case, in the Sequence name text box, enter a distinctive name as it will appear in a list with several other sequences and go directly to step 5.
A panel will open with configuration parameters. The fields displayed depend on the selected tile.

Under New Sequence, in the Sequence name text box, enter a distinctive name as it will appear in a list with several other sequences. This name will be used for all components (blocks and modules) constituting the sequence.
Fill in the following fields according to the table below:
Field Description Clear sequence configurations if they exist Check this option to delete existing configurations before creating the new sequence. Server Target server address (DNS name or IP address) to which the connection will be established. Port Port number used for connection to the target system. Default: 636. Connection Distinguished Name (Bind DN) Full identifier of the service account used to connect to the target directory. Connection Password (Bind Password) Password associated with the account specified in the Bind DN. Base Context LDAP anchor point (Base DN) from which searches and operations will be performed. Asset Name Logical name assigned to the asset representing the identity source or target system (e.g.: ServiceNow). Asset Technical Name Unique technical identifier of the asset, used in scripts and execution logs. Asset Grouping Name Name of the functional group to which the asset is attached. Default: Default Grouping. Asset Grouping Technical Name Technical identifier of the asset grouping. Default value: default. Generate provisioning block Check this option to automatically create the provisioning block associated with the sequence. User Relative Distinguished Name (RDN) Specifies the LDAP container (RDN) where user objects will be created or updated.
When provisioning new accounts, they will be added directly under the Base Context. If you want to add them in an underlying distinguished name (DN), please specify it here. (Specify only the DN without the base context)
Optional field.Click Generate to generate the sequence, including the blocks and modules that constitute it. These blocks and modules will be preconfigured according to the sequence nomenclature to facilitate management.

Perform each of the indicated steps to complete the configuration. The steps displayed as hyperlinks launch a screen that opens directly on the object to be configured. You can close the new window after you have completed the configuration and saved the modified object.
Click on Complete sequence configuration to complete the configuration. A screen opens with the sequence parameters.

In the Description text box, enter a description of the sequence. This will help you know what it does.
In the Notification Email(s) and Failure Email(s) text boxes, enter the email addresses of the identities that must be notified when the sequence has been executed and those that must be alerted if an error occurs during the execution of a sequence.
In the Schedule text box, enter the scheduling string to define the automated execution schedule according to the Quartz syntax. The string comprises 6 required fields and 1 optional field. Each field is separated by a white space.
| Field | Allowed Values | Allowed Special Characters |
|---|---|---|
| Seconds | 0-59 | , - * / |
| Minutes | 0-59 | , - * / |
| Hours | 0-23 | , - * / |
| Day of the month | 1-31 | , - * ? / L W |
| Month | 1-12 or JAN-DEC | , - * / |
| Day of the week | 1-7 or SUN-SAT | , - * ? / L ## |
| Year (optional) | Empty, 1970-2199 | , - * / |
- * (asterisk) specifies all values. For example, in the Minutes field, it means "every minute".
- ? (question mark) is used for the Day of the month and Day of the week fields. It indicates "no specific value", which is useful when you need to specify something in one of the two fields and not in the other.
- - (hyphen) specifies a range. For example, 10-12 in the Hours field means hours 10 through 12 included.
- , (comma) specifies additional values. For example, in the Day of the week field, MON,WED,FRI means that the days Monday, Wednesday and Friday are scheduled.
- / (slash) specifies the increment. For example, in the Seconds field, 0/15 means that the sequence will be executed every 0, 15, 30 and 45 seconds; if 5/15, it will be every 5, 20, 35 and 50 seconds".
- L (for last) has a different meaning in each of the two fields in which it is allowed. For example, in the Day of the month field, it means the last day of the month. However, in the Day of the week field, by itself, it means 7 or SAT. But in the Day of the week field after another value, it means the last day of the month (For example 6L means the last Friday of the month; Saturday being 7).
- W (for weekday) indicates the weekday (Monday through Friday) nearest to the given day. For example, if you specify 15W for the Day of the month field, this will mean "the nearest weekday to the 15th of the month". So if the 15th is a Saturday, the trigger will be Friday the 14th. If the 15th is a Sunday, the trigger will be Monday the 16th. If the 15th is a Tuesday, then it will be Tuesday the 15th. However, if you specify 1W in the Day of the month field and the 1st is a Saturday, the trigger will be Monday the 3rd; it will not 'jump' from one month to the next.
- ## (pound or hash) specifies the "n"th "dd" day of the month. For example, in the Day of the week field 6##3 means "the third Friday of the month" (day 6 being Friday and ##3 = the 3rd one in the month).
To prevent this sequence from executing at the same time as another, select a group from the dropdown list or enter a new group name in the Simultaneous execution prevention group field. This is important to allow a sequence to complete before another executes in order to process data that might be in the process of being imported for example.
If a sequence attempts to execute while another sequence that is part of an exclusion group is in execution, it will be queued until the first sequence completes.
Under Blocks, click on a block on the left to select it and click on the button
to add it to your sequence.When a block is selected, its description opens to the right of the page. (When several components are selected, only the description of the first one is displayed). To select several components in the same group, use the Ctrl key.

Once you have added all the necessary components in the Selected components list, click on the Save button to create the block and add it to the list of available blocks. Subsequent changes will be saved by clicking on the Save button.
You can continue to work on your sequence by adding, removing and modifying blocks:
To move the blocks up and down the Selected components list, use the buttons
 and . This determines the order in which the blocks are executed.
To temporarily disable a sequence, under Details, check the Disable the sequence box.
To modify a block, select the block and click on the button
. The corresponding Configuration page opens.Note
You can create a completely new block by clicking on the button
. This opens an empty configuration page. It is the same as going through the CONFIGURATION> Blocks menu and clicking on the button at the top of the page.Example
A sequence to import and copy data every Saturday at midnight could be configured as follows:
- In the CONFIGURATION menu, click on Sequences.
- At the top right of the page, click on the button .
- Select Empty Sequence
- Under Details, in the Name and Description text boxes, enter the name and a description of the sequence.
- Under Blocks, select the blocks that you have created to copy and import data.
- In the Selected blocks list, use the buttons and to make sure that the import block is executed before the copy block.
- In the Schedule text box, enter the 0 0 0 ? * 7 character string.
- At the bottom of the page, click on Save or Update.
The sequence is created and will execute at the scheduled time.
Configuring mappings
When data is initially imported into RAC/M, you must match the source data and the RAC/M tables. This is particularly the case for statuses. An organization may have several account statuses, but RAC/M only has a few. You must decide which RAC/M statuses reflect each of the organization's status.
The Mappings page is used to add categories, tags, sources, and external attributes when the source data name is unclear or difficult to work with, or to create working groups to refer to at a later time.
Important
All choices on this page are optional except for Status. The status of all identities must be matched within the RAC/M environment. This is necessary for many RAC/M operations.
Here is a description of the possibilities you have to map source and output data. In the menu bar, click on CONFIGURATION> Mappings.
Titles
Titles are imported for people and identities. If you want the name of a title to be displayed differently, you have to change its output name.
In the Technical Name list, select the title for which you want a different output name. You can give it a description, but it is not necessary. Then enter the new name in the Display Name text box. This is the name that will be used in RAC/M Identity.
Click on Save.
Note
If, for some reason, you need to create a completely new title, at the top right of the page, click on the button . Fill in the text boxes and click on the Save button.
Account status
Account statuses are imported for assets and accounts. However, organizations may have several account statuses, while RAC/M only has a few. You must therefore assign a RAC/M status to each of the organization's status.
This needs to be done the very first time data is imported and whenever a new status is created by the organization.
In the Display Name list, select the status for which you want to assign a RAC/M one. You can give it a description, but it is not necessary.
The selection you make here will become the identity RAC/M status

To see the original identity status, click PEOPLE> Identities, and click the identity to open its Details page.

Then, in the Effective Name list, select the RAC/M status.
Click on Save.
Note
If, for some reason, you need to create a completely new status, at the top right of the page, click on the button . Fill in the text boxes and click on the Save button. If this is the default status, check the Default Status box.
Employment type
Employment types are imported for people and identities. If you want the name of an employment type to be displayed differently, you must change its output name.
In the Display Name list, select the employment type for which you want to assign a RAC/M one. You can give it a description, but it is not necessary. Then enter the new name in the Technical Name text box. This is the name that will be used in RAC/M Identity.
Note
If, for some reason, you need to create a completely new employment type, at the top right of the page, click on the button . Fill in the text boxes and click on the Save button.
Categories
Categories are used when creating and importing assets. They enable you to define the level of the system or application.
To change the description, in the Display Name list, select the category for which you want to change the description and, in the Description text box, enter the new one. Click on Save.
If you need a new category, at the top right of the page, click on the button . Fill in the text boxes and click on the Save button.
Tags
Tags are used to help you sort accounts. This is useful when matching accounts and identities, especially if the list of accounts is very long. Tags can also help you create work groups for identities with similar characteristics.
To add a tag to an account or a provisioning request, click on the button located at the top right of the page. Select either Account or Provisioning Request and, in the Display name list, enter or select a tag name. Enter a description in the Description text box and click on Save.
Sources
Sources are used in the Identity page. They enable you to identify the identity source used to create an identity.
The Mappings page allows you to link the source to a target system, when applicable, or to create new sources.
To link a source, in the Display Name list, select the name of the file source that you want to link to a target system. In the Description text box, enter a description. Then enter the associated value from the imported data in the Technical Name text box.
If the data is imported via a connector, select it in the ICF Connector list.
Click on Save.
If you need to create a new source, click the button located at the top right of the page and enter the source information and click the Save button.
Extended attributes
Extended Attributes appear in various pages, which allow you to add attributes that will help you link the different objects to the right person.
To add an extended attribute, click the attribute tab and click the button located at the top right of the page.
In the Display Name text box, type the name of the attribute. In the Description text box, type a description then type a name in the Technical Name text box. This is the name that will be used in RAC/M Identity.
If this is to be a unique identification key, select the Is Unique Key check box. To allow modification of the attribute, select the Attribute can be modified text box.
Click Save.
The attribute is added to the Column Name list of mapping tables. It is also added to the object (tab at the top) details page.
Configuring manual provisioning
Please refer to the Manual Provisioning guide for more information.
Configuring an ICF connector
Please refer to the ICF Connectors guide for more information.
Configuring policies
RAC/M Identity allows to automatically provision accounts and access in target systems. So that automatically created accounts and passwords respect your company nomenclature and password policies, you must define three policies: password, account, and username in this sequence.
Configuring a password policy
Password policies are used to define how the password of a new account will be constructed.
To define password policies:
- In the menu bar, click on CONFIGURATION> Password Policies.
- At the top right of the page, click on the button .
- Under Details, in the Name text box, enter a name for the password policy.

- In the Description text box, enter the description of the policy.
- Under Parameters, enter the information as follows ;
| Field | Description |
|---|---|
| Length | Enter the minimum length of the password that will be generated. |
| Digits | Enter the minimum number of digits that the password must contain. |
| Lowercase letters | Enter the minimum number of lowercase letters that the password must contain. |
| Non-alphanumeric characters | Enter the minimum number of non-alphanumeric characters (for example, ##, $, &) that the password must contain. |
| Uppercase letters | Enter the minimum number of uppercase letters that the password must contain. |
- Click on Save.
When creating or activating an account, passwords will be generated randomly to respect the rules defined above.
Configuring an account policy
Account policies allow to determine how accounts are created as well as the actions to take when accounts are created automatically. When an account policy is created, a username policy is automatically created with the same name. You must configure this policy to align the syntax of identifiers and the collision resolution strategy with your account creation policies.
To define an account policy:
- In the menu bar, click on the CONFIGURATION> Account Policies button.
- At the top right of the page, click on the button .

- Under Policy, in the Name text box, enter the name of the account policy.
- In the Description text box, enter a clear description of this policy.
Enter the following fields
| Field | Description |
|---|---|
| Database | Repository database Config or Data. The Config database contains RAC/M Identity configuration parameters, while the Data database contains all access data in the repository. Select Data. |
| Table Name | The dropdown list displays the tables of the selected database. To configure an account policy for an asset, select APPLICATION. |
Click on the Save button at the bottom of the page to create the policy. A username policy is automatically created with the same name.
Under Options, in the RAC/M ID text box, enter the unique identification number generated by RAC/M to identify the asset for which you want to create an account.
- To find the identification number of an asset, in the main menu, click on ASSETS>Assets.
- Enter the asset name in the search box at the top right of the screen.
- Select the desired asset. The unique RAC/M Identity identifier appears at the top left under Object ID.
- Complete the account policy configuration by clicking on CONFIGURATION>Account Policy and select the policy to configure in the dropdown list.
- To find the identification number of an asset, in the main menu, click on ASSETS>Assets.
Check the following boxes to determine the actions to take when an account is created.
Field Description Override groups on account activation When activating the account, existing group memberships on the target system will be replaced by those defined in the repository. Active Directory Check this box if the policy applies to Active Directory. Generate a password when activating the account Check this box so that a password is generated and transmitted to the user when activating or reactivating an account. Remove groups when terminating account Check this box so that the account is removed from the groups of which it is a member when an account is terminated. Keep provisioned password Check this box so that the password that has been generated is kept. Under Configuration, in the Password Policy list, select a password policy that you have defined.
Click on Save.
The Username Policy section illustrates the configuration of the associated username policy.
Note
Configure the username policy linked to the account policy so that automatically created accounts respect the syntax required by your policies and internal standards.
Configuring a username policy
These policies are used to define how the username will be constructed as well as the collision resolution strategy. Each policy is associated with the account policy of the same name.
To configure a username policy:
- In the menu bar, click on CONFIGURATION>Username Policies.
- Under Policy, in the Name dropdown list, select the account policy for which you want to configure the username policy.
- In the Source Table list, select the repository table from which the data to build the username (identifier) will be taken. Generally, identifiers are built from the user's first and last name. If this is the case, select the
IDENTIFICATIONtable. - In the Target Table list, select the table in which the username will be created. Generally, accounts are defined in the
APPLICATION_ACCOUNTtable. - Click on the Save button at the bottom of the page.
- The TARGET TABLE section allows you to precisely define how usernames are built from source table data. Fill in the required parameters according to the following table:
| Field | Description |
|---|---|
| Source Column | In the list, select the source table column that contains the data that you want to use to create the username. Generally, the FIRST_NAME, LAST_NAME and FULL_NAME columns of the IDENTIFICATION table containing respectively the first name, last name and full name of the identity are used as source.Other columns and other tables can be used to build identifiers for impersonal identities. |
| Data Source | In this list, select the data type that will feed the column. Constant : The mapping will use the value that you specify in the Value field. Date : The mapping will use the date format that you specify in the Format field. The date is taken from the selection made in the Source Column list. Make sure to match date formats. Cur_User : The mapping will use the user that you specify in the Value text box. Column : The mapping will use the selection made in the Source Column list. Column_with_Default : The mapping will use the content directly from the source (column, file or connector). If nothing is found, the value in the Constant/Value text box is used instead. Cur_Time : The mapping will use the current time as the value. File_Name : The mapping will use the source file name as the value. Column-Hashed : The value is hashed to fit the space allowed in the table. Column_Mask : Part of the value is masked using an expression defined in the Constant text box. For example, for a source value of 00430022887, you will obtain ******2887 if you use the following mask: ^\d{7}[a-zA-Z0-9] or 0043002**** if you use: [a-zA-Z0-9].{3}$. |
| Target Column | In the list, select the column in which the username will be created. This is generally ACCOUNT_NAME. |
| Value | If the data source is Constant, enter the constant value in this field. |
| Number of characters | Enter the number of characters (starting from the beginning) that you want to use from the source columns. For example, you could use the first two letters of the first name. |
| Regular expression | This text box allows you to use more advanced syntax in Regular Expression format. |
Click on the Add button to add a line to the policy.
The buttons
and  allow to move policy elements up or down to establish the order of username construction.
The buttons
 allow to remove an element from the policy.
Username collision policy
Over time, username collisions are inevitable. For example, collisions occur if two people (identities) have similar names and first names or because an account with that same syntax already exists in a system.
To automatically resolve these situations in a robust way, RAC/M Identity allows to define collision resolution policies. 6. Check the Display user ID collision section box to display the collision policy definition section. 7. In the Name field, enter a name for this collision policy. 8. In the Description field, enter a description of this policy.
Fill in the following fields according to the desired resolution strategy.
| Field | Description |
|---|---|
| Use sequential value | Check this box if you want a number to be added to the end of the username and to increase sequentially if collisions are detected. For example, if we attempt to create an account jsmith, but one already exists, this option can create an account jsmith1. |
| Start value | Enter the value of the first sequential number. |
| Maximum value | Enter the maximum value of the sequential number. If there is no maximum value, select Infinite. |
| Minimum number of digits | Enter the minimum number of digits that the number must have. For example, if you enter 0, the number will increase as 1, 2, 3, etc. If you enter 2, the number will increase as 01, 02, 03, etc. |
- Check the Allow collision for the same person box if you want an existing account to be reused. This can be desirable in some use cases.
Example
- In the case of people who leave and return to the organization, such as medical students or seasonal workers. In this case, different identities are created for each new employment period, with only one being active at a time. In this case, it is desirable that the new identity reuse the same accounts to facilitate traceability and optimize the user experience.
- In the case where a physical person holds more than one active identity, a frequent situation in academic and medical environments. In this case, it is desirable that the same accounts be used by the various identities. For example, a person with researcher, doctor and administrator responsibilities can use a single account in Active Directory and ENTRA ID for the three identities.
- Click on the Save button.
Validate emails
RAC/M Identity includes several dozen fully customizable emails in terms of appearance, structure and content. These emails are used in several circumstances such as to:
- notify the various stakeholders that tasks have been assigned to them
- inform stakeholders of the progress of their requests
- remind certifiers to complete their certification campaign
- notify of normal operation functioning or alert in case of anomaly
- transmit access requests to a support group for manual resolution
- communicate, notify or alert one or more stakeholders as needed
The Emails topic in the main menu allows to validate that email customization is complete and correct.
To validate emails
In the menu bar, click on CONFIGURATION> Emails.
The Configuration section allows to define the SMTP server configuration used to test emails.
This page gives the possibility to use the global SMTP configuration of the system or to define a custom configuration adapted to specific environments.
Option Description Use system configuration Selects the SMTP configuration defined globally in RAC/M Identity. This configuration is used by default for all modules and processes of the system. Use a specific configuration Allows to define an SMTP configuration specific to this instance or to particular needs (e.g.: test server, secure mail relay, or dedicated domain). Specific configuration parameters
When the Use a specific configuration option is selected, the following fields must be configured:
Field Description Email server host Domain name or IP address of the SMTP server used to send messages (e.g.: smtp.office365.com).Port SMTP communication port (e.g.: 25, 465 or 587 depending on the mail provider and encryption method). Maximum timeout (in ms) Maximum time in milliseconds that the system will wait before interrupting a connection attempt. Default: 30000(i.e. 30 seconds).Number of retries Number of attempts that the system will make in case of sending failure. Default value: 3.Enable TLS Check this box to encrypt communication between RAC/M Identity and the SMTP server via the TLS (Transport Layer Security) protocol. Sender email Email address that will appear in the From field of sent messages (e.g.: noreply@organisation.ca).Authentication method Selection of authentication mode:
• Basic authentication, Classic username and password.
• OAuth2 authentication, Uses an access token for modern services (Microsoft 365, Gmail, etc.).Username (optional) Identifier used for SMTP authentication. This field can be left empty if the server does not require authentication. Password (optional) Password associated with the SMTP account. Used only if basic authentication is enabled. Important
When possible, prefer OAuth2 authentication for enterprise environments integrated with Microsoft 365, Google Workspace or other modern services.
Test recipients
Field Description Recipient(s) separated by a semicolon Allows to indicate one or more email addresses used for configuration tests. Addresses must be separated by a semicolon ";". Tip
Use an internal test address to validate the configuration before sending notifications to end users.
Configuration example (Microsoft 365)
Parameter Value Email server host smtp.office365.comPort 587Maximum timeout 30000Number of retries 3Enable TLS ✅ Sender email noreply@organisation.caAuthentication OAuth2 Username noreply@organisation.caConfiguration example (Internal server)
Parameter Value Email server host mail.interne.localPort 25Maximum timeout 20000Number of retries 2Enable TLS ☐ Sender email alertes@intra.localAuthentication None Username (empty) Configuration validation
Once the configuration is saved:
- Go to the Email Testing section.
- Enter a test address in the Recipient(s) field.
- Select an email template to test.
- Click Test to validate sending.
- Check receipt of the email in the test mailbox.
Note
If the email is received correctly, the SMTP configuration is functional.
Additional information
- SMTP configurations are used by all RAC/M Identity modules: provisioning, campaigns, system notifications and password resets.
- In case of sending error, application logs detail the error code and message returned by the SMTP server (e.g. 535 Authentication failed, 421 Timeout, etc.).
To validate one or more emails
To validate one or more emails, in the Email templates to test section, select the validation parameters to perform.
Parameter Description Select all Selects all available templates for testing. Test language Allows to choose the language version to test: French and/or English. Theme for campaign templates Defines the visual theme applied to campaign-type emails (e.g.: Default theme). The following section displays the list of different email templates available for validation. Templates are grouped according to their usage context. You can select all emails in a category by clicking on the category checkbox or you can choose specific emails.
Email categories
Category Example templates Campaigns Emails related to access review campaigns, including start, reminders and closure. Requests Emails sent during access requests including creation, activation, modification, removal of identity, accounts, access rights, roles, transfers, departure notices, etc. Provisioning Emails sent in the context of automated and manual provisioning as well as any other communication. Click on the Send button to generate and send an example of the selected templates to the designated recipient.
Test results
When a template is tested:
- The system generates the message according to current parameters (language, theme, demonstration variables).
- The email is sent to the address or addresses indicated in the recipients field.
- Visual rendering and content can be validated directly in the inbox.
Important:
During tests, dynamic variables (e.g. username, date, campaign identifier) are replaced by demonstration values to avoid any real sending of sensitive data.
Best practices
- Always validate templates after a system update or HTML content modification.
- Test each language to ensure that special characters and accents display correctly (UTF-8).
- Use an internal test address before activating notifications for end users.
- Check visual consistency between templates: logos, colors, fonts and signatures.
- Document template versions used for compliance (SOC 2, internal audit, etc.).
About provisioning emails
Emails that are sent when a provisioning request is processed are consolidated. This reduces the number of emails received by users.
Consolidation is done by recipient and by request target. In other words, each consolidated email contains all provisioning requests for a given recipient and target.
For example, if the same user makes several requests to add and remove access for the same identity, they will receive an email containing information on all these requests and, depending on the configuration in place, an email containing the passwords. Similarly, the target of these requests will receive a consolidated email containing information on all requests concerning them.
If a user makes several requests for different identities, they will receive one email per target identity, each containing information on all requests for that identity. As for the targets of these requests, they will receive a consolidated email containing all the accesses that concern them.
The same applies to all recipients of a provisioning request, i.e. the requester, the target, the target's supervisor and the members of the notification group.
Please refer to the section Provisioning notification for more information on configuring these notifications.
Configuring sending logic
When a provisioning request is processed, notifications are added to the queue.
An automated task regularly checks (depending on the mail.consolidation.job.quartz configuration) the queue and sends consolidated emails at the appropriate time, according to the configuration in place.
As long as notifications are regularly created for the same recipient, they are not sent. This avoids sending consolidated emails before all requests have been processed.
The task detects if notifications have been added to the queue recently (this is the mail.consolidation.min.delay.seconds parameter). If so, it does not send an email for this recipient. When no notification has been added to the queue since this delay, the task sends a consolidated email for this recipient.
To prevent notifications from accumulating indefinitely in the queue without being sent, the task also checks if the oldest notification for a recipient has existed for more than a certain time (this is the mail.consolidation.max.delay.seconds parameter). This could happen, for example, in the case of processing a very large number of requests. If this is the case, it sends the consolidated emails for this recipient.
Four parameters allow to configure the sending logic:
| Parameter | Description | Example values |
|---|---|---|
mail.consolidation.job.enabled | Enable or disable email sending functionality (if disabled, no email is sent) | true (enabled) or false (disabled) |
mail.consolidation.min.delay.seconds | Minimum time period before consolidated emails are sent for a recipient, in seconds | 300 (After 5 minutes) |
mail.consolidation.max.delay.seconds | Maximum time period before consolidated emails are sent for a recipient, in seconds | 3600 (After 1 hour) |
mail.consolidation.job.quartz | Time interval between task executions, in Quartz Scheduler format | 0 */5 * ? * * * (every 5 minutes) |
Configuring email retries
In case of a failed email sending, RAC/M Identity can retry sending the email in the future.
This functionality is configurable in the configuration file via these three parameters:
| Parameter | Description | Example values |
|---|---|---|
mail.retry.enabled | Enable or disable the functionality | true (enabled) or false (disabled) |
mail.retry.interval.quartz | Time interval between retries, in Quartz Scheduler format | 0 */5 * ? * * * (every 5 minutes) |
mail.retry.period.minutes | Maximum time period before abandoning sending, in minutes | 10080 (After 1 week) |
About localization
Locale configuration allows to customize the appearance of RAC/M Identity according to the language and region of users and/or the organization. It is used for displaying dates and times, as well as for emails sent to users.
A locale is a combination of language and region. For example, fr_CA is Canadian French and en_US is American English.
Configuring locale globally
The default language and locale of the application are configured in the conf/config.properties file via the default.system.language parameter. This defines the default language of the application when no language is specified for a user. It can be a language (fr) or a locale (fr_CA), but using a locale is preferable for better precision.
Configuring for a specific language
You can specify a default locale for users whose language region is not indicated in their profile. Indeed, some users have fr as language, without the locale being specified. To do this, simply add default.locale.fr as a parameter for French and default.locale.en for English.
For example, default.locale.en=en_US specifies that the default locale for users whose language is English is American English. By default, the locale used for French is fr_CA (Canadian French) and en_CA (Canadian English) for English.
This parameter also indicates the date format to use in the interface for French and English.
Configuring by identity (emails only)
It is possible to configure the language and locale of identities to personalize the language and date display in emails sent to them. For example, an identity whose locale is fr_BE will receive emails in French and dates will be displayed in Belgian format.
Identities whose language is not specified receive emails in the default language defined via the default.system.language parameter. Similarly, dates are displayed in the default locale format.
Using browser locale
It is possible to use the user's browser locale rather than the application's locale for displaying dates in the user interface. To do this, simply add override.browser.locale.for.dates=false in conf/config.properties.