Concepts
This section describes the concepts required to perform a basic setup and configuration for a RAC/M Identity implementation. It walks you through identifying authoritative sources for identities, identifying and integrating target systems and implementing basic business logic to perform initial data collection for building the RAC/M Identity repository.
About people and identities
In identity management, it is essential to distinguish between a physical person and the various relationships or affiliations that person may hold with an organization. This distinction is the foundation on which accurate identity and access governance is built.
In many cases, the relationship is straightforward: people who work for an organization are employees, people who study at a school or university are students, and people who receive care at a hospital are patients. In other cases, however, the boundaries are less clear. A person may be both a student and a staff member at a university, or may work for an organization as a contractor rather than as an employee. The possible combinations of relationships between people and organizations are virtually unlimited.
These relationships also have a lifecycle: they have a defined beginning and end, and they are typically managed or supervised by one or more individuals within a specific department or business unit of the organization.
In RAC/M Identity, the term Person designates the physical individual, while the term Identity designates each of the relationships or affiliations that person has with the organization. A single Person can therefore be associated with one or more Identities, reflecting the different capacities in which they interact with the organization.
Note
The term personas is commonly used in the identity management industry to refer to the same concept that RAC/M Identity calls identities.
Single identity vs. multiple identities
RAC/M Identity supports both approaches to modelling the relationship between a person and the organization:
- In the single-identity model, each physical person has only one identity in the repository, and the various relationships they hold are distinguished through roles.
- In the multiple-identity model, a physical person may hold several identities simultaneously, each representing a distinct relationship with the organization.
Because relationships typically have a defined beginning and end, an identity is considered active between its start date and end date, and inactive before the start date or after the end date.
A key advantage of the multiple-identity model is the traceability it provides over the affiliations and entitlements a person has held over time. When a relationship reaches its end date, the corresponding identity becomes inactive. If the same person later returns to the organization — for example, a seasonal employee or a student resuming studies after a break — a new, active identity is created, inheriting many parameters from the previous one, such as user IDs, email address and other unique identifiers.
However, because the new identity may reflect a completely different relationship, other attributes — such as supervisor and department — are set to values that accurately describe the current affiliation. The roles and entitlements assigned to the new identity may also differ, reflecting what is appropriate for this new relationship.
An important aspect of managing multiple identities is that RAC/M Identity will not deactivate an account or revoke entitlements when an identity becomes inactive if the same account or entitlements are also assigned — directly or indirectly — to another active identity held by the same person.
Note
RAC/M Identity continuously monitors the aggregate of roles, entitlements, assets, and other factors assigned to a person across all of their identities, and enforces Separation of Duties (SoD) rules to prevent the accumulation of incompatible accounts, roles, or entitlements.
Example
Take Chantal St-Germain for example. She works at St-Jude hospital. She is both a practicing physician and a researcher. As such, two entries were originally created for her in two separate identity sources the database for physicians and the database for external university researchers.

These two identities give her access to different applications, via accounts and logical accesses, physical keys, and areas within the hospital.
The information found in these identity sources:
- In the first identity source (which identifies her as a practicing physician), her surname was spelled "Saint-Germain".
- In the second identity source (which identifies her as a researcher), her surname was spelled "St-Germain" and the letter "e" is missing from her surname.
Even though they were not entered the same way in the sources, in RAC/M Identity, they are linked to the same person and considered as Chantale St-Germain.
Because RAC/M Identity links these two identities to a single person, there is no need to standardize the different identities that have been created in the original systems. If you create a new identity for Chantale, it will also be linked to the person.
Therefore, when her research project will finish, her identity as researcher will become inactive and the corresponding accesses will be revoked. But all accounts and logical accesses to assets, required to work as a physician, will remain active and valid.
Non-human entities
RAC/M Identity extends identity management to entities that are not physical persons but still interact with IT systems. This includes automation tools, workloads, and AI agents, as well as any other type of account that is not tied to an individual — such as service, test, training, and shared accounts.
Non-human identities
Identities can be designated as non-human using a standard or extended attribute, and their associated accounts can be tagged as technical during the correlation process. This flexible approach removes any restriction on the number or type of identities that can be managed and allows each type of identity to be governed by its own dedicated policies.
Non-human identities are managed exactly like human identities: assigned supervisors, reviewers, and administrators remain responsible for applying sound governance practices, including periodic access reviews.
Impersonal accounts
Impersonal accounts are managed in the same way as regular personal accounts. They are, however, assigned to designated trustees who are responsible for ensuring that applicable governance policies are followed. For example, trustees must conduct periodic access reviews of the impersonal accounts under their responsibility.
Unique identifiers
Each person and identity object in the repository is assigned a permanent, system-generated unique identifier: a Universally Unique Identifier (UUID), also referred to as a Globally Unique Identifier (GUID). These values permanently distinguish each entity from every other, which avoids ambiguity when names or other attributes change.
About identity sources and access data
This section describes how to identify sources for identities and access information as well as other required data to deploy RAC/M Identity. Detailed instructions for creating, configuring and managing objects such as people, accounts, assets, and accesses are provided in the Administration and operations guide.
Identifying identity sources
You must begin by determining the authoritative sources from which you will import the information about the identities that will populate the Identity and access repository.
Identity sources define the business relationships between people and your organization. HR systems are de facto identity sources for employees, but there may be many other sources. Typically, external contractors, interns, temporary hires and third party users are not managed by HR and are not inluded in HR systems. In most cases, other sources need to be identified where a minimum amount of information about those identities can be found.
Often, Active Directory, ENTRA ID, SQL databases and even Excel spreadsheets may be used as indentity sources for non-employees.
By using information found in identity sources, such as the start and end dates of an intern in a hospital or a person’s job in the human resources’ system, you will be able to define a person’s identities.
Identity sources can be files or lists of people involved with the organization, such as:
- Employees
- Consultants
- Partners
- Interns
- Students
- Suppliers
- Contractors
- Customers
- Any other person or entity requiring access to IT services, applications, or physical assets.
Identity sources can come from various places, such as:
- Human Resources department
- University student’s enrollment database
- List of physicians and interns in a hospital
- Any other department or service which can provide a list of persons requiring access to IT services, applications or physical assets.
Note
When an identity is found in more than one source, there is usually a source that is the most reliable or complete. In this case, you must determine the most useful source.
Informations related to a person may be gathered from several sources.
For each source, you must determine what are the relevant database tables and attributes and how to get them into RAC/M Identity. Pre built patterns for popular HR systems such as SAP are available to accelerate the integration process. With RAC/M Identity Premium edition, connectors to identity sources are typically implemented, while collectors and flat files in CSV format are used with the Governance edition.
You must clearly define and document each of these attributes in the integration forms as they will be imported into the RAC/M Identity repository later on. These details determine how each attribute will be stored and used by the business logic for automated data processing.
See Also
Note
It is important to identify and integrate all required identity sources right from the start to avoid the accumulation of “orphan” accounts that cannot be matched with identities.
Identifying assets
In the context of RAC/M Identity, an asset, also known as a target system is any logical or physical component belonging to the organization that people use to conduct business and that requires access privileges.
The term Assets by itself is the generic term used to refer to IT assets that require users to login to perform some business or technical function.
For example, assets can be applications, business systems and infrastructure components such as payroll, ERP, printers, email, servers, the wireless network, and even building access control systems.
Assets typically manage users and what they can do through a built-in, dedicated database containing accounts, passwords and entitlements. Assets may run on servers, legacy mainframes or in the cloud. The term also applies to the underlying infrastructure such as servers, mainframes and cloud platforms.
These can include:
- Servers, such as Windows, Linux, Unix, HP UX, AIX (*NIX)
- Commercial (COTS) or homegrown applications
- Enterprise systems, such as HR, CRMs, ERPs, etc.
- Databases
- Active Directories
- LDAP directories
- RAC/F, ACF2 or Top Secret for IBM mainframes
- Legacy systems such as AS/400, IBM iSeries, Tandem, etc.
- Cloud based SaaS applications, IaaS infrastucture and PaaS platforms
- Building access control systems
Logical applications
A logical application is a type of assets that does not use a built-in database for authenticating and autorizing users but relies on one or more external component such as LDAP directories, Active Directory, SQL databases, Identity provider (IDP) or other mechanisms to manage user access.
In such cases, connectors and collectors will need to be configured to access the proper Data sources, such as Active Directory and SQL databases, and extract access information that will be linked to the logical application.
Base and extended attributes can be used to hold common key values, such as employee ID or email to facilitate linking information from different sources to provide effective “logical views” of these assets.
Physical assets
Physical assets can be any item or device entrusted to people that must be tracked and retrieved at the end of their engagement, such as phones, tools, specialized clothing, keys, and access cards.
Physical assets do not use a data source for authenticating users but a data source may exist to document what items are held by each user. For each source, you must determine what are the relevant tables and attributes and how to get them into RAC/M Identity.
Identifying data sources
Data sources represent the actual entities containg accounts and access information for assets.
In the case of assets such as HR systems, applications, directories, servers, databases and cloud applications and services, the data source is usually the asset itself. In this case, access information can be extracted to a flat file to be retrieved by collectors or accessed directly through APIs and connectors.
In the case of logical applications, the data source is the actual directory, database or identity provider used to authenticate and authorize users.
Pre built patterns for popular applications and systems are available to accelerate the integration process.
Note
With RAC/M Identity Premium edition, connectors to data sources are typically implemented, while collectors and flat files in CSV format are used with the Governance edition except for Active Directory and ENTRA ID which always use a connector.
Tip
For each identity source and asset to be integrated to RAC/M Identity, you can use the provided integration forms to document the attributes to be imported. These details determine how each attribute will be stored and used by the business logic for automated data processing.
Identifying owners
Within your organization, it is important to identify someone who will be responsible for the proper operation and management of each critical asset. This person is typically known as the “owner” of the asset and plays an important role in ensuring that all accesses are legitimate.
Asset owners may be required to approve access requests as well as periodically review and validate accesses.
Note
Non critical assets that are widely accessible to most or all users, such as email, typically do not require approval workflows, but may still require an owner responsible for ensuring proper maintenance to keep the asset fully functional and up to date to limit vulnerabilities from out of date or misconfigured software.
Owners can assign delegates to approve requests in order to share the workload or to cover when they are not available. Delegates must be defined within the owner`s delegation group. Owners and delegates must have a valid, active identity defined in RAC/M Identity.
About delegation groups
A delegation group enables a person to delegate responsibilities such as approval requests and access reviews. It contains the list of delegates to which tasks can be assigned and notification emails sent.
Delegation groups are used in two distinct ways in RAC/M Identity and this can cause confusion as both relate to the same concept: identifying who can perform an action.
See Also
Delegation groups for "simple" delegation
This is the original concept of delegation implemented in RAC/M Identity. Many areas in the solution allow to define an individual identity in a metadata field (ex: Asset owner, Identity reviewer, etc.). This represents the identity responsible for performing the action, but very often they want to delegate this responsibility to others.
A delegation group has an owner representing the identity delegating its responsibility. The list of members are the delegate to whom the responsibility is delegated to.
Delegation group scopes
The notion of scope was added because the same identity could want to delegate some responsibilities to certain delegates and other responsibilities to other delegates. There are currently only two scopes defined as this approach did not prove to be flexible enough.
| Scope | Delegated responsibility |
|---|---|
| Generic | All responsibilities except those explicitly listed in self-service scope or those using workgroups. |
| Self-Service | Delegates the owner's right to see an identity's accesses for self-service access requests (when using the "filter accesses by identity" feature) or access removal request. The owner has this right for all identities for whom he is an approver. |
Delegation Group Confusion
Avoid creating more than one delegation group with a given owner in a given scope. In that situation RAC/M Identity decides arbitrarily which group to use to delegate a responsibility and this can cause confusion.
Delegation groups as workgroups
This way of using delegation groups was introduced to solve the issue of flexibility of the "simple" delegation groups. In this approach, a specific responsibility is delegated explicitly to a delegation group. The metadata fields on an object that determines who is responsible select for a delegation group instead of an individual identity. All recently added fields use this approach to give greater flexibility.
This approach completely ignores the scope as the delegation group is explicitly set.
Delegation group types
The type of delegation group determines how the delegates will be notified of the delegated responsibility.
| Type | Delegation mechanism |
|---|---|
| CASCADE_GROUP | Members of the delegation group are notified according to their priority. The priority is actually the number of reminders (starting at 1) before a member is notified of the task. Note that the member can perform the task as soon as it is created, even before he receives the notification according to his priority. For historic reasons, owners are never notified of the task, but they should using this group type. This may be changed in a future version. |
| CASCADE_GROUP_EXCL_OWNER | Do not use. Reserved for future use. |
| SIMPLE_GROUP | All members of the delegation group and the owner will be notified as soon as a task is needed of them. The priority of members is ignored. |
| SIMPLE_GROUP_EXCL_OWNER | All members of the delegation group will be notified as soon as a task is needed of them. The owner will not be notified unless he is explicitly a member of the group in addition to being the owner. |
About approval workflows (Premium edition)
Approval workflows can be defined for each critical asset and entitlement. Approval workflows are invoked when an access request is made through the self-service portal or other means.
RAC/M Identity includes a flexible workflow capability that allows you to taylor workflows to match your specific requirements without resorting to custom workflows or writing code.
Approval workflows can have up to three levels and you must determine how many levels are required and who must approve the request based on the criticality of the asset and entitlement.
The levels are additive, meaning that some assets may only require the requester`s manager approval while others may require additional approval steps by the asset owner and even more critical assets may require a third approval step by special approvers.
The three common levels of approval are the following:
Approval by the requester’s manager or his/her delegates. This level may be sufficient for assets that are moderately critical.
Approval by the asset owner, a specific approver, or their delegates. This level is typically used for critical systems and financial systems in the context of Sarbanes-Oxley, SOC 2, NERC, NIST, ISO or other management control or security frameworks.
Approval by a special approver or his delegates. This level is typically used only for highly critical assets that require special approval.
There is an additional level of approval for role modifications. If global approval is configured, this level allows for seeking approval from administrators for validation and management of activation options.
Note
Non critical assets that are widely accessible to most or all users, such as email, typically do not require approval workflows.
See Also
About the organizational structure
The organization and department a person works for is part of the person’s identity description in RAC/M.
Defining your organization's structure enables RAC/M Identity to support enhanced process automation and enforce governance through business rules.
You can define your organization’s structure by describing the departments and divisions in your organization as well as the person responsible for each level along with other complementary information such as location, cost centers, etc..
If some structural elements are not unique (for example, a cardiology department), you can create a unique key for that element by concatenating information from different fields found in the columns in the repository database (refer to Constructing keys from multiple columns).
Note
Because access requests may require the approval of the requester’s manager, it is important to identify managers and supervisors within each department and division of your organization. This allows the business logic to automatically determine who can be reached for approving requests or reviewing accesses.
RAC/M has three structural elements to work with, and multiple levels of organizations and departments can be added to match your organization. The structural elements are as follows:
- Enterprise: This structural element is at the top of the hierarchy. This corresponds to the highest level of your organization as a whole.
- Organization: This is a subcategory of the enterprise. It could correspond to divisions within a company, the different campuses within a university, and different hospitals within the same network of hospitals.
- Department: This is a subcategory of the organization. It could correspond to the different departments within a company’s divisions, the different university departments, etc. In the Example of an Organizational Structure in RAC/M Identity, it corresponds to the hospital departments or units.
In RAC/M Identity, the Organizational structure in found on the Menu bar under ORGANIZATION> Structure.

Although you can create and modify the organizational structure manually, it is usually automatically imported via a sequence.
When you open the page, only the enterprise is displayed. To expand the tree, click the plus sign on the left of the different structural elements. When you select an element of the structure, its details appear on the right.
Note
While you can modify the information directly in this page, modifications may be lost when the structure is updated via a sequence.
Identifying the work structure
Each organization typically has its own nomenclature to refer to its internal work structure for jobs, responsibilities, permissions, and employment status.
RAC/M Identity can make use of this nomenclature to properly label the related objects as well as to predefine normalized statuses to reflect various situations such as employment status.
The following are examples of terms that can be part of a work structure:
- Departments
- Organizational units (OU)s
- Costs centers
- Sites
- Locations
- Floors
- Services
- Job titles
- Pay grades
- Responsibilities
- Employment status nomenclature (for example, temporary, contractor, long-term disability, vacation, disability leave, etc.)
Tip
It is recommended that you document and organize the work structure and the terminology to be used in the enhanced IAM processes. Doing so will help ensure a consistent, harmonized use of the terms representing statuses, hierarchical levels, etc. thus greatly enhancing the resulting quality.
See Also
About extended attributes
Extended attributes allow the data model of the main RAC/M Identity objects to be easily extended at any time to hold attributes that are relevant to your organization.
For example, if specific training is required to access certain applications, an extended attribute may be added to the Identity object to contain certifications held by the person.
Business logic can validate whether the requirements are met by checking these extended attributes before assiging roles or granting entitlements.
Extended attributes are created through the management console and stored in secondary tables linked to the main tables representing the objects to be extended.
Adding extended attributes
To add extended attributes to RAC/M objects
On the Menu Bar, click CONFIGURATION> Mappings.
Select the Extended Attributes tab
Select the object for which you want to view, modify or add extended attributes
At the top of the page, click the
 button.
In the Display Name and Description fields, enter a name that reflects the meaning of the extended attribute and a short description that will be displayed under the attribute name.
In the Technical Name field, enter a short, unique name that will be used as the internal reference to the new extended attribute.
Check appropriate check boxes if the new attribute value must be unique and if the attribute value can be modified from the management console. If not modifiable from the console, the value can only be set to at import time or modified using business logic.
About group and role hierarchies
To facilitate managing entitlements and effective rights, RAC/M Identity implements a hierarchical model where parent groups and roles include the entitlements and access rights of children groups and roles.
Thus, in RAC/M Identity, a security group such as Product Owners would include the group Team members, which includes the group Employees, thus providing the members of the Product Owners group the aggregated access rights and permissions of the Product Owners, Team Members and Employees groups.
The same applies to roles. Since, in RAC/M Identity, roles can include other roles, identities who are members of the Product Owners role which includes the Team Members and Employees roles, will be granted the access rights and permissions associated with the Product Owners, Team members and Employees roles.
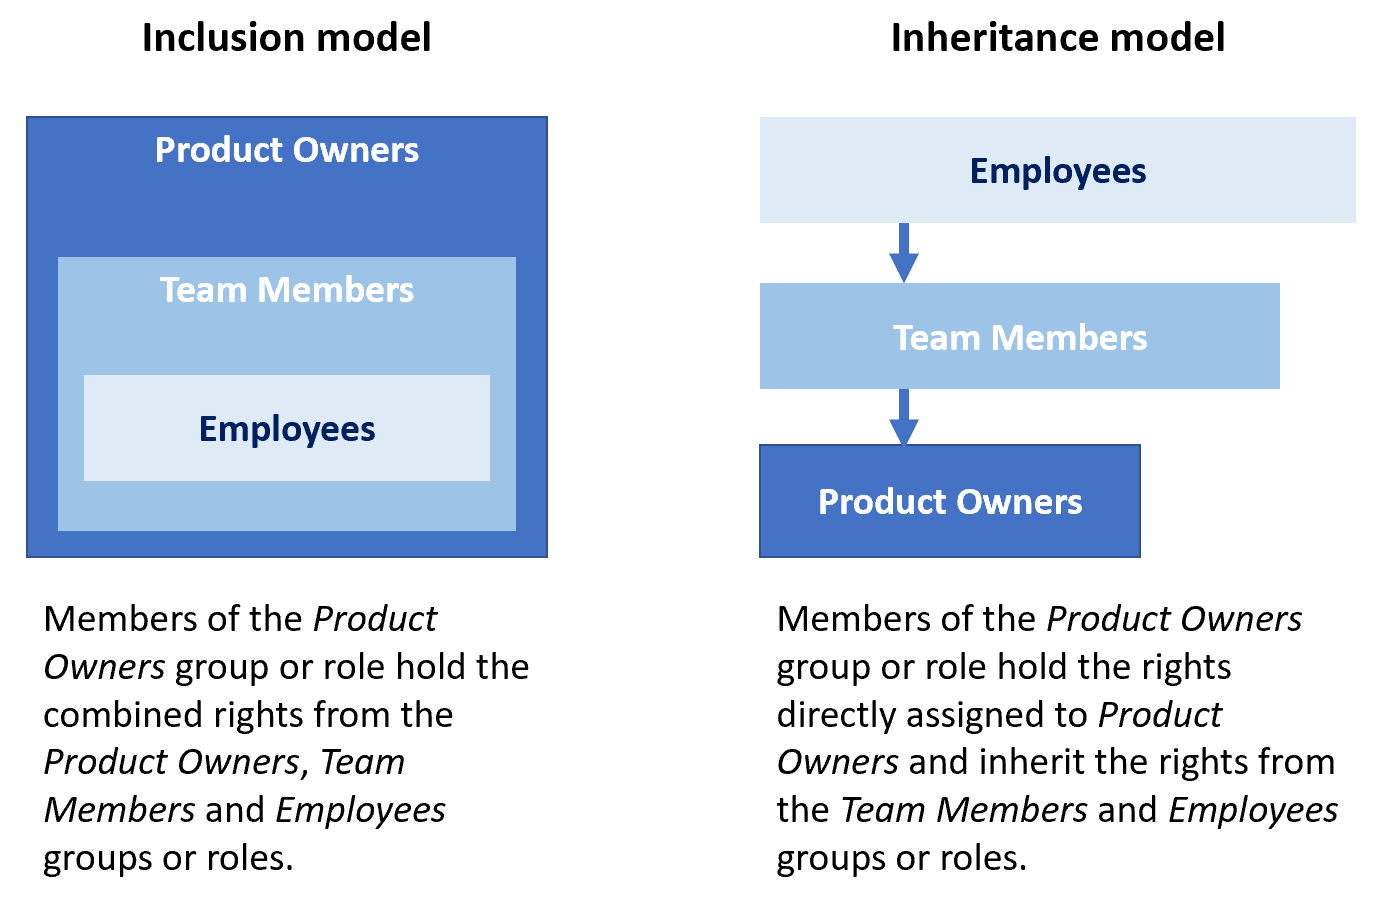
Although the representation of the hierarchy differs, the end result is the same. The effective rights held by users are exactly the same with both representations.
Important
The notion of inclusion is the inverse of an inheritance model as implemented in Active Directory but is aligned to other major systems such as SAP.
This means that, when importing security groups from Active Directory and Entra ID, groups that are members of other groups must be imported as parents of those other groups.
About analyzing data
This section describes how to analyze the Identity and Data sources to prepare for importing data via collectors and connectors.
Note
For more information on how to identify Identity sources and Data sources, refer to Identifying Identity Sources and Identifying Data Sources.
Before you start importing data, you should examine it to make sure that it is clean and consistent, and that it contains the information you need.
If some elements of the data are unclear, inconsistent or of poor quality, you must contact the person responsible for that data source and try to resolve issues before attempting to import data. Consistency and data quality are extremely important to build and maintain an effective and reliable repository.
Tip
Pay special attention to names and dates. Often people use different forms of their names. This makes matching accounts to the right identity and the right person difficult. RAC/M Identity includes several powerful mechanisms to automatically match accounts to identities, but using consistent names across different applications, systems and applications significantly reduces the time and efforts required to achieve full matching.
Also, pay special attention to dates which may be stored in various formats. It is important that dates stored within an HR system or an application use a consistent format. RAC/M Identity will attempt to recognize the date format but consistency reduces the likelyhood of errors.
Note
It is important to understand that all integrations are different and that you may encounter different situations and issues from one integration to the next. While this guide provides an overview of the analysis you need to perform and the kinds of issues you may encounter, it cannot cover every possible situation.
Determining unique identifiers
Each RAC/M Identity object must have a unique identifier to distinguish it from other objects. This unique identifier is the unique key that must be constructed from available data elements.
For example, based on this unique key, when importing identity data, RAC/M Identity will be able to determine if an identity already exists and only needs to be updated or if a new identity must be created.
In addition, RAC/M Identity assigns each person and each identity a permanent, system-generated unique identifier: a Universally Unique Identifier (UUID), also referred to as a Globally Unique Identifier (GUID). These values are distinct from the primary key you configure from source attributes; they permanently distinguish repository records from one another and avoid ambiguity when names or other data change.
Primary key
The unique key associated with RAC/M Identity objects is called a Primary key. It is the first thing you must determine when integrating an identity source or target system. Determining a primary key can be challenging, especially when policies or regulations disallow the use of sensitive information such as the Social Insurance Number (SIN), birth date, etc..
Ideally, a permanent, unique code, such as an employee number, a student number or an email address, should be used.
If an obvious primary key cannot be found, you have to meet with the subject matter expert responsible for the identity source or target system and determine what attributes or combination of attributes can be used as the primary key.
Multiple attributes can be concatenated to construct a unique key. See Constructing Keys from multiple columns
External keys
External Keys are defined to link to secondary tables, such as the Employment_Status table (the list of the organization’s employment statuses) or the Employment_Type table (the list of the organization’s employment types). These secondary tables map primary data like persons, identities, applications, roles, etc. to secondary data that can assume multiple distinct values.
Example
Although there may be 1,000 identities in the database, where each may have one of four different employment statuses, such as active, inactive, retired and sick leave, the Employment_Status table would then contain those 4 statuses. Identities would then obtain their status by linking to that table via an external key.
In RAC/M Identity, external keys are identified by the prefixes HR_, RH_, EXT_ or the suffix _ID.
Note
For more information on the external keys used when importing identity sources, refer to The IDENTITY_IMPORT table and The STRUCTURAL_IMPORT table.
You must therefore be sure that there are attributes in the columns of the source file that can be used as external keys.
Constructing keys from multiple columns
If it is not possible to find a unique key in a single column, RAC/M Identity allows you to concatenate columns in order to create a unique identifier.
Example
A hospital network has 2 hospitals: St. Mary’s Hospital and General Hospital, each with the same departments. The name of the departments cannot be used as a unique key to refer to each department because they appear more than once, hence are not unique. You can create a unique key by combining the name of the hospital and the name of the department: “St. Mary’s Hospital, Cardiology” and “General Hospital, Cardiology.” This combination then becomes a key you can use to uniquely identify each department.
For more information on concatenation, see Configuring a Collector.
The reverse situation can also happen. Parts of information in a column may be required for two distinct keys. In this case, you need to reformat the file to split the content of the source column into two columns. (see Configuring a Formatter).
Example
The identity source displays the full name (first and last) of the people in a single column instead of two. In that case, you will need to reformat the file and generate two columns, from that single one, in order to populate the Full_Name and Last_Name columns in RAC/M.
About business logic and data processing
In this section, you will learn the concepts of how to implement business logic and define processing sequences in RAC/M Identity by simple configuration, without the need for programming or scripting. This is the No-Code/Low-Code approach.
The term "business logic" refers to the instructions that determine how data is created, stored and processed.
Once you have identified your Identity and Data sources, analyzed their content, and understood which data you will need to import into the appropriate target tables, you need to decide how you will process that data: In which order will you import the data from the staging tables? Do you need to normalize some of the data before importing it? Does RAC/M need to flag certain identities when processing the data?
These are some of the questions you will need to ask yourself when making sure that RAC/M processes the data in a way that will optimize your Identity and Access Management (IAM) system.
RAC/M Identity offers a wide range of capabilities to enhance, correlate and process data found in identity and data sources. For example, in RAC/M Identity, the business logic can be defined to:
- Ensure the orderly processing of up-to-date data from Identity sources and Data sources;
- Consolidate, harmonize, and ensure integrity of attributes across multiple identity sources and target systems;
- Validate and ensure the quality of the repository;
- Trigger events and initiate responses such as sending reports and email notifications;
- Initiate actions to request, assign or revoke entitlements.
Note
Process optimization requires several iterations where the business logic is refined taking into consideration the evolution in data quality as well as the evolving maturity of the supporting IAM processes.
In RAC/M Identity, the business logic to process the data is implemented via modules, blocks, and sequences.
Formatters, collectors, file managers and modules can be used as is. These ready-to-use objects and the hundreds of primitives available are described in the document RAC/M Identity - Technical Reference Guide.
If you can't find the exact module you need, you can duplicate one and modify it to suit your needs, or even build one from scratch, directly in RAC/M Identity.
Each element of the business logic is implemented through a module, which is a basic function used to manipulate data within the repository. Modules can be represented as the smallest processing that can be performed on data and are thus typically dedicated to a single, specific purpose.
The most common module used is the one that takes data from the staging table and standardizes it to correspond to the way the information is displayed in RAC/M.
Example
To transfer the data from the IDENTITY_IMPORT staging table to the Identification target table, you need to create a module that uses the ModuleCopyColumnsAndInsert primitive.
Although the term “module” refers to the generic form of business logic, it also refers to other types of specialized business logic:
- File managers
- Formatters
- Collectors
- ICF Connectors
- Processing modules
- Extractors
The following paragraphs present the RAC/M Identity objects you will use to process data.
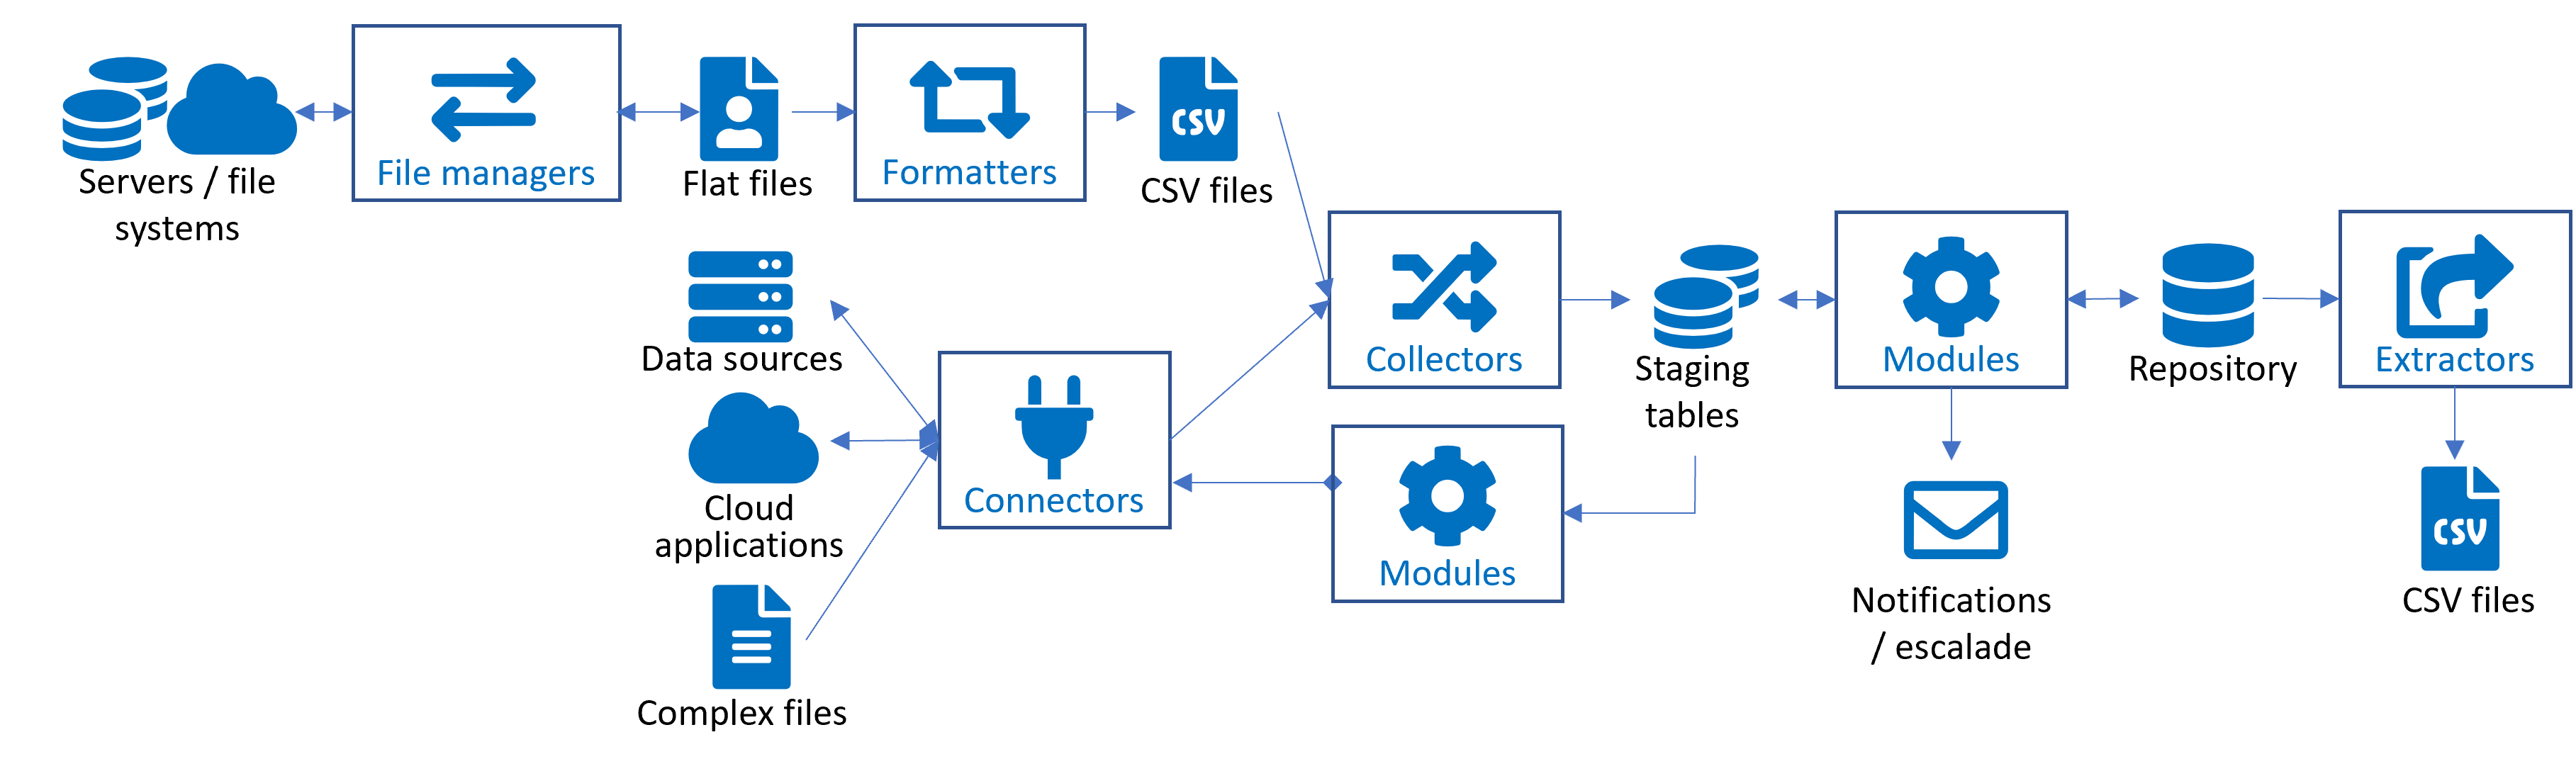
File managers
File managers allow you to connect RAC/M Identity to servers, such as FTP sites, which contain the directories that host the data of interest. For more information, see Configuring a file manager.
Formatters
Formatters allow you to format the data, as required. For example, they can be used to separate the “first name” and “last name” of an identity if the source only has the "full name” column. For more information, see Configuring a Formatter.
ICF Connectors
The ICF connectors allow you to connect RAC/M Identity directly to databases, such as Active Directory. For more information, see ICF Connectors.
Collectors
Collectors allow you to import data taken from a flat file, such as a CSV file, and place it in the RAC/M staging table (see Understanding the Data Model). They are also used to transfer data in staging tables when data is imported through an ICF Connector or a File manager. For more information, see Configuring a Collector.
Collectors control how attributes from authoritative sources are mapped to the repository. You can choose which attributes to map, apply transformations such as setting constant values, and specify which source has update priority (or authority) over each attribute.
Determining attribute priority
Configuring an attribute mapping in a collector makes that collector an authoritative source for the corresponding attributes. When the same attribute is populated by more than one collector, the final value stored in the repository is determined by the order in which the collectors are executed within their parent blocks and sequences: the value written last takes precedence.
Generic Modules
Generic modules are built to implement the organization’s business logic (see About Modules). They can be used to copy data from the staging tables to the Identity and access repository, to standardize data, to find untrusted data, to send notifications and to perform any other required processing. For more information, see Configuring a Module.
Extractors
Extractors allow you to extract data from the access repository and store it in a standard format, such as a CSV file. For more information, see Configuring an Extractor.
Reporting data extracted from the repository as a CSV file can be transferred to external systems such as SIEM solutions using any available mechanisms or APIs through configurable business logic.
Blocks
A block is a group of modules required to perform a specific task. When processes require multiple modules to perform a given task, they can be grouped and organized into blocks. For more information, see Configuring a block
Example
To update the identities in the repository, you would use a module that clears the data, followed by another module that imports the structure, followed by another one that imports the hierarchy, etc.
As for modules, blocks can be grouped to execute more elaborate tasks. Groups of blocks are called sequences.
Sequences
Sequences are made up of one or more blocks and are used to perform all the steps required to complete a specific task such as importing data, detecting arrivals, departures and moves and making the required access changes. For more information, see Configuring a sequence.
Example
To update both the identities and the accounts in the repository, you could use a block that updates the identities and another one that updates the accounts and include both blocks in a single sequence.
Sequences can be started manually or automatically based on a schedule that you define. This type of scheduling can be used to ensure that the repository is always up to date with the Identity and Data sources.
Usually, the first sequence that you will need will typically contain only one block made up of the collector and File manager modules which will allow you to import data from your selection of Identity and Data sources, and the modules to copy the information to the repository.
This will allow you to take a first look at the data, confirm that everything is imported correctly, and start fine-tuning the business logic.
Custom modules
In some cases, specific processing or actions need to be taken that cannot be achieved using the prebuilt objects, by building objects from scratch or by modifying existing ones.
In this rare case, custom modules may be developed using scripting modules or in Java and invoked as part of a sequence like any other object.
These small custom modules can implement any business logic, effectively removing any limits or technical constraints. These custom modules can be developed by you or by OKIOK.
Training on the RAC/M SDK and advanced integration topics as well as intermediate Java developer skills are required to successfully develop custom modules.
Training on the RAC/M Identity SDK and advanced integration topics as well as SQL and Java development skills are recommended to successfully develop custom modules. :::
Custom modules are deployed separately from the base RAC/M Identity distribution. This is to preserve specific customization while allowing the base distribution to evolve and be updated when new versions are available.
Responding to trigger events
Trigger events is a term used to describe situations that, when detected by RAC/M Identity, result in one or more actions to be initiated by RAC/M.
The following are some examples of trigger events:
- Detecting that people have left the organization and their accounts should be removed from all systems and applications they were using.
- Detecting that new people joined the organization and that a “basic user package” must be created for them. (This basic user package would typically include creation of an account in Active Directory, adding the account to a few base groups and creating an email account and mailbox.)
- Receiving requests to add new accesses or roles, or to modify or revoke existing ones.
- Detecting changes to the contents of roles or access rights assignments that result in changes that need to be propagated to Data sources.
- Detecting attribute changes in identity sources that signal a change in employment status or a transfer that results in changes in access rights that must be propagated to target systems.
- Any event or situation that would ultimately require a notification or an action to be taken.
Typically, these trigger events are detected by modules in sequences that are run automatically at a predetermined frequency. For example, detection of arrivals and departures is typically carried out daily, or more frequently, so that accounts can be created or revoked quickly.
Please refer to the RAC/M Identity Technical Reference Guide for more information about the built-in modules that can be used to detect these trigger events.
Once a trigger event is detected, the response can be just about anything that makes sense for you. For example, the generation and distribution of an email that lists all accounts to be removed from various systems and applications or the creation of a service ticket in an ITSM ticketing system such as ServiceNow, Jira or other, when a person leaves.
Another common response to trigger events is to provision or deprovision accounts and accesses. When data sources and applications are integrated using bidirectional connectors, fully automated provisioning and deprovisioning can be performed.
Generating an email
The simplest response is the generation of an email that is sent to a service desk to request creation, modification or deletion of accounts and accesses.
RAC/M Identity provides email templates that you can easily customize to match the look and feel of your organization by adding your logos, branding, custom text, contact information and terminology.
Furthermore, the business logic within the module generating the response email can route the email to several service desks based on the data sources or applications, or on any other considerations.
Standard tags can be inserted in the subject and body of the email that will be replaced with actual data from the repository when the email is generated.
Alternately, a structured email can be sent to an ITSM ticketing system instead of a service desk.
The structured email is constructed in the same way as described above but specific fields may need to appear in the subject or the body of the email in order for the ticketing system to be able to extract the required information to generate the ticket.
Creating a ticket in a ticketing system
An alternative to sending an email is to open a service ticket in an ITSM solution like ServiceNow, Jira, C2, etc. This approach retrieves the ticket number which is automatically entered into the tracking artifacts managed by RAC/M Identity, ensuring traceability of actions taken.
In addition, these tickets can be updated to reflect the evolution of the request until the end of the resulting processing.
RAC/M Identity allows for selecting ticketing systems based on data sources, applications, or any other consideration.
Automated provisioning and deprovisioning
In general, it can take a while for an organization to achieve the level of maturity required to implement automated provisioning and deprovisioning. The reason for this is that provisioning accounts to systems and applications is complex and numerous decisions need to be made simply to create an account and assign the right privilege levels.
Automated systems, unlike humans, cannot make such decisions. Some considerations must be analyzed and resolved ahead of time, such as:
- Location in the directory tree
- Account nomenclature
- Password nomenclature
- Dealing with collisions
- Group / profile membership
- Dealing with technical failures
RAC/M Identity allows you to define accounts and password policies and nomenclature that complies with your organization's security and access management policies.
It is also important to decide where accounts need to be created or where they need to be moved when an access is revoked. In general, it is recommended not to delete accounts from directories or systems but to set them to an inactive state and move them to a specific organizational unit (OU). This greatly facilitates enforcing a "no reuse" policy for accounts.
See Also
Provisioning notification
When accesses are automatically provisioned after a request, the following people can be notified:
- The requester (the person who made the request)
- The target (the person receiving the accesses)
- The target's supervisor
- Members of the target's provisioning notification group.
The sending of these notifications can be configured for each asset grouping, asset and group. To access this configuration, simply go to the page for an asset grouping, asset or group. The selection is located under the "Provisioning" or "Provisioning Notification" panel, depending on the page.
There is a hierarchy in the configuration of notifications. Configuration at the asset grouping level can be applied to all the assets and groups it contains. Similarly, configuration at the asset level can apply to all the groups it contains. Alternatively, a configuration specific to an asset or a group can be used to define more precisely the desired behavior for each of these elements.
Provisioning notification configuration lets you specify notification options for accounts, accesses and passwords, for each of the possible recipients. The following options are available:
| Option | Description |
|---|---|
| On account creation or activation | This option controls whether an email is sent when an account is created or activated. |
| On entitlements modification | This option controls whether an email is sent when an entitlement is provisioned. When selected, it also includes the accounts associated with the entitlements. |
| On password change | This option controls whether an email is sent when a password is changed. Typically, this is a password for an account that has just been created. When selected, it also includes the accounts associated with the passwords, unless the option to send the password in a separate email is selected. |
| Separate password delivery | This option controls whether the password is sent in a separate email from the one containing the account name. |
These options are available for each recipient, except for the option to send the password in a separate email, which is a global option.
The flexibility of these options makes it possible to meet specific needs. It is possible, for example, to send an account creation notification to the requester, the target and the target's supervisor, a notification including accesses only to the requester and the target, and the password only to the target.
It is also possible to specify a particular configuration for a group. This configuration takes precedence over that of the asset and asset grouping. For example, a low-privilege group generating a large number of emails could be configured not to send any notifications at all. Conversely, a group of particular importance could be configured so that specific people are notified as soon as an account is provisioned within it.
About importing data into the repository
This chapter describes how to import data into the RAC/M Identity repository.
Data import is done by importing the information extracted from a data source to a flat file in CSV format, or by using a connector to import directly from a data source such as Active Directory.
In both cases, collectors are used to map the data, found either in the columns of the flat files or the attributes of the source systems, to the columns of the RAC/M Identity staging tables.
Staging tables
When you import data, it is placed in staging tables of the repository, which are tables in which you can import, clean, format, and pre-process the data before copying it to the RAC/M Identity repository.
This ensures optimal data quality by applying business logic and validation rules before entering it into the repository.
Staging tables are the target tables you select when importing data via collectors and connectors.
Likewise, they are the source tables you select when copying data into secondary staging tables or into the repository itself via modules.
Note
The RAC/M Identity repository is extensive. Over time, you will become familiar with all of its tables and attributes. But for now, it is only important that you familiarize yourself with the essential objects required to get started.
Description of the staging tables
The following section provides a detailed description of the main staging tables.
Staging table names use the suffix “_IMPORT”.
The main staging tables are:
- IDENTITY_IMPORT : For importing identity information
- STRUCTURAL_IMPORT : For importing your organizational structure
- APPLICATION_ACCOUNT_IMPORT : For importing accounts and groups from assets
- PROFILE_HIERARCHY_IMPORT : For importing groups and descriptions from assets
The descriptions presented below are meant to help you determine which fields from the data sources best correspond to the data fields of the staging tables so they can be mapped correctly during data import.
Also, keep in mind that extensive data operations can be performed when importing data using collectors and connectors to complement and enhance the data. For example, operations such as constant values assignment, data concatenation and much more are available.
Applying data operators to collectors and connectors is discussed in details in a later section.
Note
Additional data fields to the ones described may be imported in extra fields present in each staging table. These fields may contain any data that is useful and relevant to your organization. Importing additional information is an advanced topic and is discussed in more details in a later section. You may also contact OKIOK to discuss your integration strategy with our IAM Subject Matter Experts.
The IDENTITY_IMPORT table
The IDENTITY_IMPORT table is where the data from your identity sources is imported. It enables you to define identities in RAC/M as well as populate secondary tables, such as the Employment_Status table (which lists all of your organization’s employment statuses) and the Employment_Type table (which lists all of your organization’s employment types).
Data is imported into this table using the IdentitiesImport collector (see Configuring a Collector) or appropriate connector such as one of the HR connectors.
The main attributes are listed in the table below. The most important ones are in bold and mandatory attributes are in bold and preceded by an asterisk.
| Attribute | Description |
|---|---|
| *IDENTITY_IMPORT_ID | This is an incremental number automatically generated by RAC/M Identity to identify the imported identities. |
| *FIRST_NAME | This is the first name of the person whose identity is created. Along with the EMPLOYEE_ID and the LAST_NAME attributes, it is one of the basic attributes you absolutely need to create an identity. |
| *LAST_NAME | This is the last name of the person whose identity is created. Along with the EMPLOYEE_ID and the FIRST_NAME attributes, it is one of the basic attributes you absolutely need to create an identity. |
| This is the email address of the person whose identity is created. It helps you match a person and an identity with certainty and can be used as a primary key if more than one person has the same name, for example (see Determining a Primary Key). | |
| EMPLOYEE_ID | This is a unique number assigned to the person. It can be an employee number, a student number, etc. Generally, this is the most important attribute as it is most often used as the primary key (see Determining a Primary Key). |
| HR_JOBS_ID | This is a unique external key that links to the JOBS table, which contains all of your organization’s jobs (for example, administrator, secretary, doctor, student, etc.). |
| HR_JOBS_NAME | This is the name of the HR_JOBS_ID attribute as displayed in the RAC/M Identity management console. |
| HR_EMPL_STATUS_ID | This is a unique external key that links to the EMPLOYMENT_STATUS table, which contains all of your organization’s employment statuses (for example, active, retired, sick leave, etc.). It is very important for this attribute to be populated as it determines if an identity is considered active and if it can be granted access. However, if the field contains no data, the identity is considered active by default. |
| HR_EMPL_STATUS_NAME | This is the name of the HR_EMPL_STATUS_ID attribute as displayed in the RAC/M Identity management console. |
| HR_EMPL_TYPE_ID | This is a unique external key that links to the EMPLOYMENT_TYPE table, which contains all of your organization’s employment types (for example, permanent, contractor, intern etc.). |
| HR_EMPL_TYPE_NAME | This is the name of the HR_EMPL_TYPE_ID attribute as displayed in the RAC/M Identity management console. |
| TERMINATION_DATE_STR | This is the date on which the person will no longer be doing the job related to this identity. This date determines when the identity will no longer be active. |
| HR_SUPERVISOR_EMPLOYEE_ID | This should contain the employee ID or other unique identifier for the employee’s manager or supervisor. |
| HR_DEPARTMENT_ID | This is a unique external key that links to the STRUCTURAL_IMPORT table. It should refer to one of your organization’s departments. |
| HR_ORGANISATION_ID | This is a unique external key that links to the STRUCTURAL_IMPORT table. It should refer to one of your organizations. |
| HR_WORK_LOCATION_ID | This is a unique external key that links to the STRUCTURAL table. It should refer to one of your organization’s work locations. |
| HR_WORK_LOCATION_NAME | This is the name of the HR_WORK_LOCATION_ID attribute as displayed in the RAC/M Identity management console. |
| HR_FILE_SOURCE_ID | This is a unique external key that links to the FILE_SOURCE table. It should refer to the name of the file corresponding to the identity source being processed. |
| BIRTH_DATE_STR | This is an optional field containing the date of birth of the person whose identity is created. It helps you match a person to an identity with certainty if more than one person has the same name, for example. |
Note
All attributes starting with the prefixes HR_, RH_, or EXT_ and the suffix _ID are external keys. This means that they are used to refer to data in another table. Since the data in those other tables is also specific to your organization, these links are created using the nomenclature of your organization. The name external keys reflects the fact that the linked data is not pre-defined in the RAC/M Identity model.
As an example, an organization can have many statuses for identities: terminated, maternity leave, sabbatical and for each entry, an attribute indicates whether RAC/M Identity should keep or revoke the entitlements. The identity table will link to the status table using the terms imported from your data: sabbatical, terminated, etc.
The STRUCTURAL_IMPORT table
The STRUCTURAL_IMPORT table is the table that describes your organization’s structure and hierarchy. While the data that will populate this table is often taken from the same source as the data that populates the IDENTITY_IMPORT table, it is imported using different collectors and connectors.
Data is imported into this table using the DepartmentImport collector and the StructuralImport collector (see Configuring a Collector).
The main attributes are listed in the table below. The most important ones are in bold and the mandatory attributes are in bold and preceded by an asterisk.
| Attributes | Description |
|---|---|
| *STRUCTURAL_IMPORT_ID | This is a unique key that corresponds to the HR_DEPARTMENT_ID column in the IDENTITY_IMPORT table. It enables you to identify the different structural elements (that is, organization or department) of the client’s organization. |
| *NAME | This is the name of the structural element (that is, organization or department). |
| *ORG_TYPE | This identifies whether the structural element is an organization or a department. |
| HR_WORK_LOCATION_ID | This is a unique external key that links to the WORK_LOCATION table. It enables you to identify all of the different work locations used to create the structure. |
| HR_WORK_LOCATION_NAME | This is the name of work location referenced by the HR_WORK_LOCATION_ID attribute as displayed in the RAC/M Identity management console. |
The APPLICATION_ACCOUNT_IMPORT table
The APPLICATION_ACCOUNT_IMPORT table is the table into which all of the data from your target systems and applications is imported. It enables you to import the accounts to which identities have access.
Data is imported into this table using collectors or connectors.(see Configuring a Collector and Configuring an ICF Connector). Although there is usually only one collector or connector per Data source, it is possible that multiple collectors or connectors be required to load the different types of objects from a Data source. For example, different collectors or connectors are used to load accounts and groups from Active Directory.
The main attributes are listed in the table below. The most important ones are in bold and the mandatory attributes are in bold and preceded by an asterisk.
| Attributes | Description |
|---|---|
| APPLICATION_ACCOUNT_IMPORT_ID | This is an incremental number automatically generated by RAC/M to identify the imported accounts. |
| *EXT_APPLICATION_ID | This is a unique external key that links to the APPLICATION table. It enables you to identify all of the different applications used by the identities. This attribute is mandatory and is often a constant, where the name of the application is entered manually. |
| *APPLICATION_NAME | This is the name of the EXT_APPLICATION_ID attribute. This attribute is often a constant, where the name of the application is entered manually. |
| *ACCOUNT_NAME | This is the username the person must enter when logging onto the application. This attribute is mandatory and its value must be unique. |
| *STATUS | This is the account status. This must indicate whether the account is active or inactive inactive, disabled. |
| *EXT_APPL_GROUP_ID | This is a unique external key that links to the APPLICATION_GROUP table. It enables you to identify all of the different security groups (or profiles) the application has. This attribute is mandatory. If the application does not use groups or profiles, a constant must be used, where a value is entered manually. |
| APPL_GROUP_NAME | This is the name of the EXT_APPL_GROUP_ID attribute. |
| HR_FILE _SOURCE_ID | This is a unique external key that links to the FILE_SOURCE table. It enables you to identify all of the different sources used to create accounts. |
| EXPIRATION_DATE_STR | This is the date on which the account will no longer be valid. |
| PASSWORD | This is the password the person must enter when logging onto the application. |
| PASSWORD_EXP_DATE | This is the date on which the password will no longer be valid. |
| IDENTIFIER1 & 2 | The IDENTIFIER1 and the IDENTIFIER2 attributes are often used as secondary keys that will help match the account to the identity. For example, one of these attributes could be linked to the EMPLOYEE_ID attribute. |
Note
In the following table descriptions, the term Profile refers to user profiles in applications as well as security groups such as Active Directory groups.
The PROFILE_HIERARCHY_IMPORT table
The PROFILE_HIERARCHY_IMPORT table is the table that describes the different groups assigned to application accounts within your organization. While the data that will populate this table is usually taken from the same source as the data that populates the APPLICATION_ACCOUNT_IMPORT table, it is imported using different collectors and connectors.
The main attributes are listed in the table below. The most important ones are in bold and the mandatory attributes are in bold and preceded by an asterisk.
| Attributes | Description |
|---|---|
| *EXT_APPLICATION_IMPORT_ID | This is a unique external key that links to the APPLICATION table. It enables you to identify all of the different applications for which the profiles exist. |
| APPLICATION_NAME | This is the name of the application referenced by the EXT_APPLICATION_IMPORT_ID attribute. |
| *ACCOUNT_NAME | This is a unique external key that links to the APPLICATION_ACCOUNT_IMPORT table. It enables you to identify the account to which a specific profile is linked. |
| EXT_PROFILE_ID | This is a unique external key that links to the PROFILE table. It enables you to identify all of the different profiles used. |
| *PROFIL_NAME | This is the name of the EXT_PROFILE_ID attribute. |
| DESCRIPTION | This is a description of the profile. |
See also
Importing Data using Collectors
Collectors are used to import data from CSV files as well as from ICF connectors.
While we recommend importing data using connectors that connect directly to the identity and data sources, in some cases, you may be restricted to using flat files. This is the case if you are implementing RAC/M Identity Governance edition.
Note
If data extracted from the identity or data source is a flat file but not in CSV format, you can use special modules called Formatters to convert the flat file to CSV format. You will then be able to process the resulting CSV file directly with a collector.
To import a CSV file:
The next steps will guide you in creating a collector that will allow you to read a CSV file and import it into the RAC/M Identity import table.
On the Menu Bar, click CONFIGURATION> Collectors.
At the top of the page, click the
button.Under Details, in the Name and Description fields, enter a name that reflects what the collector will be used for and enter a short description.
Ignore the Result File and Error File fields.
In the Separator field, enter the separator character used in the input CSV file. Semi-colons and commas are commonly used.
In the File Encoding field, enter the encoding format of the CSV file. Leaving the field blank will default to UTF-8 encoding.
Note
Entering the correct file encoding format is critical to properly displaying accented and foreign characters. Although most CSV files are encoded using UTF-8 encoding, Microsoft Excel spreadsheet files containing Canadian French characters are typically encoded using ISO-8859-1.
Select what you want the sequence to do if processing errors are encountered. You can choose to Stop the sequence, Skip remaining operations in the current block containing the collector and continue the sequence from the next block or simply Continue with the next operation.
For now, you may leave the default choice of stopping all processing when errors are encountered.
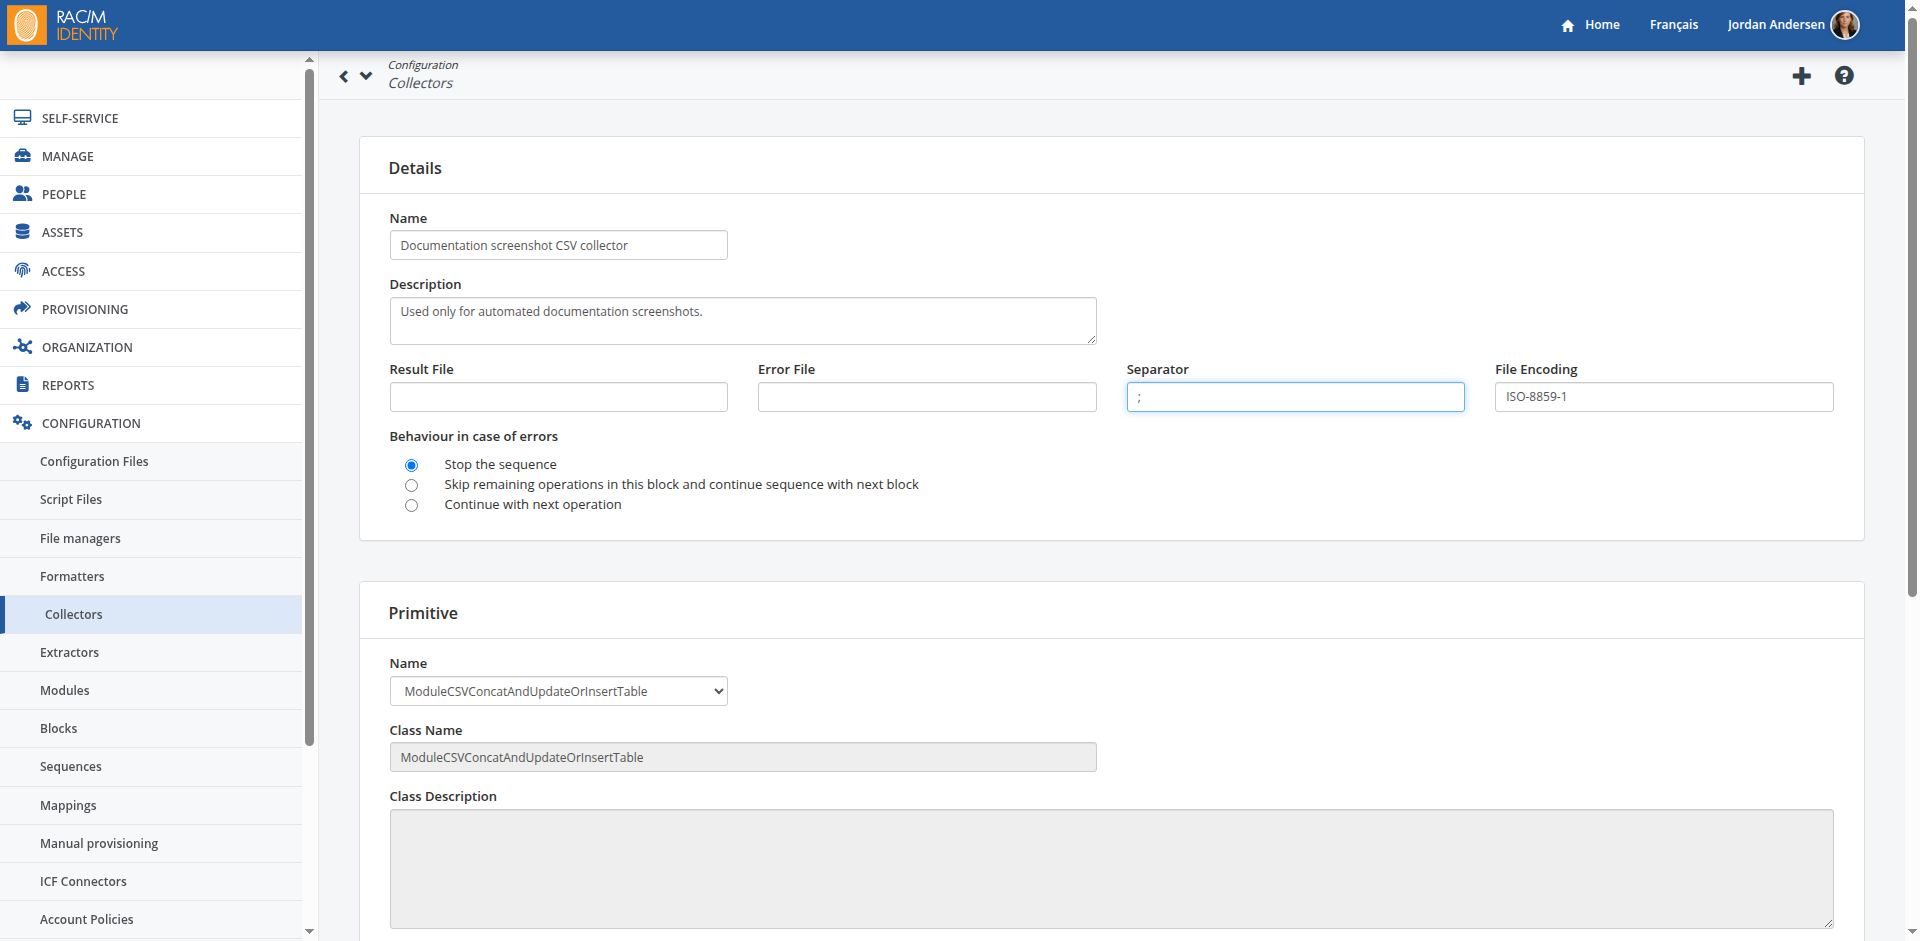
Importing a CSV File
Under Execution Class, in the Name field, select the primitive to use to import data. Primitives that can be used for importing CSV files have the characters CSV as part of their name. For now, select the ModuleCopyCSVToTable primitive. This will perform a simple copy from the source CSV file to the staging table.
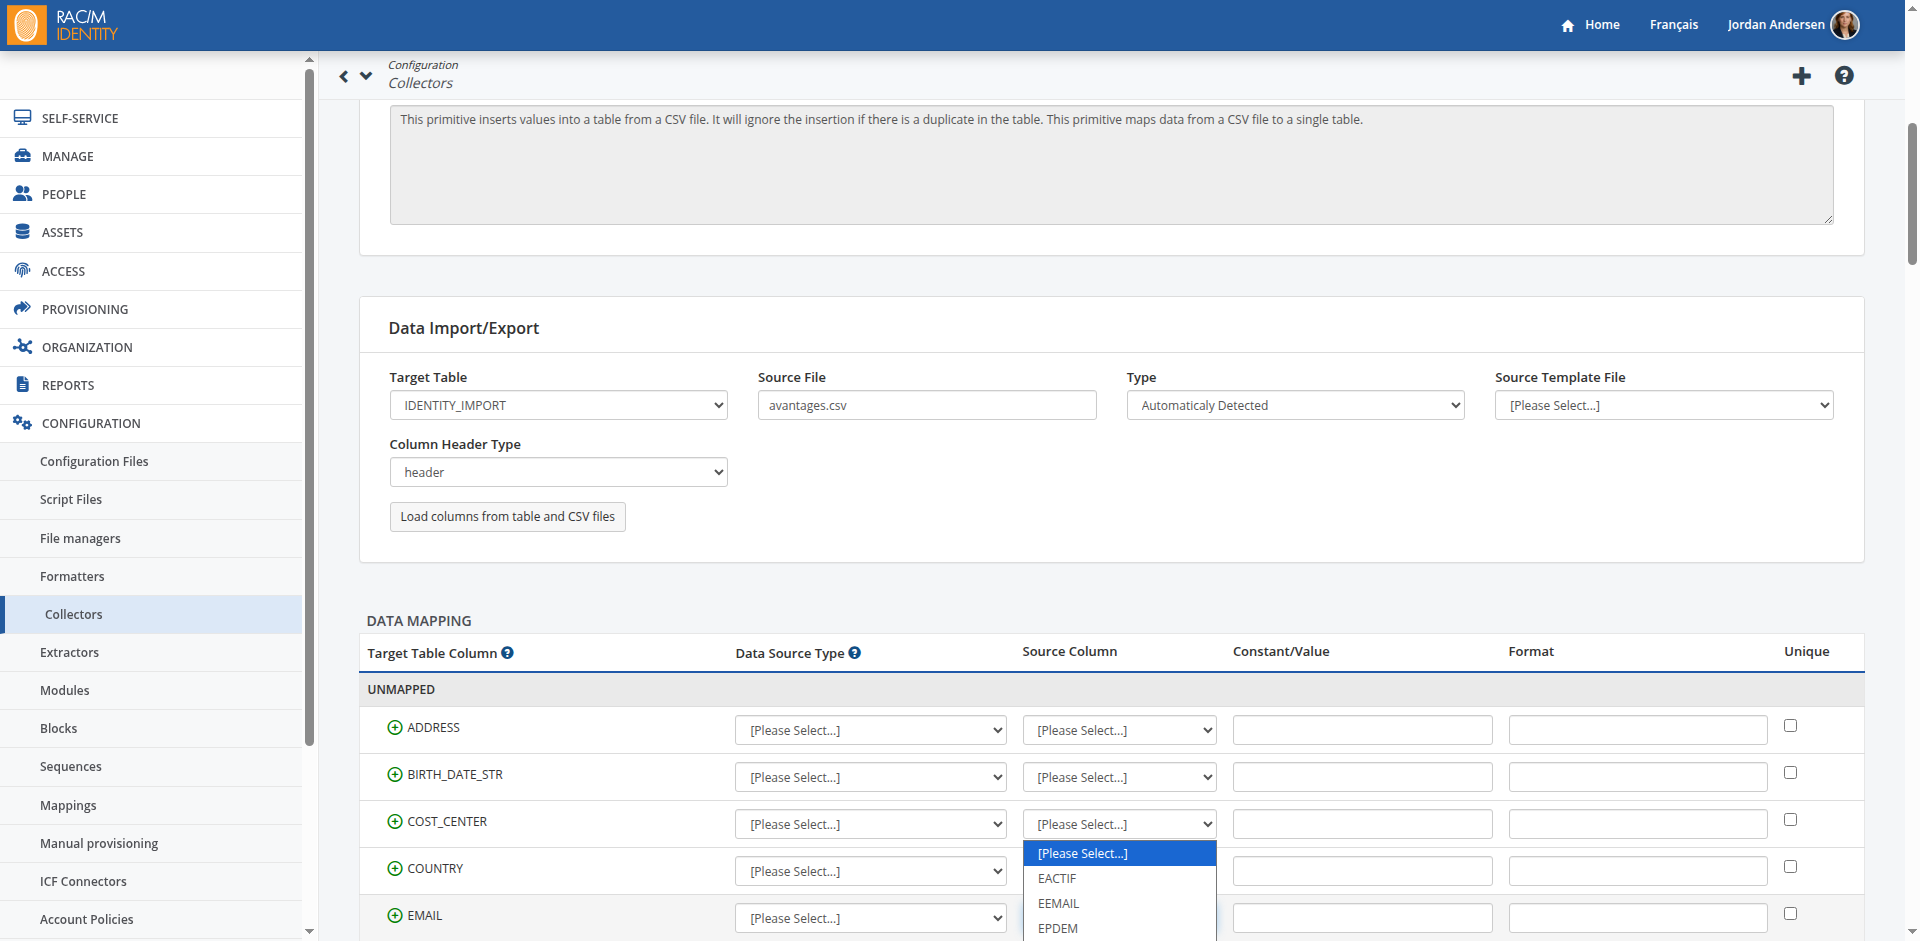
Under Data Import, in the Target Table list, select the table in which you want to import the data.
For getting started, we recommend that you import basic data in the main staging tables described above such as:
- IDENTITY_IMPORT
- APPLICATION_IMPORT
- APPLICATION_ACCOUNT_IMPORT
- ENTERPRISE_IMPORT
- PROFILE_IMPORT
- RESOURCE_IMPORT
- STRUCTURAL_IMPORT As you become familiar with RAC/M Identity and its data model you will be able to import data in other tables.
- In the Source File list, select the file from which you want to import the data. For example, to import the list of employees employed by your company, select a file in CSV format that contains the relevant information to represent each of the employees and their employment status, such as their name, title, status, department, supervisor, etc. Each field will be imported into the corresponding column of the import tables.
You can review the columns of the source file when you open a Source Column list.
The Type field allows you to select the file format to be imported. RAC/M Identity is able to automatically determine the file format in most cases. To let RAC/M automatically determine the file format, leave the field set to Automatically Detect. To select a specific format, choose it from the drop-down list.
How the columns are represented depends on how the file is stuctured. If the input CSV file contains a first line containing column headers, select Header in the Column Header Type. If the file does not contain a header line, it is possible to provide a template file that describes the columns. if a template file is available, select it in the Source Template File field, otherwise, select Index in the Column Header Type field. In this case an index number will be used to reference each column, starting at 1.
Click on Load columns from table and CSV files.
For each field in the target table where you want to import data, select a data type from the list in the Data Source Type field.
Choosing Column indicates that the value will be set to the value in the selected column of the source file.
Note
Advanced data types such as constants, pre defined values, hashed values, masked values and combinations of values can also be selected. Formats can also be specified to determine how data is represented in the target table.
See Also
For each field in the target table into which you want to import data, select the name of the column in the corresponding source file.
Click Update to save the new collector.
Tip
If data imported from a CSV file contains accented or foreign characters that are incorrectly represented in RAC/M Identity, it is probably caused by an incorrect encoding format. Please find out what encoding format is used in the source file and enter it in the File Encoding field.
Tip
You can also open flat files using other software. Sometimes this makes it easier to review the content of the file. We recommend that, when analyzing a CSV file, you open it using Microsoft Excel, it enables you to see the data organized in columns and not as a series of values separated by a comma or a semicolon.
Note
When opening a file in applications like Microsoft Excel, make sure that you preserve the encoding (for example, ISO-8859-1 or UTF-8) used to create the file, otherwise, some text, such as accented characters, might not appear properly.
Importing data using connectors
The first thing to do when planning to use a connector to extract data from an identity source or a target system is to identify the actual data source.
This may be an SQL database, as would be used for most HR systems, an LDAP directory, as is often the case when Active Directory is used as a source of identities for contractors, or an exposed API for managing cloud applications.
ICF connectors are used to connect to data sources, but they can also be used to process complex files such as SAP IDocs.
Note
Configuring ICF connectors is an advanced topic that will be discussed further. For the purpose of getting started with RAC/M Identity, we recommend that collectors with CSV files be used. Once you become familiar with the concepts and workings of RAC/M Identity, it will become much easier to configure ICF connectors along with advanced business logic.
See Also
Note
In any case, it is important to document the specific details required to establish the connection and retrieve the data using an integration form such as the spreadsheets that can be found in the distribution directory of your designated customer support site.
Tip
Even though a connector will be used to collect information, it may be useful to temporarily extract the information using a flat file and use a tool such as Excel to view the attributes or column contents.
Using such tools will allow you to view and analyze the data in just the same way as if collectors were used.
To create a collector using a connector
On the Menu Bar, click CONFIGURATION> Collectors.
At the top of the page, click the
button.Under Details, in the Name and Description fields, enter a name that reflects what the collector will be used for and enter a short description.
Ignore the Result File, Error File and Separator fields.
In the File Encoding field, enter the encoding format of the source data. Leaving the field blank will default to UTF-8 encoding.
Note
Entering the correct file encoding format is critical to properly displaying accented and foreign characters.
Select what you want the sequence to do if processing errors are encountered. You can choose to Stop the sequence, Skip remaining operations in this block and continue sequence with the next block or simply Continue with the next operation.
For now, you may leave the default choice of stopping all processing when errors are encountered.
Under Execution Class, in the Name field, select the primitive to use to import data. Primitives that can be used for importing ICF connectors have the characters ICF as part of their name. For now, select the ModuleICFImportData primitive. This will perform a simple import using an ICF connector to a data source.
Leave the Update Only field at False.
Under Data Import, in the Target Table list, select the table in which you want to import the data.
Click on Load Columns from Table to load the columns from the target file and click on Load Attributes from Target System to load the list of attributes of the target system made available through the ICF connector. You will then be able to map these attributes to the appropriate column in the DATA MAPPING section below.
Note
It is also possible to select advanced data types such as constants, predefined values, hashed values, hidden values and combinations of values. Formats can also be specified to determine how data is represented in the target table.
The use of advanced data types is described in the RAC/M Identity Administration and Operations Guide.
See also
- For each field in the target table into which you want to import data, select the name of the column in the corresponding source file.
Tip
For getting started, we recommend that you import basic data in the main staging tables described above. Staging tables contain the word "IMPORT" in their names. Ex: IDENTITY_IMPORT.
As you become familiar with RAC/M Identity and its data model you will be able to import data in other tables.
Identifying errors and invalid data
In an ideal scenario, all the data found in the CSV file, and consequently in the RAC/M repository, does not contain errors or invalid data. This, however, is never the reality. RAC/M enables you to ignore some errors that do not affect the import of data nor its use.
The following presents some common errors. When errors are found, it is important to have access to the subject matter experts responsible for the identity and data sources, in order to determine the cause of the errors and how to fix them.
Some errors you may encounter include:
Shifted columns
If you notice that the content of a column does not match the header, the columns may have been shifted (the content of column 1 could now be in column 2). This could have happened during conversion or if quotation marks (“ ”) are used. Indeed, RAC/M supports the use of quotation marks to indicate that anything within them is text and commas or semicolons are not viewed as separators. You must investigate the reason for this shift and correct it.
Date formats
The format of the date fields in a given column in a CSV file must be the same for all values in the column. However, the format may vary from column to column. The exact format, which can be something like dd/mm/yyy, mm/dd/yyyy, dd-mm-yyy, etc. is not critical. If the format is not consistent, import and processing will fail and errors must be corrected to complete the process.
Once you’ve determined that all the dates in a given column use a specific format, you can set it as a format parameter when defining the associated collector. This is done from the Menu Bar, Configuration> Collectors, under DATA MAPPING.

Typos
These may or may not need to be corrected depending on whether or not the value is a key and whether or not the mistake is consistent.
Example
If your key is the name of the hospital “St. Mary’s Hospital”, but “St. Mary’s Hospital” is sometimes also spelled “St. Marie’s Hospital”. The name is not standardized, therefore, two different entries will be created for the same hospital.
On the other hand, if the real name is “St. Mary’s Hospital”, but it was consistently entered as “St. Marie’s Hospital”, then you do not need to correct it, as only one entry will be created. This typo, while it might irritate users of the RAC/M interface, will not affect the data, nor how it is imported and used.
The way to fix data depends on the nature of the data. Identity information related to the name of a person may not need to be corrected since RAC/M will automatically match the various spellings, even if incorrect, whenever data is updated.
For reference information such as organizational structure and work structure, it is generally preferable to make corrections to the source of information.
About local RAC/M Identity users
There are two types of RAC/M user accounts: local users that are typically only used to initially configure and setup RAC/M Identity and federated user accounts that are used on a day-to-day basis by end users, operators, managers, approvers, reviewers, etc. to perform IAM operations and to manage an operational RAC/M Identity implementation.
Local accounts are created from the administrative console and are authenticated using the built-in password database. There should normally only be a very small number of local accounts, ideally only one. Local accounts are normally only used for the initial setup and configuration of RAC/M Identity.
Federated accounts do not need to be created manually because they are imported from an enterprise directory such as Active Directory or Entra ID. Federated accounts are authenticated using an external authentication mechanism such as Active Directory or a SAML authentication provider and assigned by business rules to the proper RAC/M Identity profile based on their responsibilities.
Tip
Once an authentication provider such as Active Directory or a SAML IDP is configured, it is the recommended best practice that local accounts be associated with existing identities and authenticated using a federated authentication provider rather than the internal password database.
Once a federated authentication provider has been activated and all local accounts have been associated with an identity, the internal password based authentication mechanism can be disabled.
About RAC/M Identity profiles
In RAC/M Identity, profiles let you define which menus and functionalities users will have access to. This is useful to limit what certain users can see and do within the management console based on their responsibilities.
See Also
About roles
This chapter presents the types of role modeling that will better suit your organization.
In RAC/M Identity, a role is a way to model accesses by grouping them and giving them a logical name. Roles can be cumulative and all the people with the same role have the same entitlements. For example, roles may correspond to the notion of “Job” or "Title", particularly within companies.
Once the repository has reached a sufficient level of quality and is populated with reliable data, you can start analyzing existing entitlements to define the roles relevant to your organization.
Static roles
Static roles are linked explicitely to each identity. This means that if, for example, an identity’s job or role changes within the organization, the old role will remain linked to the identity until it is explicitely removed.
Example
John Smith is a developer who is assigned a static role. When he becomes a manager, he needs access to certain time tracking applications, but the changes are not made automatically. The RAC/M Identity operator will have to manually use the admin console or apply business logic to make the changes.
This corresponds to the classic ANSI/INCITS 359-2012 Role-Based Access Control (RBAC) model, but it is often difficult to scale to medium or large organizations as organizational changes must be replicated in the roles manually. This model is more suited to organizations where there are few and very stable roles.
Dynamic roles
Dynamic roles are automatically assigned to identities based on business rules that query attributes. For example, this allows identities that move in the organization and get a new title to be automatically assigned applicable roles.
They can also be used to automatically assign baseline roles, sometimes called birthrights, when users join the organization.
This model brings the benefits of Attribute-Based Access Control (ABAC) by leveraging flexible, user defined, business rules. For example, the "manager" role can be assigned with a rule like: IF the requester's title is "manager" THEN assign the "Manager" role". This model is well suited to medium and large organizations where restructuring or movement of personnel is frequent.
When a new role is created or mined, by default a criteria that checks whether the identity is active is added by default to the role. This is to ensure that the role is only assigned to active identities only as this is the most common use case. This criteria can be removed or changed if desired.
Hybrid roles
Hybrid roles combine the features of static and dynamic roles. It allows adding some members directly to an otherwise dynamic role (for example, if you have someone from department A temporarily working in department B).
Role versions
In RAC/M Identity, the notion of versions allows to keep the history and traceability of the evolution of a role over time. Versions also allow to isolate the modeling and evolution process from the production in order to avoid any unintentional impact during the modeling activities. To this end, only one version of the role can be active which avoids any confusion and allows a quick and easy rollback if required.
The different versions of roles are distinguished from each other by a sequential number, automatically generated, which is assigned to them when they are created.
Role modification
There are two methods to make changes to an existing role:
Using the administration console
Please refer to Create a New Role Version to modify a role and then proceed to its activation.
Note
This method of modifying a role is only available to administrators. Additionally, this modification does not follow the approval process of the other method. Please use it with caution. The created versions will be in "read-only" mode for administrators while the request is pending.
Using the self-service portal.
To start the modification process, please refer to Role Modification Requests. When a request is submitted, a new version is created to represent the changes made to this role. This request will undergo an approval process based on the requested modifications (About Approval Workflows).
Once the request approval is complete, the role is ready to be activated for the changes to take effect. Activation can be automatic or require manual action from the identity and access management (IAM) personnel. The default activation type is defined by the property
self.service.workflow.role.default_activation_optionin theconfig.propertiesfile, but it can be modified during the global approval task.- Automatic Activation: The version will be activated during the next execution of the activation module. Please refer to the modules.
- Manual Activation: An email notification will be sent to the responsible party to indicate that activation is pending. This delegation group is defined in the property
self.service.workflow.role.giaof theconfig.propertiesfile.
Role provisioning
Role provisioning is the process of assigning entitlements to identities based on roles. This process involves several steps and is detailed here to help integrators and administrators understand the process.
All provisioning operations are based on the difference between the currently active version and the new version to activate. Only the differences between the two versions are considered. This includes differences in the access granted by the role and differences in the role members. For example, if a member is added, all the role's access will be provisioned to them and if an access is added to the role, all role members will receive this access.
Example
Consider an identity named Joe that has the role "Operator" which grants the profile "Operate" in asset "Machine". However, for some reason, Joe's account in "Machine" does not have this profile currently even though he has the role "Operator".
Let's say his manager Manny adds another profile "Maintenance" in a new version of the role "Operator" and activates it. RAC/M Identity will then provision the profile "Maintenance" to Joe's account in "Machine" but will not provision the profile "Operate". This is because there was no change for the profile "Operate" between the two versions.
This rule has a few special cases:
- When there is no currently active version, it is treated in the same way as if there was an empty active version without any identities or entitlements.
- Deactivating a role is treated in the same way as creating a new empty version and activating it.
- In the self-service portal, a request to grant a role to an identity will be treated in the same way as if a new version of the role with that identity added in the static members was created and activated. In reality, there is no new version created, the provisioning code simply treats this case in the same way.
Warning
The impacts of cases 1 and 2 are important. You should not deactivate a role before activating a new version. This would cause RAC/M Identity to de-provision all the entitlements of the currently active role from all the identities in the role and then provision all the entitlements of the new role to all the identities in the role.
This would create a lot of unnecessary work and issues with people temporarily losing some access.
Provisioning dynamic changes
Dynamic roles assign members based on criteria, but for efficiency reason, these criteria are not evaluated on every change to data in the repository. The criteria are evaluated through a process called "Role Integrity". When an identity or role is changed explicitly in the admin console, the "Role Integrity" process is launched focused on the changed identity or role.
In RAC/M Identity's data processing sequences, data is changed continuously and it would be too inefficient to evaluate the criteria on every change. So there is a special module called "ModuleRoleIntegrity" that is used to evaluate the criteria and trigger provisioning when changes are detected. This module can be added in any sequence.
Provisioning process
The process starts with a step called "Role Explosion" in which all changes to the role are "exploded" and applied to the identities of the role. This is non-trivial as a new identity in the role must receive all entitlements of the role whereas an existing identity must receive only changes to entitlements. This step creates "Account Provisioning Requests" and "Profile Provisioning Requests" for every change to the role. These derived requests will then be processed by other modules in the sequence in the same fashion as any other requested change to an identity's entitlements.
Implementing federated authentication
Note
This section is only relevant if you are installing RAC/M Identity on-premises, as RAC/M Identity in SaaS mode is always pre-configured upon activation to perform federated user authentication, usually with SAML and your ENTRA ID instance or with your Active Directory.
In the case of an on-premises installation or if using your own Microsoft Azure tenant, the following section will guide you through setting up RAC/M Identity to use federated authentication.
Refer to the SSO ENTRA ID (SAML) Guide for instructions on how to set up ENTRA ID to allow SAML authentication to your ENTRA ID instance.
Authentication with SAML
If you are using ENTRA ID, or another Identity Provider Service (IDP) you can use it as an identity source to authenticate RAC/M Identity users. You must edit the corresponding properties in the config.properties file to enable SAML authentication.
To edit the config.properties file
- With a text editor, open the
conf/config.propertiesfile. - Edit the following properties:
    auth.saml.enabled=true
    auth.saml.relyingPartyIdentifier=${App ID}
    auth.saml.metadataUrl=${App Federation Metadata Url}
    auth.saml.replyURL=${ReplyURL}
    auth.saml.app.id=${ID of the RACM asset containing the Entra ID accounts}
    auth.saml.username.racm.column.name=${The name of the column in the APPLICATION_ACCOUNT table where the Entra ID account name is found. e.g. ACCOUNT_NAME}
Example
The properties could be written as follows:
    auth.saml.enabled=true
    auth.saml.relyingPartyIdentifier=api://RACMDEMO1-SAML
    auth.saml.metadataUrl=https://login.microsoftonline.com/2b84024c-25a3-447b-9a4a-e9d5b6d5370d/federationmetadata/2007-06/federationmetadata.xml?appid=30c741ed-742e-4b46-858e-f8f56cd47fad
    auth.saml.replyURL=https://demo1.racmidentity.com/gui/loginSamlCallback.action
    \## RACM Application ID which holds the accounts used for the SAML auth
auth.saml.app.id=444
    \## The APPLICATION_ACCOUNT column name which contains the SAML username/SubjectID
    auth.saml.username.racm.column.name=ACCOUNT_NAME
A guide on how to configure ENTRA ID to enable SAML authentication is provided in your support directory for you to pass on to ENTRA ID administrators. They will need to perform the recommended setup to enable SAML authentication from your ENTRA ID instance.
Save the file and restart the RAC/M Identity server.
Authentication with Active Directory
If you are already using Microsoft Active Directory to manage users, groups, computers, etc., you can connect it to RAC/M Identity for authentication purposes. You must first import it into the repository along with the corresponding identities and then edit the config.properties file to enable authentication with Active Directory.
To edit the **config.properties file
- With a text editor, open the file
conf/config.properties. - Edit the following properties:
 contextsource.ldap.search=false
 contextsource.ldap.config.url=ldap://[ldap server host]:[ldap server port]
 contextsource.ldap.config.base=[authentication dn]
 contextsource.ldap.config.username=[admin user dn<u>]</u>
 contextsource.ldap.config.password=[admin user password]
 contextsource.ldap.config.pool=true
 contextsource.ldap.config.attribute.login=[login attribute]
 active.directory.application.id=[RACM application ID]
Example
The properties could be written as follows:
    contextsource.ldap.search=false
    contextsource.ldap.config.url=ldap://192.168.0.1:389
    contextsource.ldap.config.base=DC=mystructure,DC=sfiler,DC=com
    contextsource.ldap.config.username=CN=Administrator, CN=USERS,DC=mystructure,DC=sfiler,DC=com
    contextsource.ldap.config.password=mypassword
    contextsource.ldap.config.pool=true
    contextsource.ldap.config.attribute.login=SAMAccountName
active.directory.application.id=2- Save the file and restart the RAC/M Identity server.
Password management in RAC/M Identity
RAC/M Identity integrates the industry-standard PWM engine to provide a secure, user-friendly Self-Service Password Management portal. This module allows users to manage their credentials, unlock accounts, and reset passwords without needing to contact the Help Desk. This functionality is optional and can be enabled or disabled in the config.properties file.
Key features
Self-Service Password Reset (SSPR)
Users who have forgotten their passwords or have been locked out of their accounts can securely regain access.
- Forgot Password: Initiates a secure workflow to reset a lost password.
- Unlock Account: Allows users to unlock their directory account (e.g., Active Directory) if it was locked due to too many failed login attempts.
- Verification Methods: Identity is verified via pre-configured challenge questions, SMS tokens, or email one-time passcodes (OTP).
Routine password change
Users can proactively change their current passwords before they expire.
- Synchronization: Changes made here are automatically synchronized across all connected target systems (AD, LDAP, ERPs) managed by RAC/M Identity.
- Real-Time Feedback: The interface provides immediate feedback on password entry matches and validity.
Password policy enforcement
The portal ensures that all new passwords meet the organization's security standards.
- Strength Meter: Visual indicators show the strength of the chosen password.
- Rule Validation: Prevents the use of weak passwords by checking against history (preventing reuse), dictionary words, and complexity requirements (length, special characters, etc.).
Recovery profile configuration
Users can manage their own security settings to ensure they can recover their account in the future.
How to access
The Password Management features are embedded directly within the RAC/M Identity Self-Service Portal.
Navigation:
- If logged in: Click on the Password Management to access PWM and change your password or change your recovery profile.
- If locked out: Click the "Forgot Password?" link on the login screen.
About the RAC/M Identity REST API
RAC/M Identity exposes a secure REST API that allows external solutions to interact programmatically with repository objects such as Identities, Accounts, Roles, Entitlements, and access requests. The API uses OAuth 2 for authentication and enforces the same authorization and audit controls as the web interface, so external integrations operate within the same security boundary as human users.
A common use case is integration with an ITSM solution: the ITSM system can query the API to search for available roles and entitlements, then create access or termination requests on behalf of a user, in a manner similar to what users can do directly through the self-service portal. Other typical uses include synchronizing data with ticketing platforms, HR systems, and custom automation workflows.
The full API reference, including available endpoints, request and response schemas, and authentication details, is published here: RAC/M Identity REST API reference.