
How to migrate S-Filer Portal to new Windows machines
This page describes how to move an existing S-Filer Portal installation to new Windows Server machines. It covers the S-Filer server, the S-Filer gateway (with IIS as a reverse proxy) and, when needed, the SQL Server database.
The approach is to reinstall each component on its new machine, then replace the freshly created installation directory with a copy of the installation directory from the old machine. This preserves the configuration and the key material stored in the .conf files (the Administrative Console keystore, and the gateway's PKCS12 and trusted certificates). Since version 4.13, most keys and certificates, including the SFTP host key, are stored in the database: they follow the database, and SFTP clients do not get a host key warning after the migration.
Important
Take a full backup of S-Filer Portal (database, server and gateway installation directories, and file storage locations) before you start the migration.
Warning
This procedure only covers Windows Server. It does not apply as is to Linux installations or Docker deployments.
Prerequisites
Machines
Two machines are recommended: one for the S-Filer server and one for the S-Filer gateway. For each one, plan for Windows Server 2016, 2019 or 2022, a quad-core processor and at least 8 GB of memory.
Install the same version of S-Filer Portal on each new machine as on the old machines.
Network
On the new S-Filer server:
- the server must be able to reach the SQL Server database;
- if you use Active Directory, the server must reach the domain controller on port 389 (LDAP) or 636 (LDAPS);
- port 8088 (the server's default port) must be open for inbound traffic so that the gateway can retrieve its configuration; restrict it to the IP addresses of the gateway machines;
- port 8090 (the Administrative Console's default port) must be reachable by administrators; restrict it to the administration network;
- the server must be able to send emails.
On the new S-Filer gateway:
- port 443 must be open for inbound traffic to IIS;
- the gateway must be able to reach the S-Filer server on port 8088;
- if the gateway offers FTP, FTPS or SFTP, the firewall rules for these ports must be recreated on the new machine;
- the TLS certificate used by IIS on the old gateway must be available so that you can import it on the new gateway.
DNS names
Determine which of the following two cases applies before you start:
- Same DNS names: the machine names change, but the DNS names used by S-Filer Portal (server and gateway) do not. You only need to point these names to the new IP addresses in your DNS. Nothing needs to be changed in the Administrative Console or in the
.conffiles. - New DNS names: the server is reached through a new name or address. You must also update the Administrative Console (see Update the configuration in the Administrative Console) and the gateway's
.conffiles (see Migrate the S-Filer gateway).
Preparation and backup
- Plan a maintenance window: S-Filer Portal will be unavailable during the migration.
- Stop the S-Filer gateway service (S-Filer Gateway) on every gateway, then the S-Filer server service (S-Filer Server). This ensures that no transfer or change is in progress during the backup.
- Back up the S-Filer database.
- On the old server, copy the entire server installation directory (by default
C:\Program Files\Okiok Data\sfiler-server). - On the old gateway, copy the entire gateway installation directory (by default
C:\Program Files\Okiok Data\sfiler-gateway). - Write down the Windows service account used by each S-Filer service: the new services must use the same account.
- List the Windows scheduled tasks and the scripts that call the S-Filer CLI on the old machines: they must be recreated on the new machines.
Warning
If the services are not named S-Filer Server and S-Filer Gateway on your installation (for example on an older installation), look them up in the Windows Services console (services.msc).
Important
The installation directories contain sensitive data: the database connection settings and credentials (conf\sfiler.conf) and the key material embedded in the .conf files. Protect the copies:
- transfer them only over an encrypted channel, and store them only on media or shares with restricted access;
- on the new machines, restrict the permissions on the installation directory to the service account and administrators;
- once the migration is validated, securely delete the backup and transfer copies, as well as the
sfiler-server-backupandsfiler-gateway-backupdirectories created on the new machines; - if a copy may have been exposed, change the SQL account password, then enter the new password in
server\conf\sfiler.conf(see Migrate the database to a new SQL server).
Migrate the database to a new SQL server
This section only applies if the database also moves to a new server. Otherwise, skip to the next section.
- Make sure that the services of the server and of every S-Filer gateway are stopped.
- Restore the S-Filer database backup on the new SQL Server.
- After copying the installation directory to the new S-Filer server (see Migrate the S-Filer server), edit the
server\conf\sfiler.conffile so that it points to the new SQL server and the correct port:
cfg.server.local.config.url=jdbc:sqlserver://<new-sql-server>:<port>;databaseName=sfiler;encrypt=true;sendStringParametersAsUnicode=false
cfg.server.local.config.user=<sql-user>
cfg.server.local.config.password=<sql-password>
cfg.server.local.config.driver=com.microsoft.sqlserver.jdbc.SQLServerDriver
Do not change the value of cfg.sfiler.instance.name: it must remain that of the existing instance.
If the SQL account password does not change, keep the current value of cfg.server.local.config.password. Otherwise, enter the new password in clear text: on startup, the server automatically replaces it with a hidden value.
Available in4.21.0 + Starting with version 4.21.0, the cfg.server.local.config.hibernate.dialect parameter is optional. When it is missing, the dialect is detected automatically from the connection. On earlier versions, keep this parameter in sfiler.conf.
Warning
With encrypt=true, the server's Java virtual machine must trust the SQL Server certificate, either through its cacerts file or through a truststore referenced by the trustStore= option of the JDBC URL. If this truststore is outside the installation directory, copying the directory does not bring it over: copy or import it on the new server as well.
See Also
For the JDBC URL options (named instance, Windows authentication with integratedSecurity=true), see SQL Server.
Prepare the new gateway (IIS)
On the new gateway, IIS acts as a reverse proxy in front of S-Filer Portal, using Microsoft Application Request Routing (ARR) and the URL Rewrite module.
- Install IIS and open port 443. Import the gateway's TLS certificate and bind it to port 443 of the web site.
- Download and install requestRouter_amd64.msi (version 3) and rewrite_amd64_en-US.msi (version 2). Before the installation, stop the WAS and W3SVC processes from a command prompt opened as administrator, then start them again afterwards:
net stop was /y
net stop w3svc /ynet start was
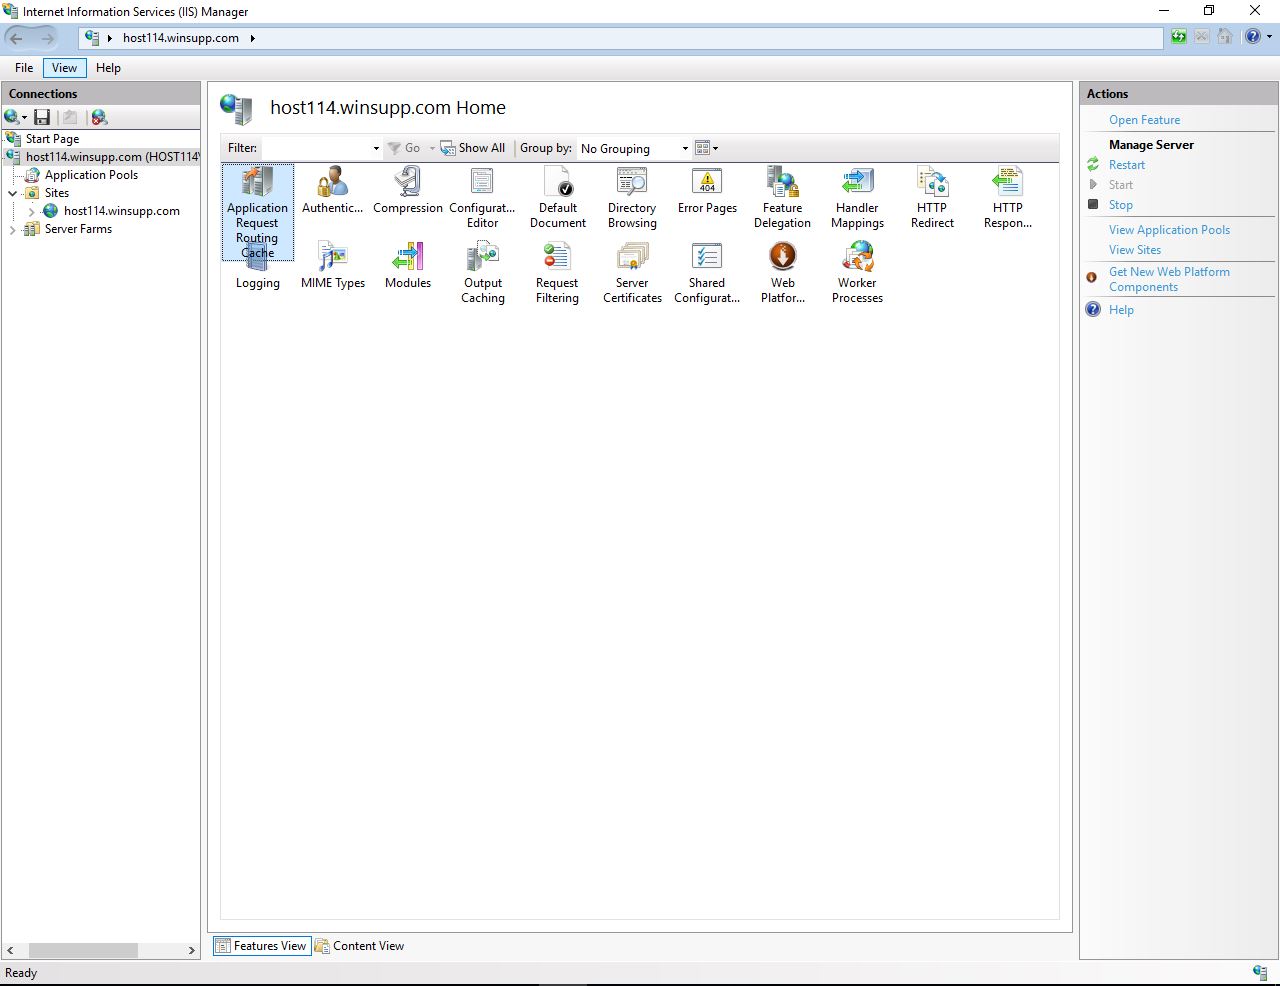
net start w3svcIn IIS Manager, select the server and open Application Request Routing Cache.
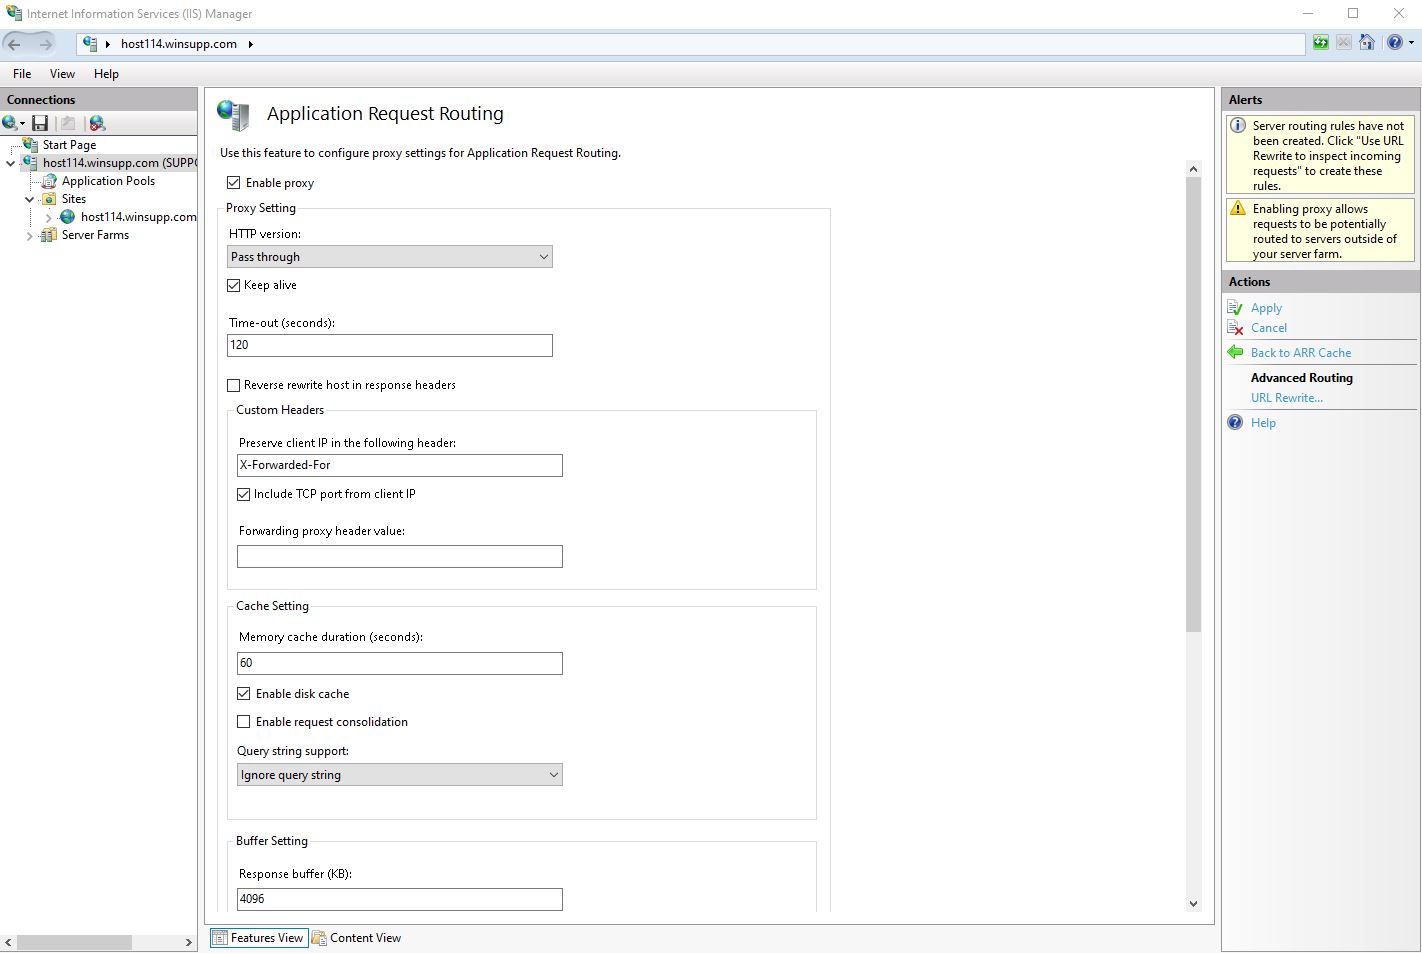
Open Server Proxy Settings, check Enable proxy and apply the change.
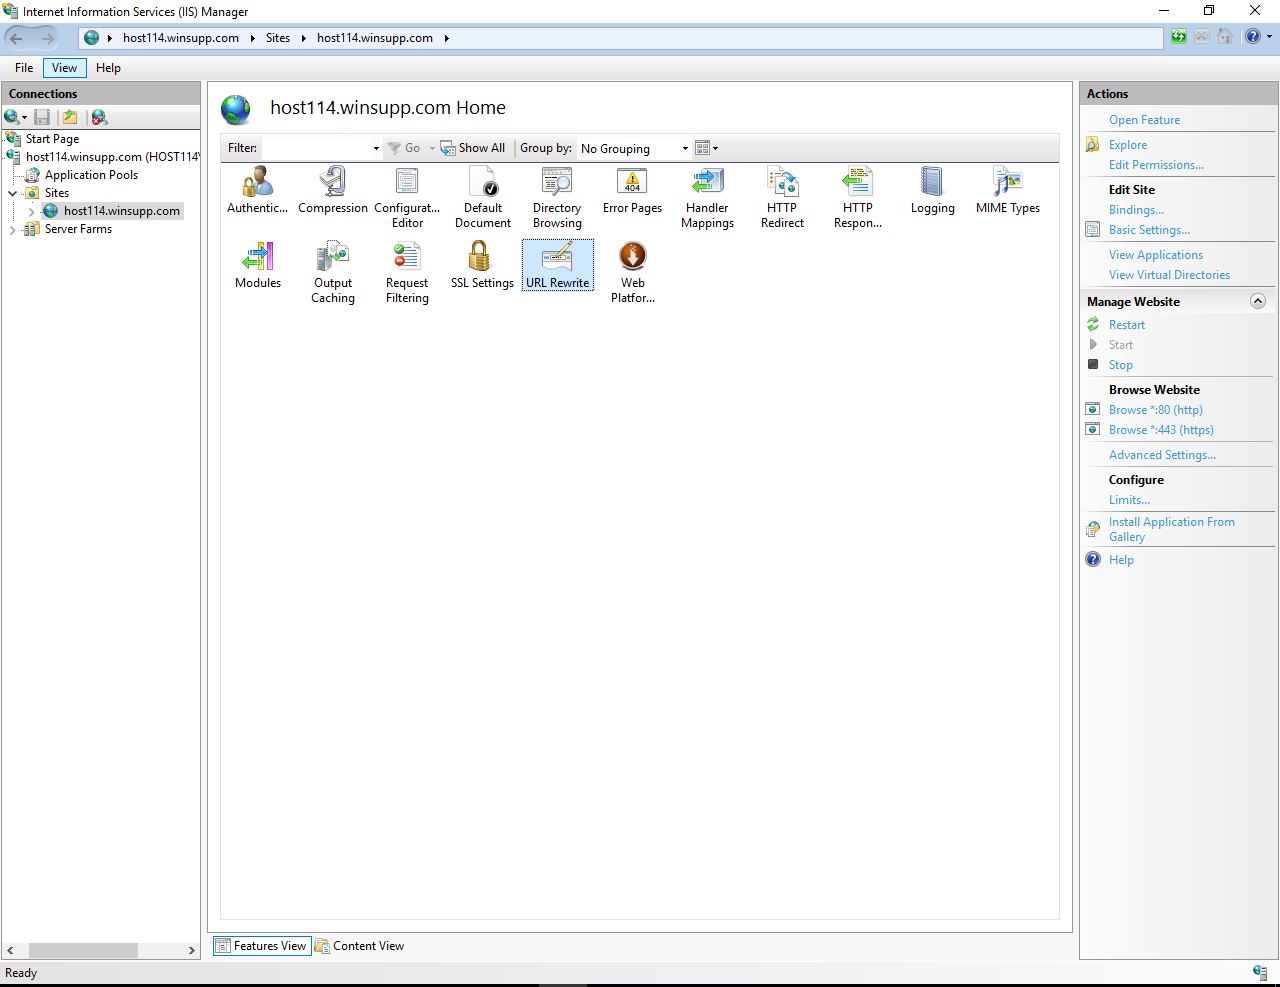
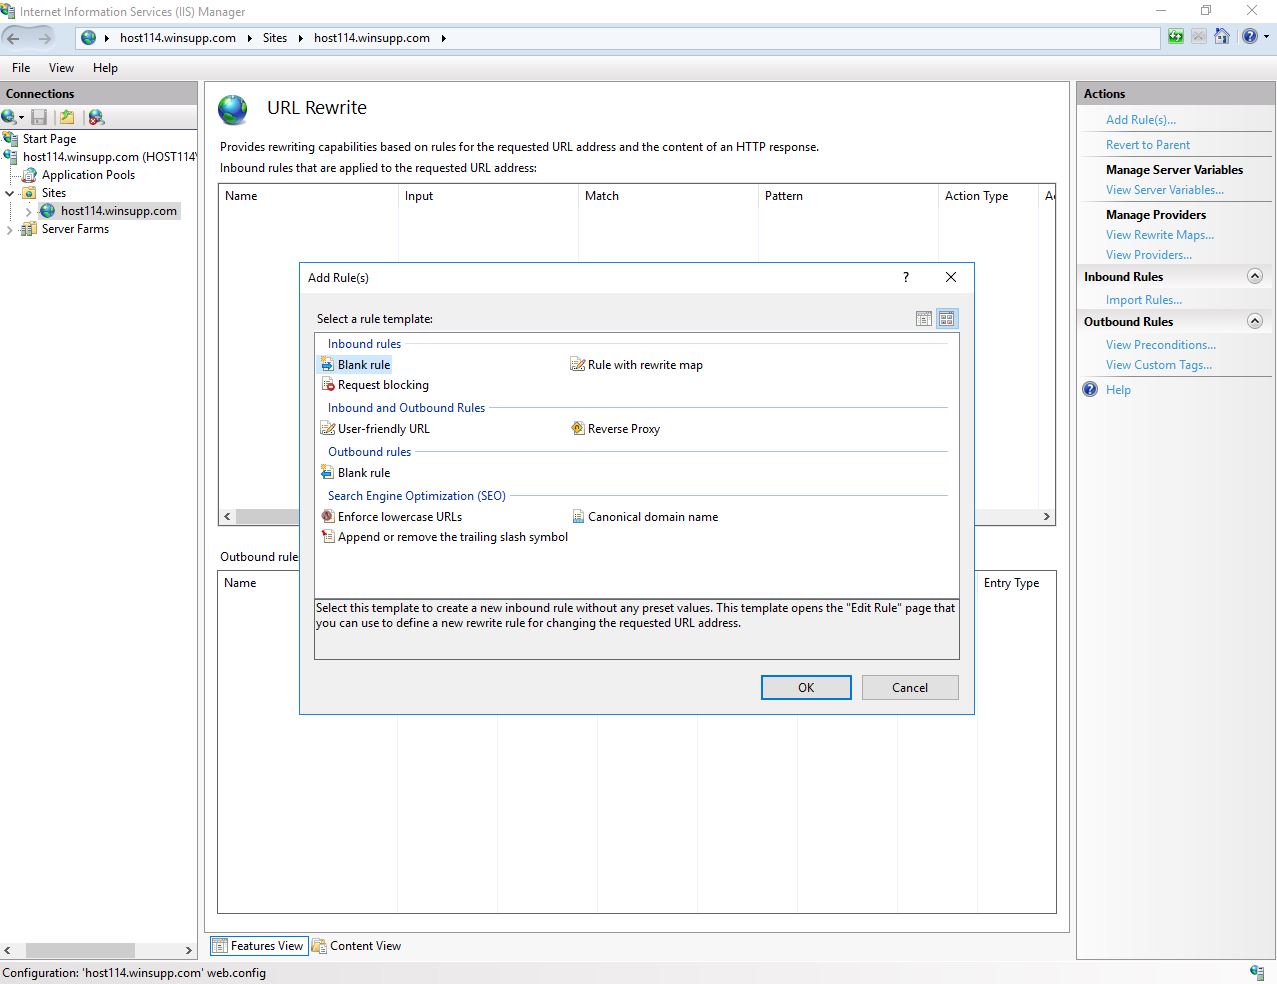
In the web site, open URL Rewrite, then click Add Rule(s) and choose Blank rule.
Enter the pattern
sfiler/(.*). In Action Properties, use the rewrite URLhttps://<gateway-host>:8081/{R:0}and check all the options. If the gateway uses an HTTPS port other than 8081 (the default port), use that port instead.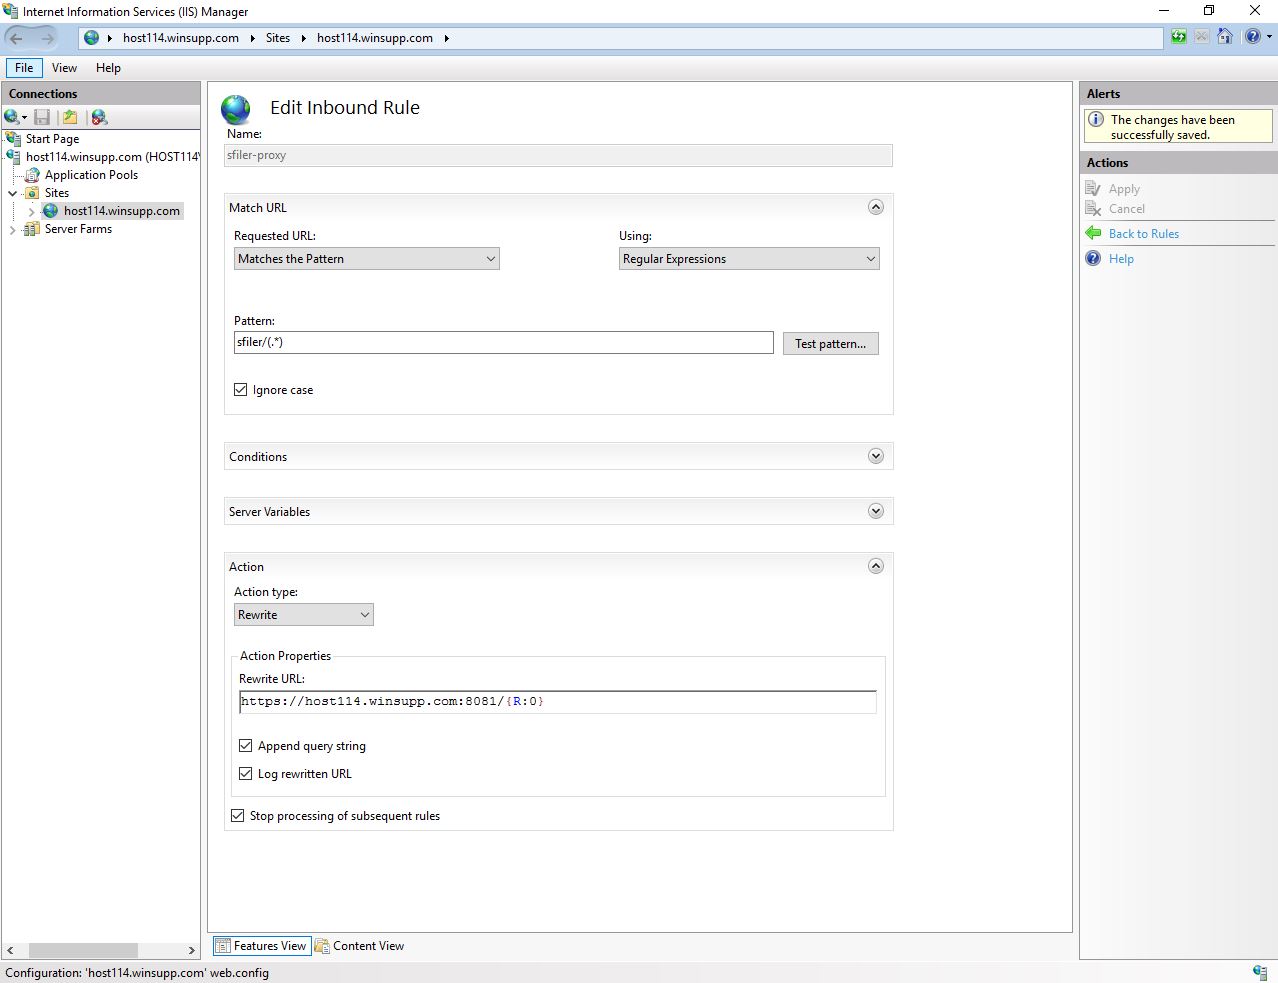
See Also
The detailed procedure, including the test of the rewrite rule, is in the Proxy for IIS section of the installation guide.
Migrate the S-Filer server
- Make sure that the S-Filer Server service is stopped on the old server.
- On the new server, install the S-Filer server with the Windows installer, in the same directory as on the old server. The installer creates the Windows service, which points to this directory.
- Rename the installation directory created by the installer, for example
C:\Program Files\Okiok Data\sfiler-servertoC:\Program Files\Okiok Data\sfiler-server-backup. Protect this directory, then delete it once the migration is validated. - Copy the installation directory backed up from the old server in its place.
- If the database moved to a new server, edit
server\conf\sfiler.confas described in Migrate the database to a new SQL server. - Make sure that all stored files are reachable from the new server (see Files and storage).
- Grant the service account the required permissions on the
sfiler-serverdirectory, and configure the S-Filer Server service to use the same service account as on the old server. - If the DNS names do not change, point the server's DNS names to the new IP addresses in your DNS (see DNS names).
- Start the S-Filer Server service on the new server.
Warning
Do not restart the old S-Filer server while the new server uses the same database.
See Also
Installing the server on Windows is described in Installing S-Filer Portal.
Update the configuration in the Administrative Console
This section only applies if the server's DNS name or address changes (see DNS names). Otherwise, skip to the next section.
Log in to the Administrative Console on the default port 8090, for example
https://<new-server-host>:8090/.Open [server name] > Configuration > Basic Configurations. In Host, enter the server's new IP address or DNS name, then click Save.
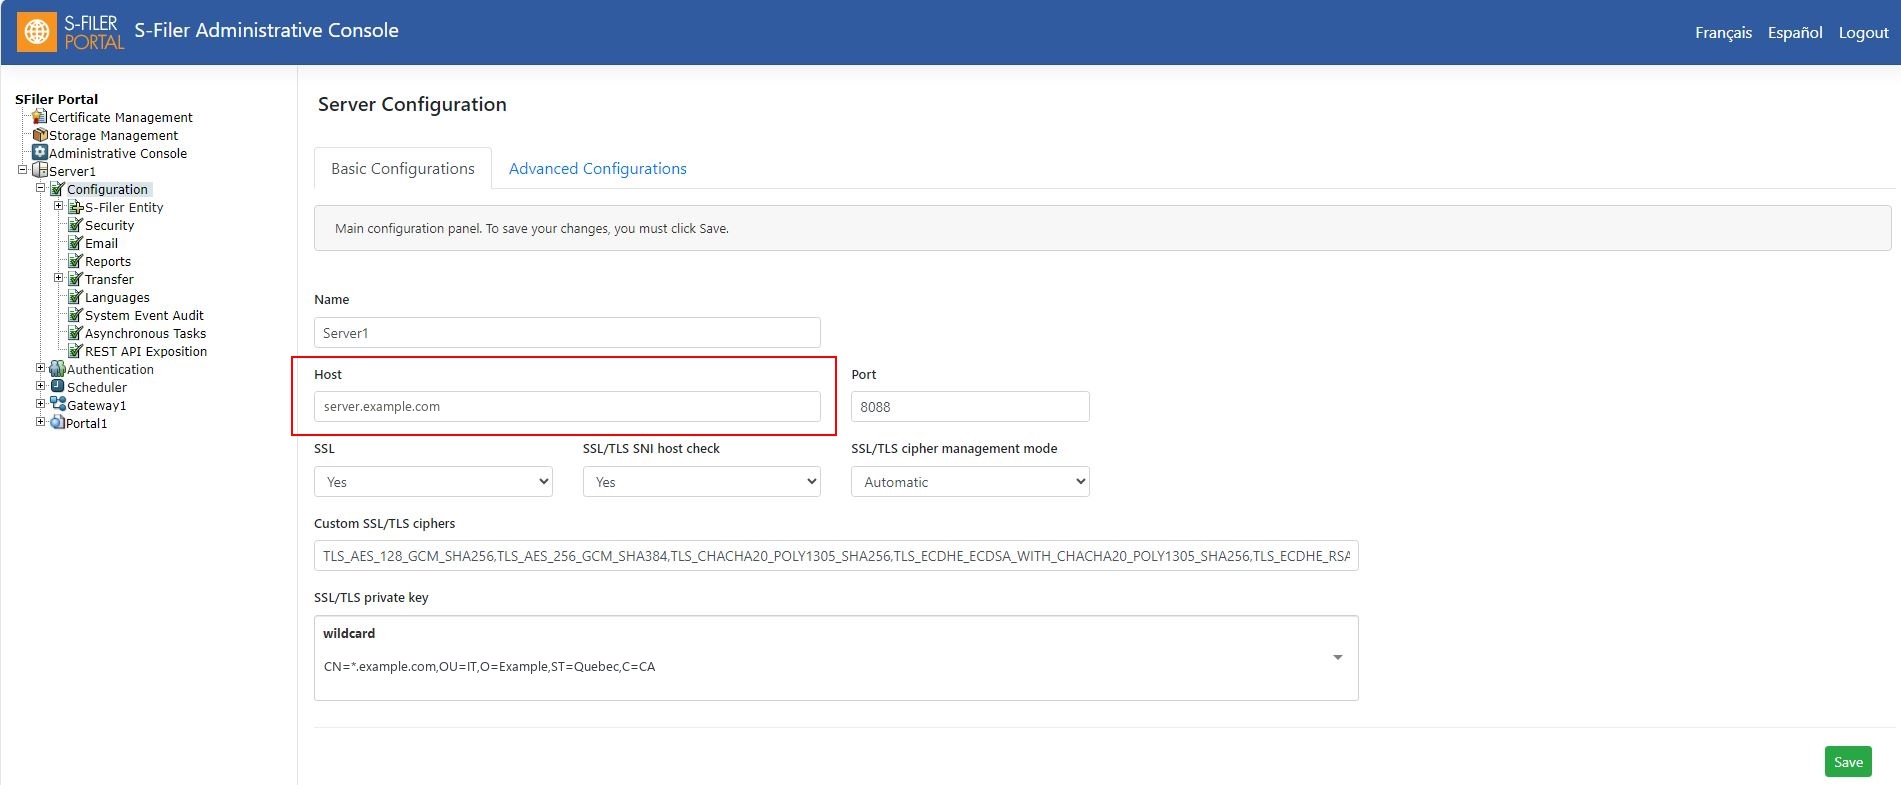
Open [gateway name] > Configuration. In Target Server URL, enter the URL of the new server (for example
https://<new-server-host>:8088/), then click Save.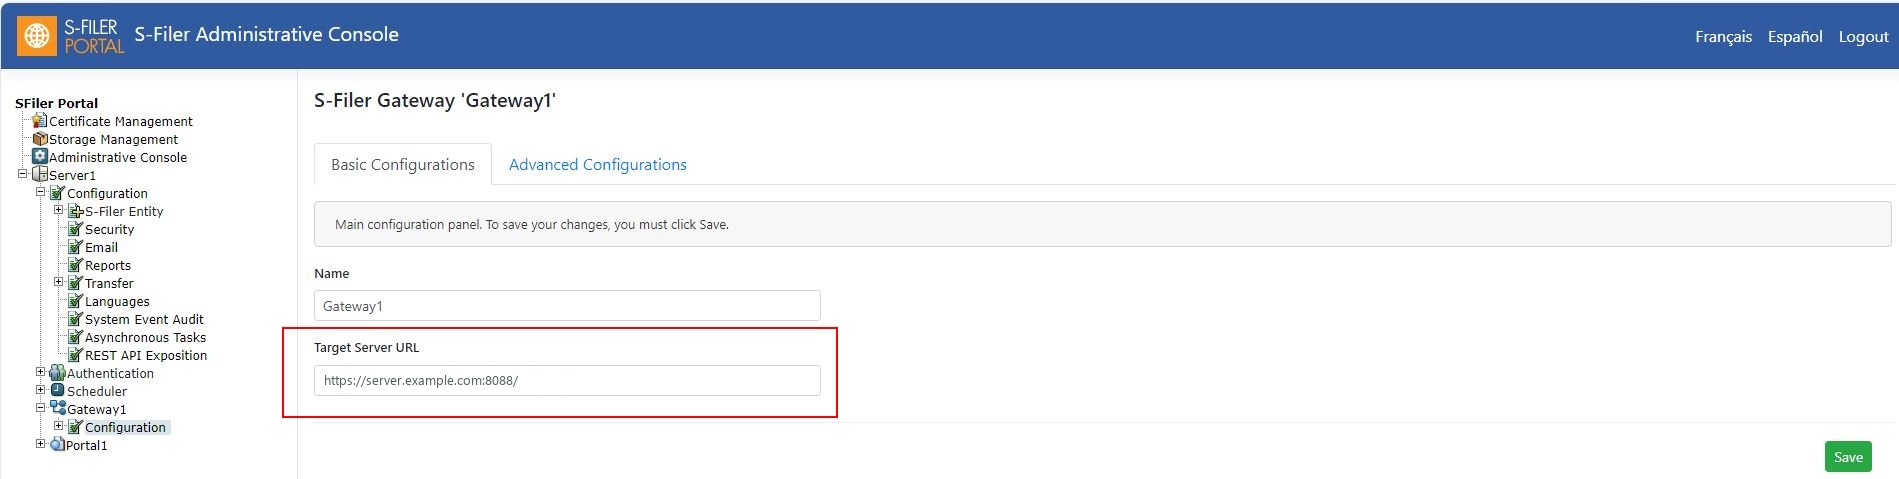
Open [web interface name] > Configuration. In Target Server URL, enter the same URL, then click Save.
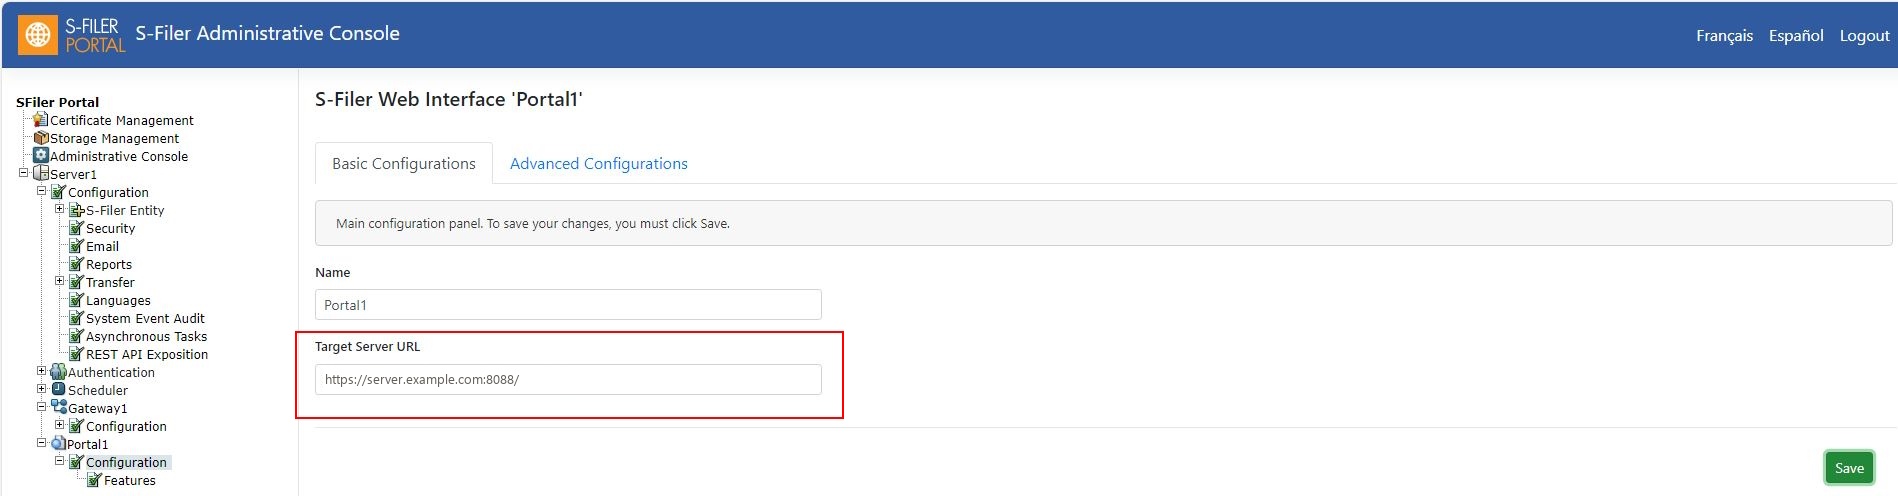
Review the other URLs that were filled in from the old host and saved in the database, for example the callback URLs of the authentication sources.
Warning
These changes do not update a gateway that is already installed: its .conf files contain a copy of the URL, made when they were downloaded or exported. Update them separately (see Migrate the S-Filer gateway).
Migrate the S-Filer gateway
- Make sure that the S-Filer Gateway service is stopped on the old gateway.
- On the new gateway, install the S-Filer gateway with the Windows installer, in the same directory as on the old gateway.
- Rename the installation directory created by the installer, for example
C:\Program Files\Okiok Data\sfiler-gatewaytoC:\Program Files\Okiok Data\sfiler-gateway-backup. Protect this directory, then delete it once the migration is validated. - Copy the installation directory backed up from the old gateway in its place.
- If the server's DNS name changed, update the
cfg.sfiler.config.urlproperty in the gateway's two configuration files (see below). - Grant the service account the required permissions on the
sfiler-gatewaydirectory, and configure the S-Filer Gateway service to use the same service account as on the old gateway. - In your DNS, point the gateway's DNS names to the new IP addresses.
- Start the S-Filer Gateway service on the new gateway.
The cfg.sfiler.config.url property of each file takes the value of a different Target Server URL field:
gateway\conf\sfiler.conf: the Target Server URL of the gateway instance;gateway\conf\gui.conf: the Target Server URL of the web interface instance.
The URL starts with https:// if the server uses an SSL/TLS certificate, otherwise with http://.
cfg.sfiler.config.url=https://<new-server-host>:8088/Instead of editing the files, you can regenerate them with the export-config command (export-config -n <instance> -ccf <file>.conf): once for the gateway instance (sfiler.conf) and once for the web interface instance (gui.conf). Then copy them to gateway\conf.
If the gateway does not respond, check the gateway logs. With a wrong server URL, the service appears started, but the gateway retries the connection every 20 seconds indefinitely and does not listen on any port.
See Also
Installing the gateway on Windows is described in Installing S-Filer Portal.
Files and storage
If the files are kept in a local storage on the old server, copy them to the new server before starting the S-Filer Server service. The service account must be able to read and write in these directories.
The default path of a local storage, files/, is relative: the files may therefore be inside the server's installation directory. In that case, they are copied along with the installation directory, which increases the size and the duration of the copy. To place them elsewhere, copy them to the new location, then change the storage path with modify-local-storage -n <name> -pd <path>.
If the file path changes, update the storage path in Storage Management in the Administrative Console or with the modify-local-storage command, then check access with test-access-local-storage.
Cloud storage (Amazon S3, Azure Blob Storage) is not affected by the migration, provided that the new machines can reach it.
See Also
To move files from one storage to another, see How to migrate files between storage.
Cutover and validation
Once the server and the gateway are started:
- Check that the Administrative Console is reachable on the new server.
- Check that the web interface is reachable through the usual public URL (for example
https://<public-host>/sfiler/). - Log in with a test account, upload a file, then download it.
- If the gateway offers FTP, FTPS or SFTP, also test a transfer with each of these protocols.
- Review the server and gateway logs for errors.
- Recreate the scheduled tasks and the scripts that call the S-Filer CLI, then check that they run correctly.
Warning
Until the migration is validated, keep the old machines stopped but do not delete them. If a problem occurs, you can stop the new services, restore the old DNS entries and the original values in the Administrative Console, then restart the old services. If the database was moved and the new server has already written to it, going back to the old machines means losing the transactions made since the cutover.