Installation
Introduction
This guide provides comprehensive instructions for installing and configuring RAC/M Identity in an on-premises environment. It covers system requirements, database configuration, the complete installation process, and post-installation service setup.
SaaS Deployment
If you are using RAC/M Identity as a Service (SaaS), the installation and infrastructure setup are fully managed by OKIOK, and you can proceed directly to the configuration steps described in the Concepts section. This installation guide is only required for on-premises or private cloud deployments.
What This Guide Covers
This installation guide is organized into the following sections:
- System Requirements: Hardware specifications, software requirements, and supported web browsers
- Database and SQL Server Configuration: Detailed requirements for the three RAC/M Identity databases, network configuration, user permissions, and authentication options
- Installation Process: Step-by-step instructions for running the RAC/M Identity installer, including screenshots for each step
- Post-Installation Setup: Configuring database connections and starting the RAC/M Identity service
Minimum Configuration for RAC/M Identity
The configuration of your SQL Server database—whether local or remote—is one of the most significant decisions affecting your hardware requirements. The specifications provided below will help you evaluate the requirements for your particular deployment.
Hardware Specifications for RAC/M Identity
The following hardware specifications are required for the RAC/M Identity application server. These are in addition to the SQL Server requirements when the database is installed on the same machine.
- Disk Space: 4 GB minimum for the application
- Memory: 8 GB RAM minimum
- Database Storage:
- Data files: 140 GB for a large database
- Log files: 2 GB for a large database
Tip
Actual storage requirements will vary based on the number of identities, accounts, assets, and the volume of historical data retained. Plan for growth and consider implementing regular database maintenance and archiving strategies.
Software Requirements
Java Runtime Environment
- OpenJDK 15 (included in the RAC/M Identity distribution)
Web Server
- Jetty web server (integrated in the RAC/M Identity installer)
Database Server
- Microsoft SQL Server 2016 or later
- Azure SQL Database
Note
Ensure that your SQL Server instance is properly configured with appropriate memory allocation, backup policies, and security settings before installing RAC/M Identity.
Supported Web Browsers
RAC/M Identity is compatible with the following web browsers:
- Microsoft Edge
- Mozilla Firefox
- Google Chrome
Database and SQL Server Configuration
This section describes the SQL Server configuration requirements for RAC/M Identity.
SQL Server Configuration
RAC/M Identity requires three separate databases on the same SQL Server instance:
- Configuration Database: Contains system configurations and processing sequence definitions (default name:
RACM_CONFIG) - Data Database: Contains the organization's identity and access data (default name:
RACM_DATA) - Workflow Database: Contains workflow controller task management tables (default name:
RACM_WORKFLOW)
Network Requirements
The SQL Server instance must be available via TCP/IP protocol. Ensure that:
- TCP/IP protocol is enabled in SQL Server Configuration Manager
- The SQL Server is configured to listen on the appropriate network interface
- Firewall rules allow connections to the SQL Server port (typically 1433)
Database User Requirements
RAC/M Identity requires a database user account with specific permissions:
- The account must have the db_owner role on all three databases (
RACM_CONFIG,RACM_DATA, andRACM_WORKFLOW) - Database tables and functions will be automatically created when the RAC/M Identity service starts for the first time
- The account needs CREATE TABLE, CREATE FUNCTION, and CREATE PROCEDURE permissions
Important
The database user must have owner-level permissions because RAC/M Identity automatically manages the database schema, including creating and modifying tables, stored procedures, and functions during startup and updates.
Database Authentication
RAC/M Identity connects to SQL Server using the Microsoft JDBC driver.
For detailed information about authentication options and connection string formats, refer to the Microsoft documentation: Connecting to SQL Server with the JDBC Driver
Installing RAC/M Identity
This section describes the installation process for RAC/M Identity, covering both new installations and updates to existing deployments.
Installation Overview
The RAC/M Identity installation is performed using a graphical installer that guides you through the configuration process. The installer handles:
- Application file deployment to the selected installation directory
- Installation folder and shortcut configuration
- Database connection setup for all three required databases (Configuration, Data, and Workflow)
The same installer is used for both new installations and updates. The installer will automatically detect if RAC/M Identity is already installed and provide options for complete installation or update mode.
Starting the Installation
To begin the RAC/M Identity installation:
Copy the
RACM Identity installer.exefile to the target server where RAC/M Identity will be installed.Right-click on the
RACM Identity installer.exefile and select Run as administrator.
If prompted by Windows User Account Control, click Yes to allow the installer to make changes to your system.
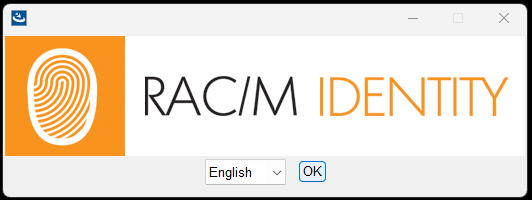
In the first screen, select your preferred language and click OK.
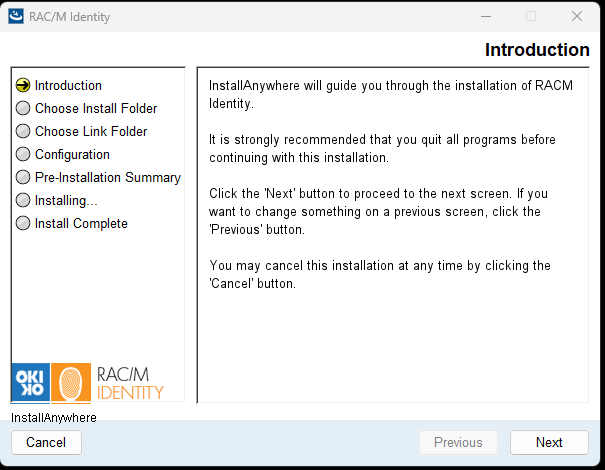
The Introduction screen appears, providing an overview of the installation process. Read the information and click Next to proceed.
In the Choose Install Set screen, select the appropriate installation type:
- Complete Installation: This option installs all files and will overwrite configuration files if installing over an existing installation. Choose this option for new installations.
- Update: This option replaces all runtime files but leaves all configuration files intact. Choose this option when updating an existing RAC/M Identity installation.
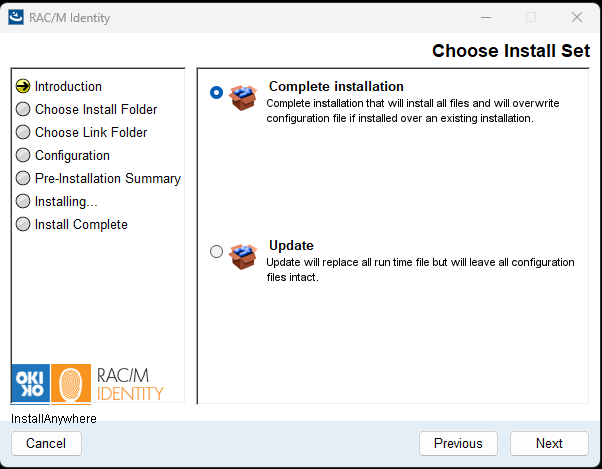
Select the appropriate option and click Next.
In the Choose Install Folder screen, specify where RAC/M Identity will be installed:
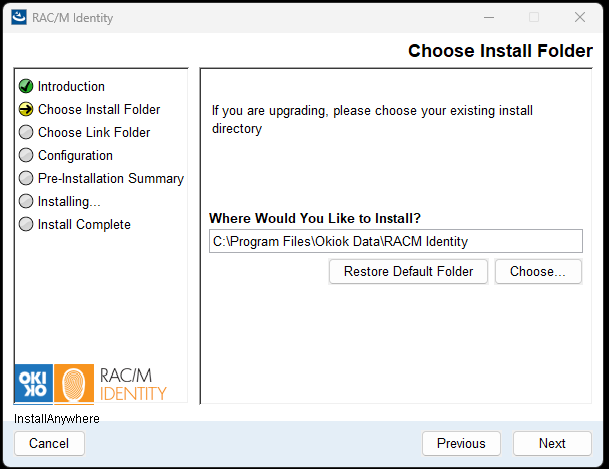
- For new installations, you can use the default location or click Choose... to select a different directory.
- For upgrades, select your existing RAC/M Identity installation directory to ensure proper upgrade of the application.
- Click Restore Default Folder to reset to the default installation path if needed.
The default installation path is typically:
C:\Program Files\Okiok Data\RACM IdentityOnce you have confirmed or selected the installation directory, click Next.
In the Choose Shortcut Folder screen, select where you would like to create the RAC/M Identity program shortcuts:
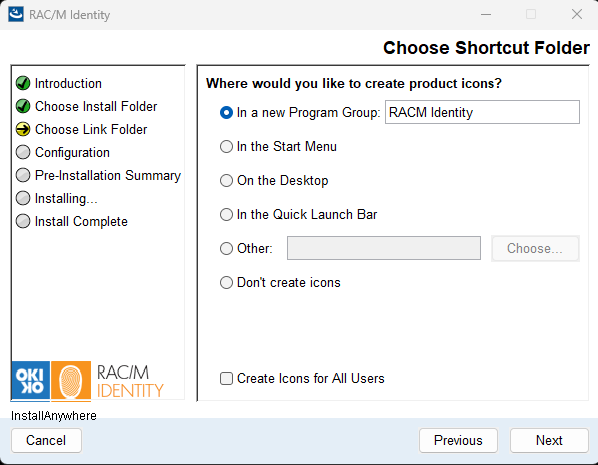
Select your preferred options and click Next.
In the Configuration database screen, enter the connection information for the configuration database:
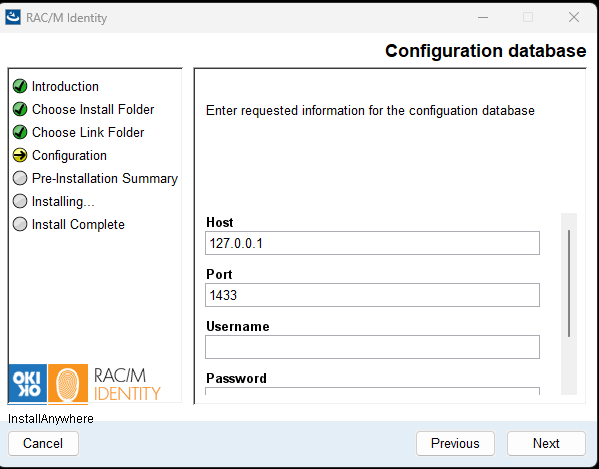
- Host: Enter the SQL Server hostname or IP address (e.g.,
127.0.0.1for local server or the server name). - Port: Enter the SQL Server port number (default:
1433). - Username: Enter the database user account with db_owner permissions on the configuration database.
- Password: Enter the password for the database user account.
Click Next to proceed to the pre-installation summary.
- Host: Enter the SQL Server hostname or IP address (e.g.,
In the Data database configuration screen, enter the connection information for the data database:
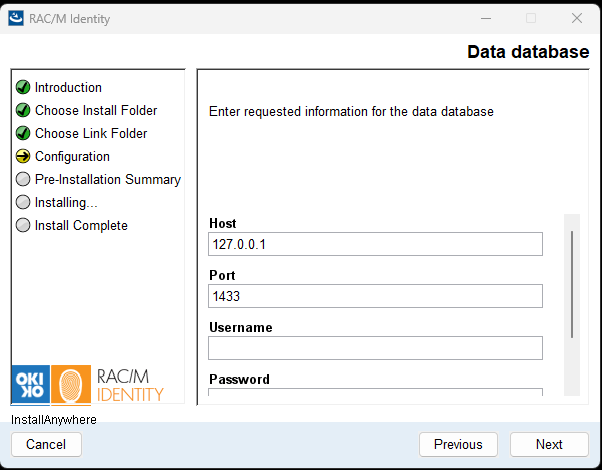
- Host: Enter the SQL Server hostname or IP address.
- Port: Enter the SQL Server port number (default:
1433). - Username: Enter the database user account with db_owner permissions on the data database.
- Password: Enter the password for the database user account.
Click Next to continue.
In the Workflow database configuration screen, enter the connection information for the workflow database:
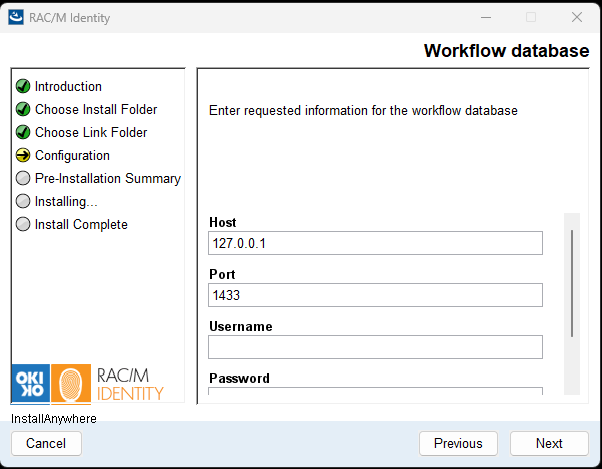
- Host: Enter the SQL Server hostname or IP address.
- Port: Enter the SQL Server port number (default:
1433). - Username: Enter the database user account with db_owner permissions on the workflow database.
- Password: Enter the password for the database user account.
Click Next to proceed to the next database configuration.
The Pre-Installation Summary screen displays a summary of all the installation settings you have configured:
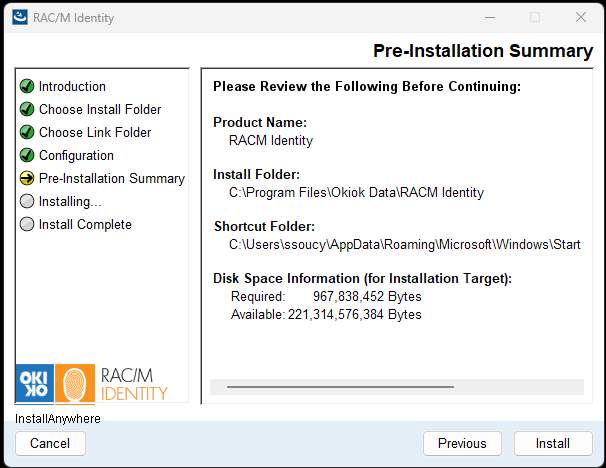
Review the following information:
- Install Folder: The directory where RAC/M Identity will be installed
- Disk Space Information: Shows the required disk space versus available disk space on the installation target
When you are satisfied with the configuration, click Install to begin the installation process.
The Installing RACM Identity screen displays the installation progress:
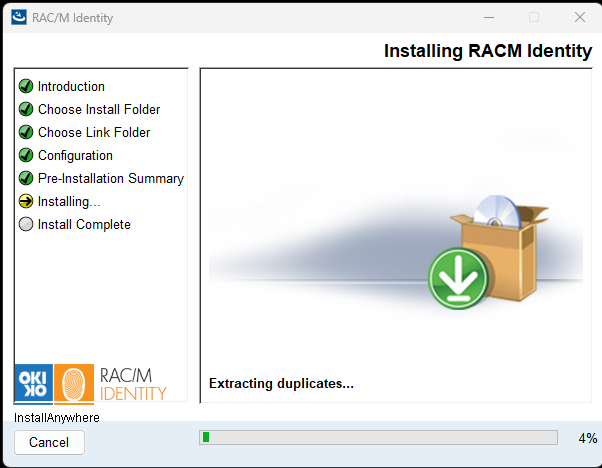
During this phase, the installer will:
- Extract and copy application files to the installation directory
- Configure the RAC/M Identity service
- Install required components
A progress bar indicates the current status of the installation. This process may take several minutes depending on your system performance and database configuration.
Warning
Do not close the installer window or interrupt the installation process. The installer will automatically proceed to the next screen once the installation is complete.
The Install Complete screen confirms that RAC/M Identity has been successfully installed:
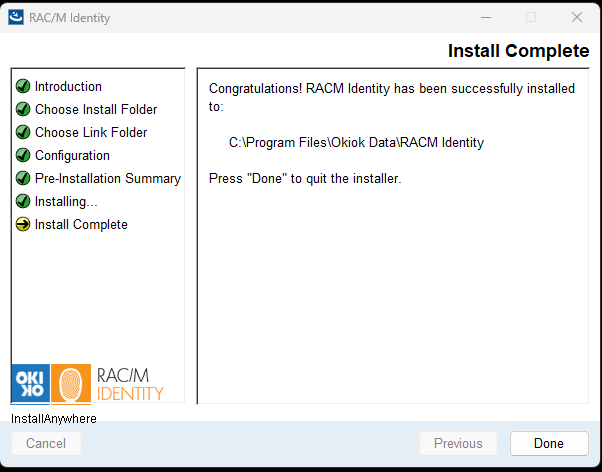
Click Done to exit the installer.
Congratulations! RAC/M Identity is now installed on your server.
Starting the RAC/M Identity Service
After completing the installation, you need to configure the database connection strings and start the RAC/M Identity service.
Configuring Database Connections
Before starting the service for the first time, you may need to verify or update the database connection configuration.
Navigate to the RAC/M Identity configuration folder. The default location is:
C:\Program Files\Okiok Data\RACM Identity\conf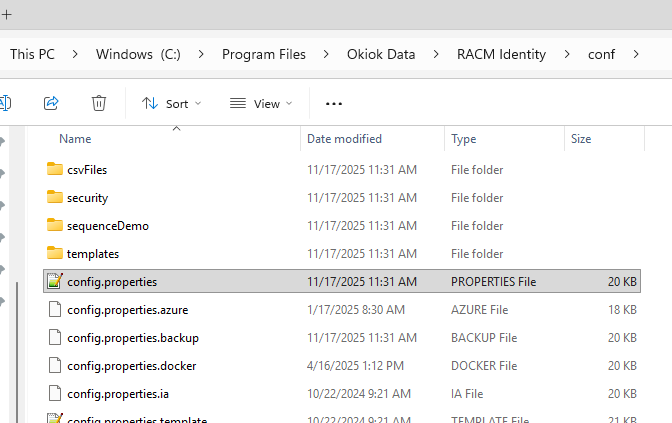
Open the
config.propertiesfile using a text editor (such as Notepad). This file contains the database connection strings for all three databases.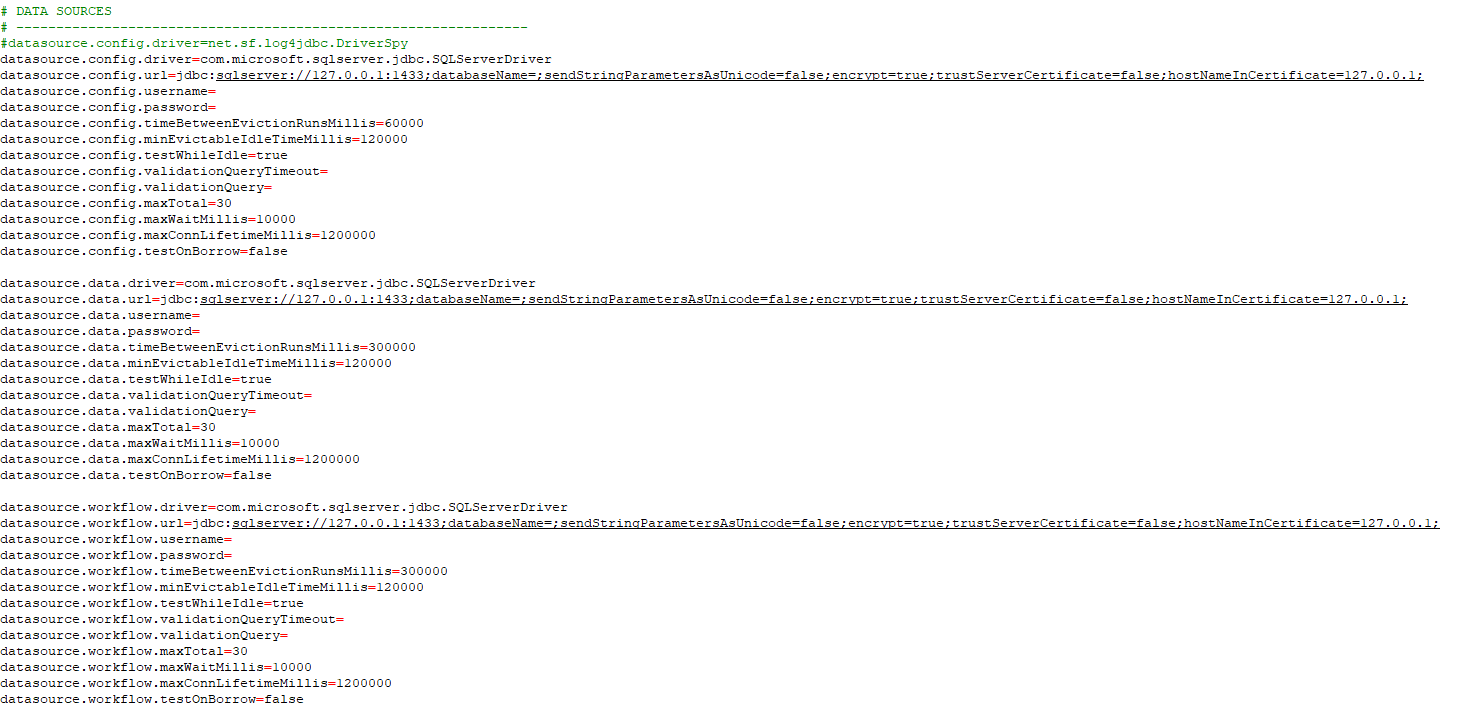
The file contains three main sections for data sources:
- Configuration database (
datasource.config.*) - Data database (
datasource.data.*) - Workflow database (
datasource.workflow.*)
Each section includes the following connection parameters:
driver: The JDBC driver class (pre-configured)url: The database connection URL with server, port, and database nameusername: The database user accountpassword: The database user password
Important
The connection information should match what you entered during the installation. Only modify these settings if you need to correct connection details or if your database configuration has changed.
- Configuration database (
If you made any changes to the
config.propertiesfile, save it and close the text editor.
Starting the Service
To start the RAC/M Identity service:
Open the Windows Services management console:
- Press
Windows Key + Rto open the Run dialog - Type
services.mscand press Enter
- Press
In the Services window, locate RACM Identity in the list of services.
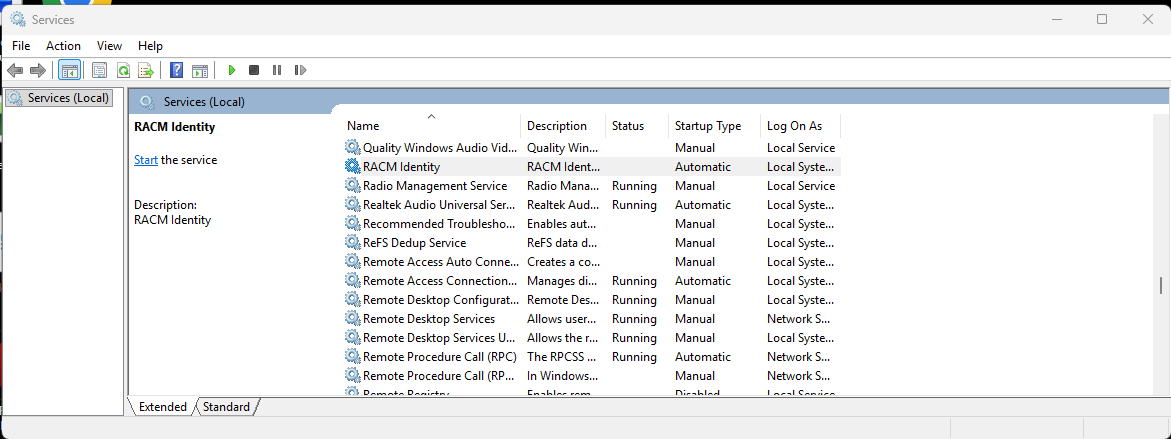
Right-click on RACM Identity and select Start from the context menu.
Wait for the service to start. The Status column should change to Running.
Tip
The first time the service starts, it will automatically create all required database tables, stored procedures, and functions in the three databases. This initial startup may take a few minutes.
Verify that the Startup Type is set to Automatic to ensure the service starts automatically when the server restarts.
To change the startup type if needed:
- Right-click on RACM Identity and select Properties
- In the Startup type dropdown, select Automatic
- Click OK to save the changes
Troubleshooting
If the service fails to start, check the following:
- Verify that the database connection strings in
config.propertiesare correct - Ensure that the SQL Server is running and accessible
- Confirm that the database user has db_owner permissions on all three databases
- Check the RAC/M Identity log files in the
logsfolder for error messages
Once the service is running, you can proceed to log on to RAC/M Identity for the first time.
Appendix: SSL Configuration
SSL (Secure Sockets Layer) is a security protocol for encrypting communications over the Internet. This section describes how to configure RAC/M Identity to use SSL/HTTPS for secure connections.
Enabling SSL
To enable SSL in RAC/M Identity:
- Prepare your SSL certificate files (keystore and truststore)
- Copy the certificate files to the
conf/security/directory - Configure SSL settings in the
config.propertiesfile - Restart the RAC/M Identity service
SSL Configuration Parameters
Edit the config.properties file and configure the following SSL parameters:
webserver.ssl=true
webserver.ssl.port=8443
webserver.ssl.keystore=conf/security/racm-keystore.jks
webserver.ssl.keystore.password=passw0rd
webserver.ssl.truststore=conf/security/cacert
webserver.ssl.truststore.password=changeit
webserver.ssl.keystoreType=JKS
Parameter descriptions:
webserver.ssl: Set totrueto enable SSLwebserver.ssl.port: The HTTPS port (default: 8443)webserver.ssl.keystore: Path to the keystore file containing your SSL certificatewebserver.ssl.keystore.password: Password for the keystorewebserver.ssl.truststore: Path to the truststore filewebserver.ssl.truststore.password: Password for the truststorewebserver.ssl.keystoreType: Keystore type (typically JKS for Java KeyStore)
Important
For production environments, use a valid SSL certificate issued by a trusted Certificate Authority (CA). Self-signed certificates should only be used for testing and development purposes.
Default Self-Signed Certificate
RAC/M Identity includes a default self-signed certificate for testing purposes. When using the default certificate, the application URL will be:
https://www.racm.com:8443/gui/
Security Warning
The default self-signed certificate is provided for testing only and should never be used in production environments. Always obtain and install a proper SSL certificate from a trusted Certificate Authority for production deployments.
Configuring Host File
To use the default self-signed certificate (or any certificate with a specific hostname), you need to add an entry to your system's hosts file.
Windows:
- Open the hosts file located at:
C:\Windows\System32\drivers\etc\hosts - Add the following entry:
127.0.0.1 www.racm.com
Linux:
- Open the hosts file located at:
/etc/hosts - Add the following entry:
127.0.0.1 www.racm.com
Creating a Self-Signed Certificate
For testing purposes, you can create a self-signed certificate using the Java keytool utility. The following commands demonstrate how to create a self-signed certificate:
1. Delete any existing certificate (if necessary):
keytool -delete -alias racm -keystore cacertWhen prompted, enter the truststore password (default: changeit).
2. Generate a new keystore with a self-signed certificate:
keytool -genkey -v -keysize 2048 -keyalg RSA -alias racm -validity 3650 -keystore racm-keystore.jks -storepass passw0rd -dname "CN=www.racm.com, OU=Okiok, O=Okiok, L=Laval, S=Quebec, C=CA"This command creates a keystore file named racm-keystore.jks with:
- Key size: 2048 bits
- Algorithm: RSA
- Validity: 3650 days (10 years)
- Common Name (CN): www.racm.com
3. Export the certificate:
keytool -export -alias racm -keystore racm-keystore.jks -file racm.crtWhen prompted, enter the keystore password (default: passw0rd).
4. Import the certificate into the truststore:
keytool -import -alias racm -file racm.crt -storetype JKS -keystore cacertWhen prompted, enter the truststore password (default: changeit).
5. Copy the certificate files to the RAC/M Identity security directory:
Copy the generated racm-keystore.jks and cacert files to:
C:\Program Files\Okiok Data\RACM Identity\conf\security\6. Update the config.properties file with the SSL configuration parameters as described above.
7. Restart the RAC/M Identity service to apply the SSL configuration.
After completing the SSL configuration and restarting the service, you can access RAC/M Identity using HTTPS at the configured secure URL.