A couple of days ago, while endlessly scrolling Twitter for the 6th hour in a row, a tweet grabbed my attention, specifically:
<$150 and < 24 hours for admin access to ANY computer with NetNTLMv1 enabled. Your EDR doesn’t matter at that point.
If you haven’t audited NTLM in your environment, the best time is now.(I’ll cite sources if they’d like me to, but their account is private)
— Tim McGuffin (@NotMedic) April 18, 2024
This piqued my interest, but was just vague enough that I didn’t really know where to go from there. Scrolling some more luckily ended up then showing me this other tweet:
I smoked the crack
it worked
dumping dit now
netntlmv1 –> nt thanks to @Evil_Mog and modern computing
Took ~ 20 hours with 12 RTX 4090s. Cost: 130$
— IAMERICA (@EricaZelic) April 18, 2024
Now I had more information to go on! I started scrolling through EricaZelic’s twitter feed (excellent account, by the way, go subscribe to her!) and got the juicy details I wanted.
So, what’s this all about?
The short version is that thanks to vast.ai’s cloud computing service, you can rent a completely overpowered cracking setup, we’re talking anywhere from 1 to 14 RTX 4090s and use this computing power to crack any NTLMv1 hash. The exact costs and times will vary depending on how many GPUs you choose to get (and how lucky you get with the cracking process), but the rates are between 35 cents to 8 dollars/hour, and with 14 RTX 4090s, you can get through the entire keyspace within about 24 hours.
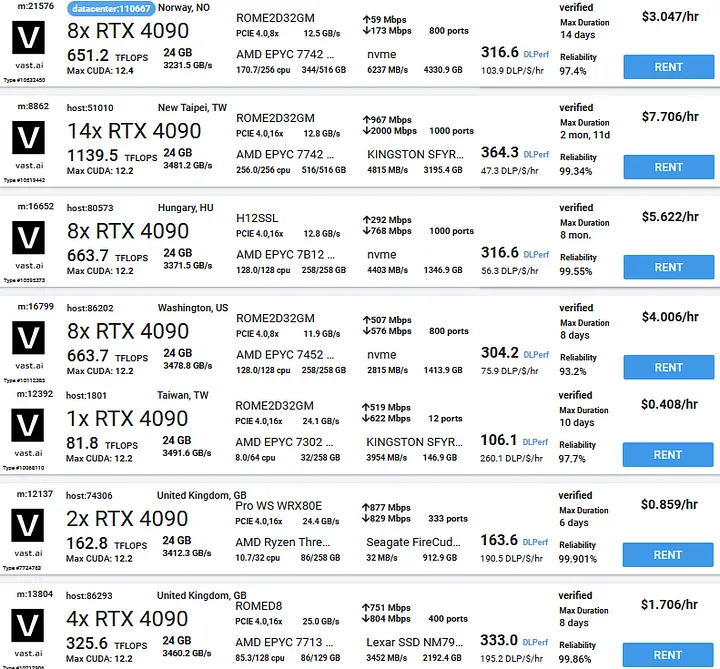
Random sampling of setups offered
If you’ve been around the internal penetration testing/red teaming world for a little while, you know that a couple of years ago, crack.sh existed for this. You’d fire up responder with crack.sh’s well known challenge (1122334455667788), take that hash, format it, send it over to crack.sh and you’d get the resulting NT hash back.

Example of crack.sh output
Sadly, crack.sh no longer works as the service has been down for “maintenance” for at least the past two years, with no signs of ever coming back. Even when it did still exist, one of the downsides of having to use the 1122334455667788 challenge is that since this challenge is so well known, it trips up a lot of EDRs/NDRs, which can be a problem, especially during a red team exercise.
Of course, there are other attack paths involving relaying NTLMv1 hashes, so you don’t necessarily need to crack this hash to succeed, but sometimes the other misconfigurations required for those attack paths to work are not present in the environment you’re in. Plus, if you can get a quick win just off an NTLMv1 hash, that’s even better!
What does all this mean?
Going back to the initial tweet, that means that any environment still using NTLMv1 (and yes, this is still very common) can be pwned in less than 24 hours and for a very affordable cost. This probably shouldn’t be the FIRST thing you attempt, if you can avoid spending the money, then do so, but it sure makes it easy. Once you’ve exhausted the typical attack paths and tried cracking some user hashes by yourself on a less powerful setup and hit a dead end, it’s time to coerce the NTLMv1 DC into authenticating to your responder, grab the machine account hash and send it over. Oh yeah, did I mention that this means you don’t even need a privileged user’s (such as Domain Admin) hash? Machine account hashes are usually ignored when trying to crack hashes during an engagement as those passwords are incredibly long and complex, but when you can crack an entire keyspace in less than 24 hours, you have no such limitations.
Okay, but how?
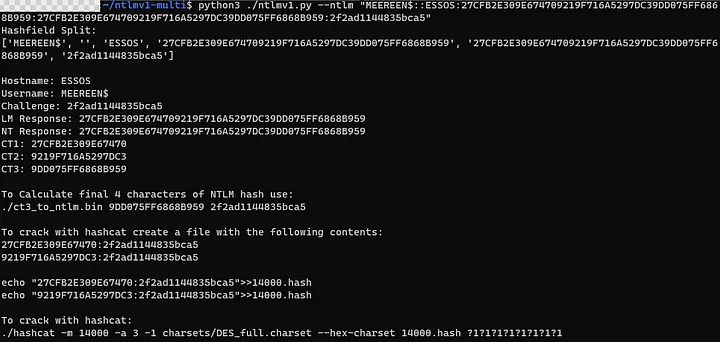
I’m gonna skip over the part where you obtain the hash as that’s outside of the scope of this post, but the short version is start up responder (don’t forget, you don’t even need to use the common 1122334455667788 challenge) and then coerce the Domain Controller into sending its machine account hash to you. From there, there’s some handling of the hash that needs to be done, but thankfully an excellent tool already exists for this, made by the great EvilMog at https://github.com/evilmog/ntlmv1-multi.
The guide on the github repository is fairly exhaustive and straight forward, so l won’t go too deep how to format everything, but here are the broad steps:
1. Obtain the machine account NTLMv1 hash

2. Use the NTLMv1 Multi Tool to get the hash in an usable hashcat 14000 format
3. Save this output, you will need it.
vast.ai was mentioned previously as that’s what EricaZelic used and prompted this article, but you don’t specifically need to use it, you can use any GPU cloud computing service of your choice. The goal of this article isn’t to be an ad, so I won’t go too deep into how to set up one particular service, but they’re all relatively the same: you rent an instance, ssh into it, install your tools (in this case, hashcat) and do your thing.
4. Create the 14000.hash file on your overpowered rented rig with the output from step 2, copy the hashcat command from the Multi Tool output in step 2 and then… wait.
5. Eventually, you’ll get the magic results you did all of this for:

6. You’re almost there, convert the resulting DES keys to NTLM, then put them together

7. Test your brand new machine account hash and dump that ntds.dit (for example purposes here, feel free to do it in a more opsec-safe way, or whatever else you decide to do with the hash):
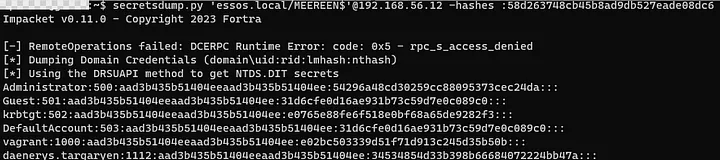
Congratulations! You are now Domain Admin.