Introduction
In this blog post, I am going to explain how we used GitLab and OpenShift to automatically deploy S-Filer when a new change is made in our repository. This is a very useful tool to have for a couple of reasons. First of all, when a new feature is pushed into the repository, we can actually see and use it without having to checkout this new code and start the environment ourselves which is time consuming. Another advantage is that you can deploy many applications on the same host without bothering with conflicting ports or anything of the sort. For example, you can have multiple MySQL databases all listening on the same port without any problem. Lastly, this is all done automatically! After the initial effort, there is little to no maintenance to do and you will have an awesome new tool at your disposal.
Terminology
Before talking about the integration from a technical point of view, let’s go through a couple of definitions. Firstly, what is OpenShift? From Wikipedia: “OpenShift is a computer software product from Red Hat for container-based software deployment and management. It is a supported distribution of Kubernetes using Docker containers and DevOps tools for accelerated application development.“(https://en.wikipedia.org/wiki/OpenShift) Basically, OpenShift is a wrapper of Kubernetes with added functionalities. In case you do not know what Kubernetes is, here is an excerpt from the official documentation: “Kubernetes provides a container-centric management environment. It orchestrates computing, networking, and storage infrastructure on behalf of user workloads. This provides much of the simplicity of Platform as a Service (PaaS) with the flexibility of Infrastructure as a Service (IaaS), and enables portability across infrastructure providers.“(https://kubernetes.io/docs/concepts/overview/what-is-kubernetes/) OpenShift enables us to easily deploy different versions of an application because they will be completely isolated from one another; it will be as if they were on different physical machines.
Implementation
Now that we have clarified what is OpenShift, we can talk about how we integrated it with GitLab. First off, here is the flow chart describing our GitLab pipeline :
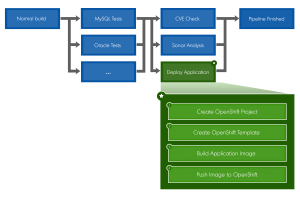
The first step in the “Deploy Application” job (in green) is to create the OpenShift project. Put simply, a project is a way to segment each application. In this case, I am going to use the name of the git branch in which the code change was made as the project name. You can use the variable $CI_COMMIT_REF_SLUG in your gitlab-ci.yml file which is the branch name formatted so that it is usable in an URL.
The second step is to create the template inside the created project. After deploying the template, OpenShift will start to create each component specified in your template. In our case, we have 2 MySQL databases, 1 S-Filer Server and 1 S-Filer Gateway which are Java applications. Since the MySQL image is readily available, OpenShift will download it and start both databases. After that, it will try to download the S-Filer Server image and the S-Filer Gateway image, but they are not available yet so OpenShift will wait until they are. Inside the template, you can also configure your routes which enable access to your application from outside the cluster. In our case, we have two:
- https://gui.$CI_COMMIT_REF_SLUG.openshift.example.com → port 8081 of S-Filer Server container
- https://config.$CI_COMMIT_REF_SLUG.openshift.example.com → port 8090 of S-Filer Server container
This is why you can “reuse” the same port. In the background, OpenShift forwards your request to the right container because it knows which hostname belongs to which application and each route is linked to a specific port. Consequently, it is important to have unique hostnames because the same route cannot be forwarded to different ports. There is a lot of information that goes in the template and covering it all here would be impossible. Therefore, if you want more information on that, I will invite you to checkout the official OpenShift documentation.
The last two steps are to build the images and push them to the OpenShift Registry. Once the images are pushed, OpenShift will automatically deploy them and after that, your application should be available via the previously configured routes. Building an image is fairly simple; you will need a Dockerfile in which you put some commands and these will be executed on the base image of your choice. For example, S-Filer Gateway’s Dockerfile is based on openjdk:8-jre which itself is based on Debian. Inside the Dockerfile, we also defined some commands and the following steps are basically what we are doing:
- Copy relevant directories to the image.
- Create some folders for persistent data.
- Edit a configuration file.
- Specify the volume and exposed ports.
After that, you can optionally add an entrypoint which is a script that is executed when the image is started.
Below, you will find the content of our gitlab-ci.yml file describing the job definition that implements the deployment:
deploy-sfiler:
stage: deploy
script:
# OpenShift and Docker login
- "oc login https://openshift.example.com:443 -u=registry_user -p=$REGISTRY_USER_PASSWORD"
- "docker login -u registry_user -p $(oc whoami -t) docker-registry-default.apps.openshift.example.com"

# Delete OpenShift project. ( "|| true;" makes sure that the job continues even if the delete does not exit successfully.)
- "{ oc delete project $CI_COMMIT_REF_SLUG || true; }"

# Build project
- "mvn -DskipTests -DexcludedGroups=database -DtrimStackTrace=false install"

# Deploy to OpenShift
- "oc new-project $CI_COMMIT_REF_SLUG"
- "oc process -p BRANCH_NAME=$CI_COMMIT_REF_SLUG -p CONFIG_MYSQL_USER=user -p CONFIG_MYSQL_PASSWORD=Passw0rd -p MYSQL_USER=user -p MYSQL_PASSWORD=Passw0rd -p SFILER_ADMIN_EMAIL=admin@dev.okiok.com -f sfiler-server/sfiler-ephemeral-template.json | oc create -f - "

# Build sfiler-gateway image and push it
- "docker build -f sfiler-gateway/Dockerfile -t docker-registry-default.apps.openshift.example.com/$CI_COMMIT_REF_SLUG/sfiler-gateway:latest sfiler-gateway/"
- "docker push docker-registry-default.apps.openshift.example.com/$CI_COMMIT_REF_SLUG/sfiler-gateway"

# Build sfiler-server image and push it
- "docker build -f sfiler-server/Dockerfile -t docker-registry-default.apps.openshift.example.com/$CI_COMMIT_REF_SLUG/sfiler-server:latest sfiler-server/"
- "docker push docker-registry-default.apps.openshift.example.com/$CI_COMMIT_REF_SLUG/sfiler-server"
environment:
name: $CI_COMMIT_REF_SLUG
url: https://gui.$CI_COMMIT_REF_SLUG.openshift.example.com/sfiler
on_stop: stop_review_app
tags:
- "docker-builder"
Finally, you can define a job to manually stop the deployment. This is necessary to clean up your environments so that you do not use resources for no reason.
# This is a manual step that stops the deployment and deletes the OpenShift project.
stop_review_app:
stage: deploy
when: manual
environment:
name: $CI_COMMIT_REF_SLUG
action: stop
script:
# OpenShift login
- "oc login https://openshift.example.com:443 -u=registry_user -p=$REGISTRY_USER_PASSWORD"

# Delete OpenShift project. ( "|| true;" makes sure that the job continues even if the delete does not exit successfully.)
- "{ oc delete project $CI_COMMIT_REF_SLUG || true; }"
tags:
- "docker-builder"
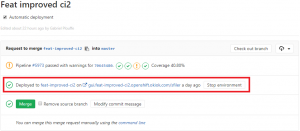
Once the pipeline finishes, you will find a link to your environment in your merge request on GitLab. This is done by adding an environment block inside the job definition.
Conclusion
And there you have it! Your application is now automatically deployed when a new change is added to your repository and this new tool will prove very useful for reviewing changes that are hard to review when using text only (images, graphical bugs, etc.).